background image

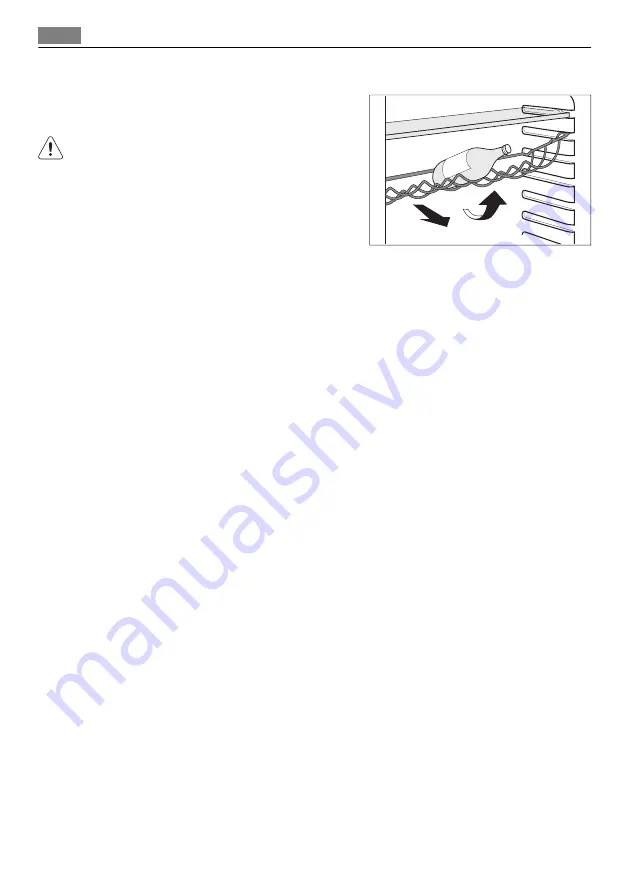
Flessenrek

Plaats de flessen (met de openingen naar voren

gericht) in het voorgeplaatste schap.
Als het schap horizontaal geplaatst is, mogen al

-

leen afgesloten flessen worden neergezet.

Dit schap voor een flessenhouder kan worden ge

-

kanteld om vooraf geopende flessen te bewaren.

Trek hiervoor de houder omhoog zodat deze omh

-

oog draait en op het niveau erboven kan worden

geplaatst.

NUTTIGE AANWIJZINGEN EN TIPS

Tips voor energiebesparing

• De deur niet vaker openen of open laten staan dan strikt noodzakelijk.
• Als de omgevingstemperatuur hoog is, de thermostaatknop op een lage temperatuur

staat en het apparaat volledig gevuld is, kan de compressor continu aan staan waardoor

er ijs op de verdamper ontstaat. Als dit gebeurt, zet u de thermostaatknop naar een war

-

mere instelling om de koelkast automatisch te laten ontdooien en zo elektriciteitsver

-

bruik te besparen.

Tips voor het koelen van vers voedsel

Om de beste prestatie te verkrijgen:
• Zet geen warm voedsel of verdampende vloeistoffen in de koelkast
• dek het voedsel af of verpak het, in het bijzonder als het een sterke geur heeft
• plaats het voedsel zodanig dat de lucht er vrijelijk omheen kan circuleren

Nuttige tips voor het koelen

Nuttige tips:

Vlees (alle soorten) in plastic zakken verpakken en op het glazen schap leggen, boven de

groentelade.

Bewaar het, voor de veiligheid, slechts een of maximaal twee dagen op deze manier.

Gekookt voedsel, koude schotels, enz.: deze moeten afgedekt worden en mogen op wille

-

keurig welk schap gezet worden.

Fruit en groente: deze moeten zorgvuldig schoongemaakt worden en in de speciaal daar

-

voor bedoelde lade(n) geplaatst worden.

Boter en kaas: dit moet in speciale luchtdichte bakjes gelegd of in aluminiumfolie of plastic

zakjes gewikkeld worden om zoveel mogelijk lucht buiten te sluiten.

Melkflessen: deze moeten een afdekdop hebben en opgeslagen worden in het flessenrek in

de deur.

Bananen, aardappelen, uien en knoflook, indien niet verpakt, mogen niet in de koelkast be

-

waard worden.

12

Nuttige aanwijzingen en tips

Summary of Contents for S63800KMW0

Page 1: ...S63800KMW0 NL KOELKAST GEBRUIKSAANWIJZING 2 EN REFRIGERATOR USER MANUAL 23 IT FRIGORIFERO ISTRUZIONI PER L USO 43 ...

Page 2: ...inuten de tijd om het door te lezen zodat u er optimaal van kunt profiteren ACCESSOIRES EN VERBRUIKSARTIKELEN In de AEG webshop vindt u alles wat u nodig heeft om al uw apparaten van AEG mooi te houden en perfect te laten functioneren Ook vindt u hier een groot aantal accessoires die zijn ontworpen en gebouwd volgens de hoge kwaliteitsnormen die u verwacht van speciaal kookgerei tot bestekmandjes ...

Page 3: ...iging 14 Problemen oplossen 17 Technische gegevens 17 Montage 20 Geluiden 22 Het milieu In deze gebruiksaanwijzing worden de volgende symbolen gebruikt Belangrijke informatie over uw persoonlijke veiligheid en informatie over het voorkomen van schade aan het apparaat Algemene informatie en tips Milieu informatie Wijzigingen voorbehouden Inhoud 3 ...

Page 4: ... hebben ontvangen over het gebruik van het apparaat Houd kinderen uit de buurt om te voorkomen dat ze met het apparaat gaan spelen Houd alle verpakkingsmateriaal buiten het bereik van kinderen Gevaar voor verstikking Als u het apparaat afdankt trek dan de stekker uit het stopcontact snij de voedingskabel door zo dicht mogelijk bij het apparaat en verwijder de deur om te voorkomen dat kin deren een...

Page 5: ...en elektrische schok of brand 6 U mag het apparaat niet gebruiken zonder de afdekking van het lampje indien voorzien voor de binnenverlichting Dit apparaat is zwaar Wees voorzichtig als u het apparaat verplaatst Haal geen artikelen uit het vriesvak en raak ze niet aan als uw handen vochtig nat zijn dit kan uw huid beschadigen of vrieswonden veroorzaken Stel het apparaat niet langdurig bloot aan di...

Page 6: ...er u ervan dat de stekker bereikbaar is nadat het apparaat geïnstalleerd is Sluit het apparaat alleen aan op een drinkwaterleiding Indien er een wateraansluiting voorzien is Onderhoud Alle elektrotechnische werkzaamheden die noodzakelijk zijn voor het uitvoeren van on derhoud aan het apparaat dienen uitgevoerd te worden door een gekwalificeerd elektri cien of competent persoon Dit product mag alle...

Page 7: ...emaakt Display 7 5 6 4 3 2 1 1 Timerfunctie 2 COOLMATIC functie 3 Minute Minder functie 4 Kinderslotfunctie 5 Alarmlampje 6 Temperatuurlampje 7 Vakantiefunctie Inschakelen Ga als volgt te werk om het apparaat in te schakelen 1 Steek de stekker in het stopcontact 2 Druk op de ON OFF knop als het display uit is 3 Als dEMo op het display verschijnt staat het apparaat in de demonstratiestand Zie Probl...

Page 8: ...mpje knippert De timer toont gedurende enkele seconden de ingestelde waarde 30 minuten 2 Druk op de timerknop om de waarde van de timer te wijzigen van 1 tot 90 minuten 3 Druk op de OK toets om te bevestigen Het Minute Minder lampje wordt getoond De timer begint te knipperen min Op het einde van de aftelling knippert het Minute Minder lampje en klinkt een alarm 1 druk op de toets OK om het geluid ...

Page 9: ...t COOLMATIC lampje knippert 2 Druk op de OK toets om te bevestigen Het COOLMATIC lampje wordt getoond De COOLMATIC functie wordt automatisch na ongeveer 6 uur uitgeschakeld Om de functie uit te schakelen voor deze automatisch afloopt 1 Druk op de Mode knop tot het COOLMATIC lampje knippert 2 Druk op de OK toets om te bevestigen 3 Het COOLMATIC lampje gaat uit De functie gaat uit door een andere in...

Page 10: ...dere ingestelde koelkasttemperatuur te selecteren Alarm bij open deur Als de deur enkele minuten heeft opengestaan klinkt er een geluidsalarm De alarmtoe stand bij geopende deur wordt aangegeven door Knipperende alarmindicator Zoemer Als de normale omstandigheden zijn hersteld deur gesloten wordt het geluidsalarm uitge schakeld Tijdens het alarm kan de zoemer worden uitgeschakeld door op een wille...

Page 11: ...gewenste geuren in het koelvak waardoor de bewaarkwali teit wordt verbeterd Bij levering zit het filter in een plastic zak Raadpleeg Installatie van de Clean Air Control filter voor instructies Zorg er voor een goede werking voor dat het klepje van de luchthendel is gesloten Verplaatsbare schappen De wanden van de koelkast zijn voorzien van een aantal geleiders zodat de schappen op de gewen ste pl...

Page 12: ...l Om de beste prestatie te verkrijgen Zet geen warm voedsel of verdampende vloeistoffen in de koelkast dek het voedsel af of verpak het in het bijzonder als het een sterke geur heeft plaats het voedsel zodanig dat de lucht er vrijelijk omheen kan circuleren Nuttige tips voor het koelen Nuttige tips Vlees alle soorten in plastic zakken verpakken en op het glazen schap leggen boven de groentelade Be...

Page 13: ...k nooit schoonmaakmiddelen schuurpoeders erg geparfumeerde reinigingsproduc ten en waspolijstmiddelen om de binnenkant schoon te maken aangezien deze het opper vlak beschadigen en een sterke geur achterlaten Maak de condensor zwart rooster en de compressor op de achterkant van het apparaat schoon met een borstel of stofzuiger Deze handeling zal de prestatie van het apparaat ver beteren en het elek...

Page 14: ... te voorkomen Als uw apparaat aan blijft staan vraag dan iemand om het zo nu en dan te controleren om te voorkomen dat het bewaarde voedsel bederft als de stroom uitvalt PROBLEMEN OPLOSSEN WAARSCHUWING Voordat u storingen opspoort de stekker uit het stopcontact trekken Het opsporen van storingen die niet in deze handleiding vermeld zijn dient te worden ver richt door een gekwalificeerd technicus o...

Page 15: ...schakelaar of na het ver anderen van de tempera tuur Dit is normaal er is geen storing De compressor start na enige tijd Er loopt water over de achterkant van de koel kast Tijdens het automatische ont dooiproces ontdooit de rijp te gen de achterwand Dit is normaal Er loopt water in de koel kast De waterafvoer is verstopt Reinig de waterafvoer Producten verhinderen dat wa ter in de wateropvangbak k...

Page 16: ...er werken Het lampje vervangen 1 Schakel het apparaat uit 2 Druk op de achterste haak en schuif het kapje tegelijkertijd in de richting van de pijl 3 Vervang het kapotte lampje door een nieuw lampje met hetzelfde vermogen dat specifiek bedoeld is voor huishoude lijke apparaten het maximale vermogen wordt getoond op de afdekking van het lampje 4 Installeer het lampenkapje door het te rug te schuive...

Page 17: ... onder een hangend keukenkastje wordt geplaatst moet de minimale afstand tussen de bovenkant van het meubel en het wandkastje minstens 100 mm bedragen om optimale presta ties te garanderen Voor de beste prestatie kunt u het apparaat beter niet onder een hangend keu kenkastje zetten De verstelbare voetjes aan de onderkant van het apparaat garanderen een nauwkeurig horizontale uitlijning Als het meu...

Page 18: ...oet geaard zijn De netsnoerstekker is voorzien van een contact voor dit doel Als het stopcontact niet geaard is sluit het apparaat dan aan op een afzonderlijk aar depunt in overeenstemming met de geldende regels raadpleeg hiervoor een gekwalificeerd elektricien De fabrikant neemt geen verantwoordelijkheid op zich als de bovenstaande veiligheids maatregelen niet worden nageleefd Dit apparaat voldoe...

Page 19: ...hroeven los en plaats het afstandsstuk onder de kop van de schroef draai daarna de schroeven weer vast Omkeerbaarheid van de deur WAARSCHUWING Voordat u werkzaamheden uitvoert haalt u de stekker uit het stopcontact Om de volgende handelingen uit te voeren raden we aan dit te doen met de hulp van een tweede persoon die de deur van het apparaat tijdens de werkzaamheden stevig vasthoudt Leg het appar...

Page 20: ...en die na de ver wijdering van de hendel zijn overgeble ven daarmee dicht 9 Verzeker u ervan dat de voorste plaat van de deur zich evenwijdig bevindt aan de voorste plaat van de bovenkant 10 Zet het apparaat op zijn plaats water pas en wacht minstens vier uur voordat u de stekker in het stopcontact steekt Voer een laatste controle uit om te zorgen dat Alle schroeven zijn aangehaald De magnetische ...

Page 21: ...BRRR HISSS CLICK BLUBB CRACK SSSRRR OK CLICK CLICK BRRR BRRR BLUBB BLUBB Geluiden 21 ...

Page 22: ...en elektronische apparatuur wordt gerecycled Als u ervoor zorgt dat dit product op de juiste manier wordt verwijderd voorkomt u mogelijke negatieve gevolgen voor mens en milieu die zich zouden kunnen voordoen in geval van verkeerde afvalverwerking Voor gedetailleerdere informatie over het recyclen van dit product kunt u contact opnemen met de gemeente de gemeentereiniging of de winkel waar u het p...

Page 23: ...e spend a few minutes reading to get the very best from it ACCESSORIES AND CONSUMABLES In the AEG webshop you ll find everything you need to keep all your AEG appliances looking spotless and working perfectly Along with a wide range of accessories designed and built to the high quality standards you would expect from specialist cookware to cutlery baskets from bottle holders to delicate laundry ba...

Page 24: ...o if 37 Technical data 37 Installation 40 Noises 42 Environmental concerns The following symbols are used in this user manual Important information concerning your personal safety and information on how to avoid damaging the appliance General information and tips Environmental information Subject to change without notice 24 Contents ...

Page 25: ...e plug out of the socket cut the connection cable as close to the appliance as you can and remove the door to prevent playing chil dren to suffer electric shock or to close themselves into it If this appliance featuring magnetic door seals is to replace an older appliance having a spring lock latch on the door or lid be sure to make that spring lock unusable before you discard the old appliance Th...

Page 26: ...Avoid prolonged exposure of the appliance to direct sunlight Bulb lamps if foreseen used in this appliance are special purpose lamps selected for household appliances use only They are not suitable for household room illumination Daily use Do not put hot pot on the plastic parts in the appliance Do not store flammable gas and liquid in the appliance because they may explode Appliance s manufacture...

Page 27: ...thorized Service Centre and only genuine spare parts must be used Environment Protection This appliance does not contain gasses which could damage the ozone layer in either its refrigerant circuit or insulation materials The appliance shall not be discarded together with the urban refuse and rubbish The insulation foam contains flammable gases the ap pliance shall be disposed according to the appl...

Page 28: ...ff To switch off the appliance do these steps 1 Press the ON OFF button for 5 seconds 2 The display switches off 3 To disconnect the appliance from the power disconnect the mains plug from the pow er socket Temperature regulation The set temperature of the fridge may be adjusted by pressing the temperature button Set default temperature 5 C for the fridge The temperature indicator shows the set te...

Page 29: ... buttons from unintentional operation select the Child Lock function To switch on the function 1 Press the Mode button until the corresponding icon appears 2 The Child Lock indicator flashes 3 Press the OK button to confirm The Child Lock indicator is shown To switch off the function 1 Press the Mode button until the Child Lock indicator flashes 2 Press the OK button to confirm 3 The Child Lock in...

Page 30: ...d and empty during a long holiday period without the formation of a bad smell The fridge compartment must be empty with holiday function on To switch on the function 1 Press the Mode button until the corresponding icon appears The Holiday indicator flashes The fridge temperature indicator shows the set temperature 2 Press the OK button to confirm The Holiday indicator is shown To switch off the fu...

Page 31: ...appliance is in demonstration mode refer to WHAT TO DO IF paragraph DAILY USE this appliance is sold in France In accordance with regulations valid in this country it must be provided with a special de vice see figure placed in the lower compartment of the fridge to indicate the coldest zone of it Clean Air Control Filter Your appliance is equipped with a carbon filter behind the air lever flap Th...

Page 32: ... re sult pull the shelf up so it can rotate upwards and be placed on the next higher level HELPFUL HINTS AND TIPS Hints for energy saving Do not open the door frequently or leave it open longer than absolutely necessary If the ambient temperature is high and the Temperature Regulator is set to low tempera ture and the appliance is fully loaded the compressor may run continuously causing frost or i...

Page 33: ...appliance contains hydrocarbons in its cooling unit maintenance and recharging must therefore only be carried out by authorized technicians Replacing the Clean Air Control filter To get the best performance replace the Clean Air Control filter once every year New active filters can be purchased from your local dealer Refer to Installation of the Clean Air Control filter for instructions Periodic c...

Page 34: ...event the water over flowing and dripping onto the food inside Use the special cleaner provided which you will find already inserted into the drain hole Periods of non operation When the appliance is not in use for long periods take the following precautions disconnect the appliance from electricity supply remove all food defrost if foreseen and clean the appliance and all accessories leave the do...

Page 35: ...mperature de crease to room temperature be fore storage The room temperature is too high Decrease the room temperature The compressor does not start immediately after pressing the COOLMATIC switch or after changing the temperature This is normal no error has oc curred The compressor starts after a peri od of time Water flows on the rear plate of the refrigerator During the automatic defrosting pro...

Page 36: ...10 sec the OK button since a long sound of buzzer is heard and the Display shut off for a short while appliance start works regularly Replacing the lamp 1 Switch off the appliance 2 Press on the rear hook and at the same time slide the cover in the direction of the arrow 3 Replace the lamp with one of the same power and specifically designed for household appliances the maximum power is shown on t...

Page 37: ...e cabinet To ensure best performance if the appliance is positioned below an overhanging wall unit the minimum distance between the top of the cabinet and the wall unit must be at least 100 mm Ideally however the appliance should not be positioned below over hanging wall units Accurate levelling is ensured by one or more adjustable feet at the base of the cabinet If the cabinet is placed in a corn...

Page 38: ...r domestic power supply The appliance must be earthed The power supply cable plug is provided with a contact for this purpose If the domestic power supply socket is not earthed connect the appliance to a separate earth in compliance with current regulations consulting a qualified electrician The manufacturer declines all responsibility if the above safety precautions are not ob served This applian...

Page 39: ...s and insert the spacer under the screw head then retighten the screws Door reversibility WARNING Before carrying out any operations remove the plug from the power socket To carry out the following operations we suggest that this be made with another person that will keep a firm hold on the door of the appliance during the operations Gently lay the appliance on its back To change the opening direc...

Page 40: ...o plugs and cover the holes left open after having removed the handle 9 Make sure that the front board of the door is parallel to the front board of the top 10 Reposition level the appliance wait for at least four hours and then connect it to the power socket Do a final check to make sure that All screws are tightened The magnetic seal adheres to the cabinet The door opens and closes correctly If ...

Page 41: ...BRRR HISSS CLICK BLUBB CRACK SSSRRR OK CLICK CLICK BRRR BRRR BLUBB BLUBB Noises 41 ...

Page 42: ...lectrical and electronic equipment By ensuring this product is disposed of correctly you will help prevent potential negative consequences for the environment and human health which could otherwise be caused by inappropriate waste handling of this product For more detailed information about recycling of this product please contact your local council your household waste disposal service or the sho...

Page 43: ... alla lettura per sapere come trarre il massimo dal vostro elettrodomestico ACCESSORI E PRODOTTI DI CONSUMO All interno del webshop AEG troverete tutto ciò che vi serve per fare in modo che i vostri elettrodomestici AEG siano sempre perfettamente puliti e funzionanti Non mancano inoltre una vasta gamma di accessori studiati e realizzati conformemente agli elevati standard qualitativi che vi aspett...

Page 44: ...osa fare se 57 Dati tecnici 57 Installazione 61 Rumori 63 Considerazioni ambientali In questo manuale sono riportati i seguenti simboli Informazioni importanti relative alla prevenzione dei rischi per la salute personale e dei danni alle apparecchiature Informazioni e consigli generali Informazioni in materia di sicurezza ambientale Con riserva di modifiche 44 Indice ...

Page 45: ...ischi di soffocamento Qualora l apparecchio venga demolito estrarre la spina dalla presa tagliare il cavo di col legamento il più vicino possibile all apparecchio e smontare lo sportello per evitare che i bambini giocando possano subire scosse elettriche o chiudersi dentro l apparecchio Se questo nuovo apparecchio che è dotato di guarnizioni magnetiche nello sportello va a sostituirne uno più vecc...

Page 46: ...oprilampada interno se previsto Questa apparecchiatura è pesante Procedere con cautela durante gli spostamenti Evitare di estrarre o di toccare gli alimenti riposti nel vano congelatore con le mani ba gnate o umide il contatto potrebbe provocare abrasioni o ustioni da freddo Evitare un esposizione prolungata dell apparecchiatura alla luce solare diretta Le lampadine utilizzate in questa apparecchi...

Page 47: ...tallare l apparecchio in modo che la presa rimanga accessibile Per il collegamento idrico usare solo sorgenti d acqua potabile 2 Assistenza tecnica Gli interventi elettrici sull apparecchiatura devono essere eseguiti esclusivamente da elet tricisti qualificati o da personale competente Gli interventi di assistenza devono essere eseguiti esclusivamente da tecnici autorizzati e utilizzando solo rica...

Page 48: ...to ON OFF se il display è spento 3 Se dEMo appare sul display l apparecchiatura si trova in modalità dimostrazione Fare riferimento al paragrafo Cosa fare se 4 Gli indicatori di temperatura visualizzano la temperatura impostata predefinita Per selezionare una temperatura diversa consultare la sezione Regolazione della tempera tura Spegnimento Per spegnere l apparecchiatura procedere come segue 1 P...

Page 49: ...ante il conto alla rovescia 1 Premere il tasto Mode fino a quando la spia Minute Minder lampeggia 2 Premere il tasto OK per confermare 3 La spia Minute Minder si spegne È possibile modificare l ora in qualsiasi momento durante il conto alla rovescia e alla fine premendo il tasto Temperatura più fredda ed il Tasto temperatura più calda Funzione Sicurezza Bambini Per evitare che i tasti vengano prem...

Page 50: ...2 Portare la leva dell aria 1 al massimo 3 Attivare la funzione COOLMATIC 4 La funzione Quick Chill si interrompe auto maticamente dopo circa 6 ore 5 Una volta terminato il raffreddamento ripor tare la leva dell aria 1 al minimo Per disattivare la funzione in qualsiasi momento premere il tasto COOLMATIC Funzione Holiday Questa funzione consente di mantenere il frigorifero chiuso e vuoto durante un...

Page 51: ...parecchiatura per la prima volta lavare l interno e gli accessori con acqua tiepida e sapone neutro per eliminare il tipico odore dei prodotti nuovi quindi asciu gare accuratamente Non usare detergenti corrosivi o polveri abrasive che possano danneggiare la finitura Se dEMo appare sul display l apparecchiatura si trova in modalità dimostrazione fare ri ferimento al paragrafo COSA FARE SE UTILIZZO ...

Page 52: ...mensole della porta possono essere posizionate ad altezze differenti Griglia portabottiglie Disporre le bottiglie con l apertura in avanti sul l apposito ripiano Se il ripiano è in posizione orizzontale utilizzarlo solo per le bottiglie chiuse Questo ripiano può essere inclinato per consentire l appoggio di bottiglie già aperte Tirare il ripiano e ruotarlo verso l alto in modo da appoggiarlo al li...

Page 53: ...contenitori ermetici speciali o avvolti in pelli cole di alluminio o sacchetti di politene per escludere per quanto possibile l aria Bottiglie di latte dovrebbero essere tappate e conservate nell apposito ripiano sulla porta Non conservare nel frigorifero banane patate cipolle o aglio se non sono confezionati PULIZIA E MANUTENZIONE ATTENZIONE Staccare la spina dell apparecchio prima di eseguire la...

Page 54: ...el vano frigorifero Durante l uso normale la brina viene eliminata automaticamente dall evaporatore del vano frigorifero ogni volta che il motocompressore si arresta L acqua di sbrinamento giunge at traverso un condotto in un apposito recipiente posto sul retro dell apparecchio sopra il mo tocompressore dove evapora È importante pulire periodicamente il foro di sca rico dell acqua di sbrinamento s...

Page 55: ...presa di alimenta zione un altro apparecchio elettri co Rivolgersi ad un elettricista quali ficato La lampadina non si ac cende La lampadina è in modalità stand by Chiudere e riaprire la porta La lampada è difettosa Fare riferimento alla sezione So stituzione della lampadina Il compressore rimane sempre in funzione La temperatura non è impostata correttamente Impostare una temperatura supe riore L...

Page 56: ...mettere a conservare gli alimenti lasciarli raffreddare a temperatura ambiente Sono stati introdotti molti ali menti contemporaneamente Introdurre gli alimenti poco alla volta La temperatura nel frigo rifero è troppo alta L aria fredda non circola corret tamente all interno dell apparec chio Adottare le misure necessarie per garantire una corretta circolazio ne dell aria fredda Sul display della t...

Page 57: ...ccenda Chiusura della porta 1 Pulire le guarnizioni della porta 2 Se necessario regolare la porta Vedere Installazione 3 Se necessario sostituire le guarnizioni della porta difettose Contattare il Centro di as sistenza locale DATI TECNICI Nicchia di incasso Altezza 1800 mm Larghezza 600 mm Profondità 650 mm Tensione 230 240 V Frequenza 50 Hz Le informazioni tecniche sono riportate sulla targhetta ...

Page 58: ...a spina rimanga facilmente accessibile Luogo d installazione AVVERTENZA Qualora occorra ritirare dall uso un apparecchio con serratura si raccomanda di rendere quest ultima inservibile per evitare che i bambini possano chiudersi all interno La spina dell apparecchio deve essere accessibile dopo l installazione Installare l apparecchio in un luogo la cui temperatura ambiente corrisponda alla classe...

Page 59: ...nsegna il filtro è contenuto in una confezione di plastica al fine di preservarne le prestazioni 1 Aprire il flap della leva dell aria 2 Togliere il filtro dalla confezione di pla stica 3 Inserire il filtro nell alloggiamento posto sul retro del flap della leva dell aria 4 Chiudere il flap della leva dell aria Maneggiare il filtro con attenzione per evita re che eventuali frammenti si stacchino da...

Page 60: ...ire le seguenti operazioni si raccomanda di farsi aiutare da un altra persona che tenga ben ferma la porta dell apparecchiatura Appoggiare delicatamente l apparecchiatura sullo schienale Per modificare il senso di apertura dello sportello procedere come segue 1 Estrarre la griglia di ventilazione agganciata estrarre la presa e dalla griglia di venti lazione e installarla sul lato opposto 2 Toglier...

Page 61: ...lelo a quello della parte superiore 10 Riposizionare l elettrodomestico met terlo a livello attendere almeno quattro ore ed inserire la spina nella presa di corrente Effettuare un controllo finale per verificare che tutte le viti siano serrate La guarnizione magnetica aderisca all apparecchiatura Lo sportello si apra e si chiuda correttamente Se la temperatura ambiente è bassa ad esempio in invern...

Page 62: ...BRRR HISSS CLICK BLUBB CRACK SSSRRR OK CLICK CLICK BRRR BRRR BLUBB BLUBB 62 Rumori ...

Page 63: ...parecchiature elettriche ed elettroniche Provvedendo a smaltire questo prodotto in modo appropriato si contribuisce a evitare potenziali conseguenze negative per l ambiente e per la salute che potrebbero derivare da uno smaltimento inadeguato del prodotto Per informazioni più dettagliate sul riciclaggio di questo prodotto contattare l ufficio comunale il servizio locale di smaltimento rifiuti o il...

Page 64: ...www aeg com shop 222344839 B 232011 ...

Reviews: