background image

S51800DSW0

EN

FRIDGE FREEZER

USER MANUAL

2

DE

KÜHL - GEFRIERSCHRANK

BENUTZERINFORMATION

21

Summary of Contents for S51800DSW0

Page 1: ...S51800DSW0 EN FRIDGE FREEZER USER MANUAL 2 DE KÜHL GEFRIERSCHRANK BENUTZERINFORMATION 21 ...

Page 2: ...se spend a few minutes reading to get the very best from it ACCESSORIES AND CONSUMABLES In the AEG webshop you ll find everything you need to keep all your AEG appliances looking spotless and working perfectly Along with a wide range of accessories designed and built to the high quality standards you would expect from specialist cookware to cutlery baskets from bottle holders to delicate laundry b...

Page 3: ...do if 14 Technical data 14 Installation 20 Environmental concerns The following symbols are used in this user manual Important information concerning your personal safety and information on how to avoid damaging the appliance General information and tips Environmental information Subject to change without notice Contents 3 ...

Page 4: ...he plug out of the socket cut the connection cable as close to the appliance as you can and remove the door to prevent playing chil dren to suffer electric shock or to close themselves into it If this appliance featuring magnetic door seals is to replace an older appliance having a spring lock latch on the door or lid be sure to make that spring lock unusable before you discard the old appliance T...

Page 5: ...e appliance to direct sunlight Bulb lamps2 used in this appliance are special purpose lamps selected for household ap pliances use only They are not suitable for household room illumination Daily Use Do not put hot pot on the plastic parts in the appliance Do not store flammable gas and liquid in the appliance because they may explode Do not place food products directly against the air outlet on t...

Page 6: ...cookers Make sure that the mains plug is accessible after the installation of the appliance Connect to potable water supply only 4 Service Any electrical work required to do the servicing of the appliance should be carried out by a qualified electrician or competent person This product must be serviced by an authorized Service Centre and only genuine spare parts must be used Environment Protection...

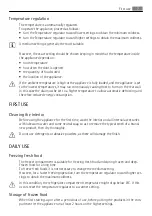
Page 7: ...educed energy consumption FIRST USE Cleaning the interior Before using the appliance for the first time wash the interior and all internal accessories with lukewarm water and some neutral soap so as to remove the typical smell of a brand new product then dry thoroughly Do not use detergents or abrasive powders as these will damage the finish DAILY USE Freezing fresh food The freezer compartment is...

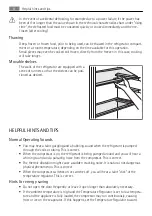
Page 8: ...mal Operating Sounds You may hear a faint gurgling and a bubbling sound when the refrigerant is pumped through the coils or tubing This is correct When the compressor is on the refrigerant is being pumped around and you will hear a whirring sound and a pulsating noise from the compressor This is correct The thermic dilatation might cause a sudden cracking noise It is natural not dangerous physical...

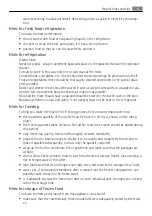
Page 9: ...Hints for freezing To help you make the most of the freezing process here are some important hints the maximum quantity of food which can be frozen in 24 hrs is shown on the rating plate the freezing process takes 24 hours No further food to be frozen should be added during this period only freeze top quality fresh and thoroughly cleaned foodstuffs prepare food in small portions to enable it to be...

Page 10: ...he cabinet Never use detergents abrasive powders highly perfumed cleaning products or wax polishes to clean the interior as this will damage the surface and leave a strong odour Clean the condenser black grill and the compressor at the back of the appliance with a brush This operation will improve the performance of the appliance and save electricity consumption Take care of not to damage the cool...

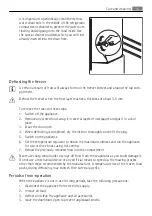
Page 11: ...y the interior thoroughly and refit the plug 5 Switch on the appliance 6 Set the temperature regulator to obtain the maximum coldness and run the appliance for two or three hours using this setting 7 Reload the previously removed food into the compartment Never use sharp metal tools to scrape off frost from the evaporator as you could damage it Do not use a mechanical device or any artificial mean...

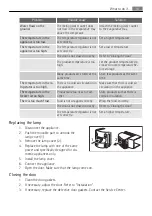
Page 12: ... power There is no voltage in the mains socket Connect a different electrical ap pliance to the mains socket Contact a qualified electrician The lamp does not work The lamp is in stand by Close and open the door The lamp is defective Refer to Replacing the lamp The compressor operates continually The temperature is not set cor rectly Set a higher temperature The door is not closed correctly Refer ...

Page 13: ... circulation in the appliance Make sure that there is cold air circulation in the appliance The temperature in the freezer is too high Products are too near to each other Store products so that there is cold air circulation There is too much frost Food is not wrapped correctly Wrap the food correctly The door is not closed correctly Refer to Closing the door The temperature regulator is not set co...

Page 14: ... appli ance before installing the appliance Positioning This appliance can be installed in a dry well ventilated indoor garage or cellar also but for optimum performance install this appliance at a location where the ambient temperature corresponds to the climate class indicated on the rating plate of the appliance Climate class Ambient temperature SN 10 C to 32 C N 16 C to 32 C ST 16 C to 38 C T ...

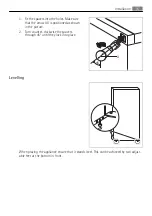
Page 15: ... positioned as shown in the picture 2 Turn counter clockwise the spacers through 45 until they lock into place Levelling When placing the appliance ensure that it stands level This can be achieved by two adjust able feet at the bottom in front 45 A Installation 15 ...

Page 16: ...abinet If the cabinet is placed in a corner and the side with the hinges facing the wall the dis tance between the wall and the cabinet must be at least 10 mm to allow the door to open enough so that the shelves can be removed WARNING It must be possible to disconnect the appliance from the mains power supply the plug must therefore be easily accessible after installation Door reversibility To car...

Page 17: ...3 Remove the doors by pulling them slightly and remove the hinge 4 On the opposite side remove the hole covers 3 2 1 Installation 17 ...

Page 18: ...eet and the screws of the bottom door hinge Re move the bottom door hinge and install it on the opposite side 6 Unscrew the bottom far side screw and install on the opposite side 7 Unscrew the top door holding pin 18 Installation ...

Page 19: ...overs 11 Tighten the hinge Make sure that the doors are aligned 12 Remove and install the handle5 on the opposite side 13 Reposition level the appliance wait for at least four hours and then connect it to the power socket Do a final check to make sure that All screws are tightened The door opens and closes correctly 3 2 1 5 If foreseen Installation 19 ...

Page 20: ...th in compliance with current regulations consulting a qualified electrician The manufacturer declines all responsibility if the above safety precautions are not ob served This appliance complies with the E E C Directives ENVIRONMENTAL CONCERNS The symbol on the product or on its packaging indicates that this product may not be treated as household waste Instead it should be taken to the appropria...

Page 21: ...cht vorhanden sind Nehmen Sie sich ein paar Minuten Zeit zum Lesen um seine Vorzüge kennen zu lernen ZUBEHÖR UND VERBRAUCHSMATERIALIEN Im AEG Webshop finden Sie alles was Sie für ein makelloses Aussehen und perfektes Funktionieren Ihrer AEG Geräte benötigen Wir bieten auch ein umfangreiches Zubehörsortiment das Ihre höchsten Qualitätsansprüche erfüllt vom Profi Kochgeschirr bis zu Besteckkörben vo...

Page 22: ... Pflege 32 Was tun wenn 34 Technische Daten 34 Montage 40 Hinweise zum Umweltschutz In dieser Benutzerinformation werden folgende Symbole verwendet Wichtige Hinweise zur Sicherheit von Personen und Informationen zur Vermeidung von Geräteschäden Allgemeine Hinweise und Ratschläge Hinweise zum Umweltschutz Änderungen vorbehalten 22 Inhalt ...

Page 23: ...rden damit sie nicht am Gerät herumspielen können Halten Sie das Verpackungsmaterial unbedingt von Kindern fern Erstickungsgefahr Ziehen Sie vor der Entsorgung des Gerätes den Netzstecker schneiden Sie das Netzkabel so nah wie möglich am Gerät ab und entfernen Sie die Tür so dass spielende Kinder vor elektrischem Schlag geschützt sind und sich nicht in dem Gerät einschließen können Wenn dieses Ger...

Page 24: ...st schwer Vorsicht beim Transport Entnehmen oder berühren Sie nie mit nassen feuchten Händen Tiefkühlgut da dies zu Hautverletzungen oder Kälteverbrennungen führen kann Das Gerät nicht über eine längere Zeit direkter Sonneneinstrahlung aussetzen Die Leuchtmittel7 für dieses Gerät sind Speziallampen die ausschließlich für Haushalts geräte geeignet sind Sie eignen sich nicht zur Raumbeleuchtung Tägl...

Page 25: ...eisungen Das Gerät sollte zur Vermeidung von Verbrennungen durch Berührung von heißen Bau teilen Kompressor Kondensator möglichst mit der Rückseite gegen eine Wand aufge stellt werden Das Gerät darf nicht in der Nähe von Heizkörpern oder Kochern installiert werden Vergewissern Sie sich dass der Netzstecker des Gerätes nach der Installation frei zugäng lich ist Verbinden Sie das Gerät ausschließlic...

Page 26: ...peratur im Innern des Gerätes von verschiedenen Faktoren abhängt von der Raumtemperatur von der Häufigkeit der Türöffnung von der Menge der eingelagerten Lebensmittel und vom Standort des Geräts Ist die Umgebungstemperatur hoch oder das Gerät voll beladen dieses aber auf die niedrig ste Temperatur eingestellt so kann es bei andauerndem Betrieb des Geräts an der Rück wand zu Frostbildung kommen In ...

Page 27: ... auf den höheren Einstellungen laufen bevor Sie Lebensmittel in das Gefrierfach hinein legen Kam es zum Beispiel durch einen Stromausfall der länger dauerte als der in der Tabelle mit den technischen Daten angegebene Wert siehe Ausfalldauer zu einem ungewollten Ab tauen dann müssen die aufgetauten Lebensmittel sehr rasch verbraucht oder sofort ge kocht und nach dem Abkühlen erneut eingefroren werd...

Page 28: ...ati sches Abtauen und damit auch einen niedrigeren Energieverbrauch ermöglicht Hinweise für die Kühlung frischer Lebensmittel So erzielen Sie beste Ergebnisse Legen Sie bitte keine warmen Lebensmittel oder dampfende Flüssigkeiten in den Kühl schrank Decken Sie die Lebensmittel ab oder verpacken Sie diese entsprechend besonders wenn diese stark riechen Legen Sie die Lebensmittel so hinein dass um s...

Page 29: ...ln darauf dass diese keinen Kontakt mit Gefriergut bekommen da dieses sonst antauen kann weniger fetthaltige Lebensmittel lassen sich besser lagern als fetthaltigere Salz verkürzt die Lagerzeit von Lebensmitteln im Gefrierfach werden Gefrierwürfel direkt nach der Entnahme aus dem Gefrierfach verwendet können Sie zu Frostbrand auf der Haut führen es empfiehlt sich das Einfrierdatum auf jeder einzel...

Page 30: ...tel oder Wachspolituren da diese die Oberfläche des Innenraums beschädigen und einen starken Eigengeruch hinterlassen können Reinigen Sie den Kondensator schwarzes Gitter und den Kompressor auf der Geräterück seite mit einer Bürste Dadurch verbessert sich die Leistung des Geräts und es verbraucht weniger Strom Bitte achten Sie darauf das Kühlsystem nicht zu beschädigen Viele Haushaltsreiniger für ...

Page 31: ...bgetaut trocken Sie die nassen Oberflächen gründlich ab und setzen Sie den Stopfen wieder ein 5 Schalten Sie das Gerät ein 6 Drehen Sie den Temperaturregler auf eine höhere Einstellung um die maximal mögliche Kühlung zu erreichen und lassen Sie das Gerät zwei bis drei Stunden mit dieser Einstel lung laufen 7 Legen Sie die ausgelagerten Lebensmittel wieder in das Fach hinein Verwenden Sie bitte nie...

Page 32: ... ausge glichen worden Kontrollieren Sie ob eventuelle Unebenheiten der Standfläche korrekt ausgeglichen wurden so dass alle vier Füße fest auf dem Boden stehen Das Gerät funktioniert nicht Die Lampe funktio niert nicht Das Gerät ist abgeschaltet Schalten Sie das Gerät ein Der Netzstecker steckt nicht richtig in der Steckdose Stecken Sie den Netzstecker rich tig in die Steckdose Das Gerät bekommt k...

Page 33: ...tellen Sie eine höhere Tempera tur ein Die Temperatur im Gerät ist zu hoch Die Temperatur ist nicht richtig eingestellt Stellen Sie eine niedrigere Tempe ratur ein Die Tür ist nicht richtig ge schlossen Siehe hierzu Schließen der Tür Die Temperatur der zu kühlen den Lebensmittel ist zu hoch Lassen Sie die Lebensmittel auf Raumtemperatur abkühlen bevor Sie sie in das Gerät legen Es wurden zu viele ...

Page 34: ...r 1 Reinigen Sie die Türdichtungen 2 Stellen Sie die Tür nach Bedarf ein Siehe hierzu Montage 3 Ersetzen Sie die defekten Türdichtungen falls erforderlich Kontaktieren Sie den Kun dendienst TECHNISCHE DATEN Abmessungen Höhe 1209 mm Breite 496 mm Tiefe 604 mm Ausfalldauer 17 h Spannung 230 V Frequenz 50 Hz Die technischen Informationen befinden sich auf dem Typschild innen links im Gerät sowie auf ...

Page 35: ...Typschild des Geräts angegeben ist Klimaklasse Umgebungstemperatur SN 10 C bis 32 C N 16 C bis 32 C ST 16 C bis 38 C T 16 C bis 43 C Distanzstücke hinten In der Dokumententasche befinden sich zwei Distanzstücke die so angebracht werden müs sen wie in der Abbildung gezeigt 1 Setzen Sie die Distanzstücke in die Öff nungen ein Stellen Sie sicher dass der Pfeil A wie in der Abbildung gezeigt aus geric...

Page 36: ...llte die Aufstel lung des Geräts unter einer überhängenden Wand nach Möglichkeit vermieden werden Die korrekte waagerechte Ausrichtung des Geräts kann mit Hilfe eines oder mehrerer Schraubfüße am Sockel des Geräts erfolgen Wird das Gerät in einer Ecke aufgestellt und zeigt die Scharnierseite dabei zur Wand so muss der Abstand zwischen Wand und Gerät mindestens 10 mm betra gen damit die Tür zum Her...

Page 37: ...wie folgt vorgegangen werden 1 Ziehen Sie den Stecker aus der Steckdose 2 Öffnen Sie die Tür des Gerätes Lösen Sie das Scharnier 3 Bauen Sie die Türen ab indem Sie vor sichtig an ihnen ziehen und das Schar nier entfernen 3 2 1 Montage 37 ...

Page 38: ...eide Schraubfüße und die Schrauben am unteren Türscharnier Bauen Sie das untere Türscharnier ab und bauen Sie dieses auf der gegenüber liegenden Seite ein 6 Lösen Sie die untere seitliche äußere Schraube setzen Sie diese auf der ande ren Seite ein und ziehen Sie sie fest 38 Montage ...

Page 39: ...rauben Sie den oberen Haltebolzen der Tür los 8 Schrauben Sie den Bolzen auf der ande ren Seite ein 9 Setzen Sie die Türen auf die Bolzen und sichern Sie diese Installieren Sie das Scharnier 3 2 1 Montage 39 ...

Page 40: ...ktrischer Anschluss Kontrollieren Sie vor der ersten Benutzung des Gerätes ob die Netzspannung und fre quenz Ihres Hausanschlusses mit den auf dem Typenschild angegebenen Anschlusswerten übereinstimmen Das Gerät muss geerdet sein Zu diesem Zweck ist die Netzkabelsteckdose mit einem Schutzkontakt ausgestattet Falls die Steckdose Ihres Hausanschlusses nicht geerdet sein sollte lassen Sie das Gerät b...

Page 41: ...falsches Entsorgen gefährdet Weitere Informationen über das Recycling dieses Produkts erhalten Sie von Ihrem Rathaus Ihrer Müllabfuhr oder dem Geschäft in dem Sie das Produkt gekauft haben 41 ...

Page 42: ...42 ...

Page 43: ...43 ...

Page 44: ...www aeg com shop 200383588 B 052011 ...

Reviews: