background image

AEG HausgerŠte GmbH

Postfach 1036

D-90327  NŸrnberg

http://www.aeg.hausgeraete.de

2222 274-93

Summary of Contents for OKO - SANTO 3244-4 i

Page 1: ... KO SANTO 2972 6 i Integrating Fridge Freezer Operating and Installation Instructions ...

Page 2: ...al words Warning Important Attention Please observe the following instructions carefully Additional information regarding operation and practical applications of the appliance appear after this symbol Tips and notes concerning economical and environmentally sound use of the appliance are marked with the flower In the event of a malfunction these operating instructions contain information on how to...

Page 3: ...k 10 Preparation of Ice Cubes 11 Frozen Food Symbols Freezing calendar 11 Defrosting 11 Switching off the appliance 12 Cleaning and Care 13 Energy Saving Tips 14 Something Not Working 14 Changing the light bulb 16 Service and Spare Parts 17 Guarantee Conditions 18 Installation 19 Electrical Connection 19 Installation Location 20 Your appliance needs air 20 Reversing the door 20 Housing dimensions ...

Page 4: ... refrigerant isobutane R600a is contained within the refrigerant circuit of the appliance a natural gas with a high level of environ mental compatibility which is nevertheless flammable During transportation and installation of the appliance be certain that none of the components of the refrigerant circuit become damaged If the refrigerant circuit should become damaged Ð avoid open flames and sour...

Page 5: ... the plug from the mains socket do not pull on the cable Service Under no circumstances should you attempt to repair the appliance yourself Repairs carried out by inexperienced persons may cause injury or serious malfunctioning Contact your local AEG Service Force Centre Disposal Appliance Packaging Information All materials are environmentally sound The plastics can be recycled and are identified...

Page 6: ...emnants of adhesive using white spirit Warning Before disposing of old appliances make them inoperable Remove plug from mains sever the power cable remove or destroy any snap or latch closures to prevent small children being trapped inside Use an authorised disposal site Contact your Local Council or Enviromental Health Office to see if the re are facilities in your area to recycle the appliance ...

Page 7: ...ity of food stored how often the door is opened The temperatures in the refrigerator compartment and freezer com partment cannot be independently regulated If you want to freeze fresh food rapidly select setting Ò6Ó ensuring that the temperature in the refrigerator compartment does not drop below 0 C You should reset the temperature control knob to setting Ò3Ó or Ò4Ó if this does occur As soon as ...

Page 8: ...led upwards or down wards and removed Please do the same in reverse to insert the shelf at a different hei ght Slide the front half of the Vario storage shelf in another level to the rear This will enable you to place tall items on the storage shelf below Adjusting the upper door rack Depending on the food sto red the upper door racks can be changed to other positions or removed Take out the refri...

Page 9: ... warm food or evaporating liquid in the refrigeator do cover or wrap the food particularly if it has a strong flavour Position food so that air can circuiate freely round it Useful hints Meat all types wrap in polythene bags and place on the glass shelf above the vegetable drawer s For safety store in this way only one or two days at the most Cooked foods cold dishes etc these should be covered an...

Page 10: ...d so that no flavour contamina tion of other frozen goods occurs Important Do not touch frozen food with wet hands Your hands could stick to the food 1 Place the packed food in the drawers Place food to be frozen in the upper drawer Unfrozen food must not touch items already frozen otherwise the frozen food could begin to defrost 2 Place frozen foods in the drawers sorted by type as far as possibl...

Page 11: ...lower value applies to foods with high fat content By attaching the included index tabs to the drawers they can be marked according to which type of foods the individual compart ments contain Defrosting Refrigerator Frost is automatically eliminated from the evaporator of the refrigera tor compartment every time the motor compressor stops during nor mal use The defrost water drains out through a t...

Page 12: ...nd put it in a very cool place 2 Switch off the appliance and pull out the plug or turn the temperature control knob to Ò0Ó 3 Leave the freezer compart ment door open 4 Insert the plastic scraper into the recess provided under the defrost water channel and pla ce a collecting basin under it 5 Once defrosting is completed keep the scraper handy for future use 6 Turn the thermostat knob to the requi...

Page 13: ...d Ð cleansers which contain acetic acid Do not allow such substances to come into contact with appliance parts Do not use any abrasive cleansers 1 Remove frozen food and the food from the refrigerator Wrap frozen food in several layers of newspaper Store it in a cool place well covered 2 Switch the appliance off and remove the plug from the mains or swit ch off 3 Clean the appliance and the interi...

Page 14: ... Force Cen tre Warning Repairs should only be carried out by qualified service engineers Repairs carried out by inexperienced persons may cause injury or serious malfunctioning Energy Saving Tips Do not install the appliance near radiators or other sources of conti nuous warmth High ambient temperatures cause longer more fre quent operation of the compressor Ensure sufficient air circulation at th...

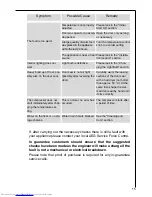
Page 15: ...in the Installa tion location section A large quantity of warm food was placed in the appliance within the last 24 hours Open the door only as long as necessary Symptom Possible Cause Remedy The compressor starts after a period of time See the Cleaning and Care section This is normal no error has occurred The compressor does not start immediately after chan ging the temperature set ting Water on t...

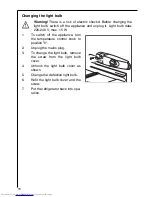
Page 16: ... 220 240 V max 15 W 1 To switch off the appliance turn the temperature control knob to position 0 2 Unplug the mains plug 3 To change the light bulb remove the screw from the light bulb cover 4 Unhook the light bulb cover as shown 5 Change the defective light bulb 6 Refit the light bulb cover and the screw 7 Put the refrigerator back into ope ration AEG65 ...

Page 17: ... details of the fault What is the fault When does the fault occur 4 The model production number and product identification number This information can be found on the serial plate in the interior at the left of the appliance Model Name Model Number PNC Serial Number S No 5 Date of purchase Customer Care Department For general enquiries regarding your AEG appliance or futher informa tion on AEG pro...

Page 18: ...ls 5 Repairs carried out under guarantee do not extend the guarantee period for the appliance Parts removed during guarantee repairs become the pro perty of AEG 6 The purchaserÕs statutory rights are not affected by this guarantee European Guarantee If you should move to another country within Europe then your guarantee moves with you to your new home subject to the following qualifications The gu...

Page 19: ...e coloured in accordance with the fol lowing code Green and Yellow Earth Blue Neutral Brown Live As the colours of the wires in the mains lead of this appliance may not correspond with the coloured markings identifying the terminals in your plug proceed as follows 1 The wire coloured green and yellow must be connected to the termi nal marked with the letter ÒEÓ or by the earth symbol or coloured g...

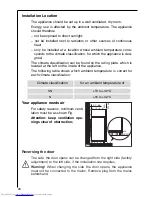
Page 20: ...located at the left on the inside of the appliance The following table shows which ambient temperature is correct for each climate classification Climate classification for an ambient temperature of SN 10 to 32 C N 16 to 32 C Your appliance needs air For safety reasons minimum venti lation must be as shown Fig Attention keep ventilation ope nings clear of obstruction 50 mm min cm2 200 200 cm 2 min...

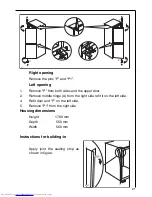
Page 21: ...s and the upper door 2 Remove middle hinge A from the right side refit it on the left side 4 Refit door and ÒPÓ on the left side 5 Remove ÒP1Ó from the right side Housing dimensions Height 1780 mm Depth 550 mm Width 560 mm Instructions for building in D765 Apply joint the sealing strip as shown in figure ...

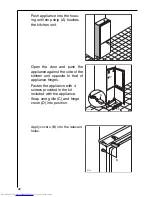
Page 22: ...il stop strip A touches the kitchen unit D C D723 Open the door and push the appliance against the side of the kitchen unit opposite to that of appliance hinges Fasten the appliance with 4 screws provided in the kit included with the appliance Snap vent grille C and hinge cover D into position ...

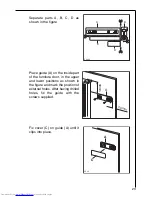
Page 23: ...wer positions as shown in the figure and mark the position of external holes After having drilled holes fix the guide with the screws supplied 20 mm A 50mm PR166 Separate parts A B C D as shown in the figure PR266 A B C D PR33 C A Fix cover C on guide A until it clips into place ...

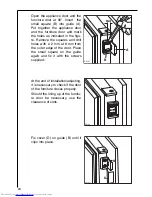
Page 24: ...mark the holes as indicated in the figu re Remove the squares and drill holes with 2 mm at 8 mm from the outer edge of the door Place the small square on the guide again and fix it with the screws supplied 8mm PR167 A B PR168 At the end of installation adjusting it is necessary to check if the door of the furniture closes properly Should the lining up of the furnitu re door be necessary use the cl...

Page 25: ...andards The necessary measures in accordance with appliance safety legislation regulations GSG accident prevention regulations for refrigeration appliances VBG 20 and the regulations of the German Society of Electrical Engineers VDE were observed in the manufacture of this appliance The refrigerant circuit has been checked for leaks This appliance is in accordance with the following EU guidelines ...

Page 26: ......

Page 27: ......

Page 28: ...AEG HausgerŠte GmbH Postfach 1036 D 90327 NŸrnberg http www aeg hausgeraete de 2222 274 93 ...

Reviews: