Operating instructions
8
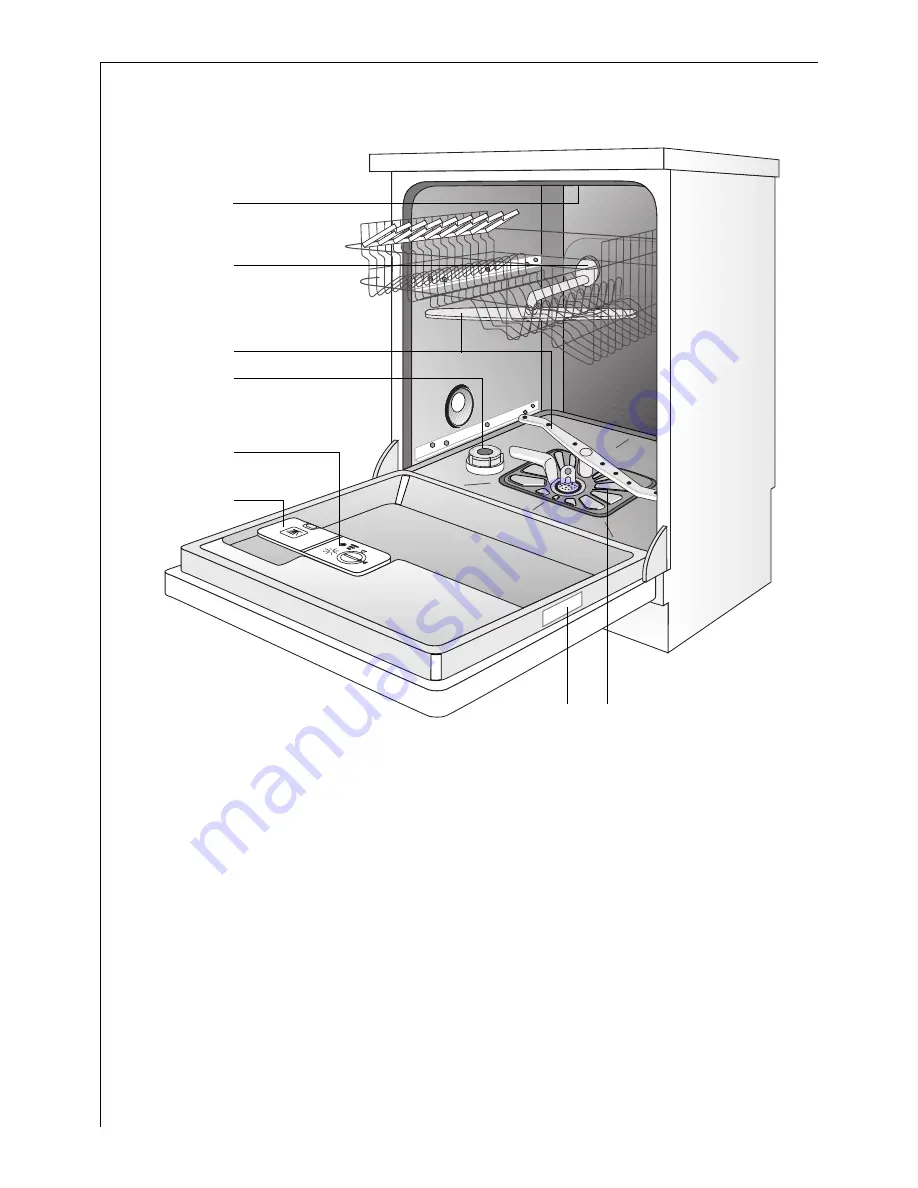
Appliance Features and Control Panel
Spray Arms
Container for Salt
Rating Plate
Containerfor Rinse Aid
DetergentDispenser
Filters
Top Spray Nozzle
Rubber Seal for Connecting the Water Feed to the Upper Spray Arm
Page 1: ...ÖKO_FAVORIT 5070 Dishwasher User Instructions ...
Page 2: ...r numbered instruction steps lead you step by step through the operation of the appliance 3 Next to this symbol you receive additional information and practical tips on using the appliance 2 Tips and instructions for the economical and environmentally conscious use of the appliance are marked with a clover leaf In the event of a malfunction these operating instructions contain information on how t...
Page 3: ... and Large Plates 16 Loading Cups Glasses and Coffee Services 17 Adjusting the Height of the Upper Rack 18 Filling with Detergent 19 Bio Wash Programmes and Concentrated Detergents 20 Selecting the Wash Programme Programme Table 21 Start the Wash Programme 22 Changing Interrupting Cancelling the Wash Programme 22 Load Sensing Sensor Logic 23 Switching Off the Dishwasher 23 Emptying the Dishwasher ...
Page 4: ...r 31 Free Standing Appliances 31 Connecting the Dishwasher 33 Water Connection 33 Permitted water pressure 33 Connect the inlet hose 33 Water drain 34 Leak Prevention System 35 Electrical Connection 35 Connections 37 Service Departments 38 Other Countries 38 Guarantee Conditions 41 Great Britain 41 Other Countries 42 Service Spare parts 43 ...
Page 5: ...type of fuse to be used You will find details on how to correctly install and connect up your dishwasher in the Installation section Adaptors connectors and extension cables must not be used Child Safety This appliance is designed to be operated by adults Children should not be allowed to tamper with the controls or play with the product Keep all packaging away from children Keep all detergents in...
Page 6: ...rp items of cutlery such as carving knives must be positioned horizontaly in the upper basket When finished loading or unloading close the door as an open door can be a hazard Correct Use Only wash household dishes with the dishwasher If the appliance is used for purposes other than those intended or used incorrectly no liability will be accepted by the manufacturer for any damage that may be caus...
Page 7: ...from recycled paper and should be deposited in the waste paper collection for recycling Disposal of Old Appliances When disposing of old appliances remove the plug and ensure that any locks or catches are removed to prevent young children becoming trapped inside Use an authorised disposal site 2 Economical and Ecological Dishwashing Ensure that the water softener is correctly adjusted Do not pre r...
Page 8: ...ions 8 Appliance Features and Control Panel Spray Arms Container for Salt Rating Plate Container for Rinse Aid Detergent Dispenser Filters Top Spray Nozzle Rubber Seal for Connecting the Water Feed to the Upper Spray Arm ...
Page 9: ...Indicators have the following meanings Prior to using for the first time Prior to using for the first time remove all the clips with which the dish racks are secured for transport Then perform the following steps 0 1 Adjust the water softener 2 Filling with Special Salt for the Water Softener 3 Filling with Rinse Aid SALT Refill with salt RINSE AID Refill with rinse aid Display for the Individual ...
Page 10: ...ess the function and water softener buttons simultaneously and keep them pressed 3 In addition press the ON OFF switch The LED indicators for the function and water softener buttons flash 4 Press the softener button again The water softener button indicator starts to flash The number of flashes corresponds to the hardness setting Excep tion hardness setting 0 is indicated by 10 flashes The sequenc...
Page 11: ...luminated 3 If the water hardness in your area is less than 4 d you do not need to use dishwasher salt 0 1 Open the door remove the lower rack 2 Undo the lid on the salt container by turning it anticlockwise 3 When using for the first time fill the salt container with water 4 Place the funnel supplied on the container opening Fill the container with salt through the funnel the capacity of the con ...
Page 12: ... of salt are dependent on the hardness of the local water Filling with Rinse Aid Rinse aid is automatically added during the last rinse ensuring thor ough rinsing spot and streak free drying 1 Only use rinse aid specifically designed for domestic dishwashers Never fill the rinse aid container with any other substance as this would dam age the appliance Fill with rinse aid Prior to using the dishwa...
Page 13: ...and can adjusted from 1 to 6 Gradually increase the dose if there are drops of water or lime spots on the dishes after washing Reduce if it there are sticky whitish streaks on the dishes 0 1 Turn the lid of the container of a turn anticlockwise and remove 2 Adjust the dose setting with a tea spoon 3 Replace the lid and tighten by turn ing clockwise 4 If rinse aid has run out wipe up with a cloth I...
Page 14: ...he dishwasher the following cutlery dishes are not suitable are of limited suitability Cutlery with wooden horn china or mother of pearl handles Plastic items that are not heat resistant Older cutlery with glued parts that is not temperature resistant Bonded cutlery items or dishes Pewter or copper items Lead crystal glass Steel items subject to rusting Wooden platters Items made from synthetic fi...
Page 15: ... Place the grid insert on the cutlery rack 2 Place short knives forks and spoons in the grid insert with their handles pointing downwards To make the removal of cutlery easier on some dishwasher models it is possible to open the cutlery rack If you use the grid insert then the cutlery rack cannot be opened 1 To ensure that the cutlery rack can not open on removal from the appli ance you should alw...
Page 16: ... Load large and heavily soiled dishes in the lower rack 3 To ease the loading of large items at some dishwasher models the two rows of prongs for the right hand plate insert can be folded down 0 1 Slightly lift the right plate insert 2 Fold the plate insert to the left ...
Page 17: ...tems of crockery on the folding cups racks so that they are offset from each other and water can reach all items The cup racks can be folded up out of the way for tall items Lay or hang wine champagne and brandy glasses in the cut outs on the cup racks Glasses beakers etc can also be placed on the two rows of prongs on the left of the upper rack ...
Page 18: ...o the stop 2 Lift and lower the upper rack using the handle at the rear of the right hand cup rack Raising the Upper Rack 0 1 Pull out the upper rack to the stop 2 Lift the upper rack by the handle pull gently forwards and allow to latch into the upper position Maximum Height of the Dishes in the Upper Rack Lower Rack With Raised Upper Rack 22 cm 31 cm With Lowered Upper Rack 24 cm 29 cm ...
Page 19: ...ergent packaging The detergent dispenser is on the inside of the door 0 1 If the lid is closed Press the latching lever 1 forwards The lid springs open 2 Fill the detergent dispenser with detergent The markings are an aid to correct dosing MIN corresponds to approx 30 ml detergent MAX corresponds to approx 40 ml detergent 3 Close the lid press it down until the latch engages 3 In the case of heavi...
Page 20: ...properties of the enzymes in the concentrated detergent It is for this reason that BIO wash programmes can achieve the same results at 50 C that can otherwise only be achieved using 65 C programmes During BIO programmes the water is briefly heated to more than 50 C so that the active oxygen becomes effective 3 Detergent tablets from different manufacturers dissolve at different rates For this reas...
Page 21: ...dition with non tem perature resist ant dishes with delicate glasses Type of Soiling heavily soiled dried on left overs partic ularly egg white and thickeners normally soiled dried left overs normally soiled lightly soiled Used dishes that are being collected in the dishwasher for washing later particularly suited to the use of concentrated detergents Suitable Programme INTENSIVE 70 C NORMAL 65 C ...
Page 22: ... interrupt a wash programme in progress if it is abso lutely necessary to do so Changing the wash programme 3 If you want to change the wash programme within 6 seconds of mak ing a programme selection briefly press the button for the new wash program If you want to change the wash programme at a later point in time use the following procedure 0 1 Press the button for the new wash programme and hol...
Page 23: ... load 6 place settings up to 2 litres of water and 0 2 kWh of electricity are saved Switching Off the Dishwasher Only switch off the dishwasher when END is illuminated on the pro gramme progress display 0 1 Press the ON OFF button The ON OFF button indicator extinguishes 1 Hot steam may escape from the appliance when opening the door immediately after the end of the programme 2 Open the door caref...
Page 24: ...ecked and cleaned regularly Blocked filters will give poor wash results 0 1 Open the door remove the lower rack 2 The dishwasher filter system com prises a coarse fine filter microfilter and a flat filter Unlock the filter sys tem using the handle on the microfil ter and remove 3 Turn the handle about a turn anti clockwise and remove 4 Take hold of the coarse fine filter 1 by the handle with the h...
Page 25: ...ilter in the microfilter and press together 9 Put the filter combination in place and lock by turning the handle clock wise to the stop During this process ensure that the flat filter does not protrude above the base of the wash ing compartment 1 The dishwasher must not be used without filters under any circum stances ...
Page 26: ...Service Force If indicators for other programme steps on the programme progress display are flashing please contact AEG Service Force and state the fault indicated Symptom Possible Cause Solution END on the pro gramme progress dis play is flashing no water is running into the dishwasher Tap is closed Open tap The filter where present in the threaded hose fitting is blocked Clean the filter in the ...
Page 27: ...mptom Possible Cause Solution The programme does not start The door of the dishwasher is not closed properly Shut the door Mains plug is not plugged in Insert mains plug House fuse is defective Replace fuse A start delay is selected If the dishes are to be washed immediately set the start delay to 0 hours Rust spots are visible in the washing compart ment The washing compartment is made from rust ...
Page 28: ... including Directive Amendment 92 31 EWG EMC Directive Capacity 12 place settings including serving dishes Permitted Water Pressure 1 10 bar 10 100 N cm2 0 1 1 0 MPa Electrical Connection Information on the electrical connection is given on the rating plate on the inner edge of the dishwasher door on the right Dishwasher Free Standing Appliances Dimensions 850 x 600 x 600 H x W x D in mm Max Weigh...
Page 29: ...rack with cutlery basket Cutlery rack Test Standard EN 5O 242 Comparative Programme Normal BIO 50 C for full and half load Full Load 12 place settings incl serving dishes Detergent Dosing 30g Type B in the detergent container Half Load 6 place settings incl serving dishes For half load every second stacking position is left empty Detergent Dosing 20g Type B in the detergent container Rinse Aid Set...
Page 30: ...n the design of the threaded feet use either an open end spanner or a screwdriver For built in integrated and fully integrated dishwashers the rear feet should be adjusted from the front of the appliance using a screwdriver The drain hose inlet hose and mains cable must be laid such that they are free to move in the rear of the plinth recess so that they cannot be kinked or crushed The dishwasher ...
Page 31: ...used You can obtain this with the E No 911 239 008 Built In Dishwasher see enclosed installation instructions Free Standing Appliances 1 can be set up as stand alone without additional installation If the dishwasher is set up next to a gas or coal cooker a heat insu lating non flammable plate must be mounted between the dish washer and the cooker flush to the top edge of the work surface depth 57 ...
Page 32: ...is later used as a free standing appliance the original work surface must be re mounted 3 The plinth on free standing appliances is not adjustable Free standing appliances can be outfitted with a décor panel to match the facings of other kitchen equipment The décor panels must be obtained from the kitchen man ufacturer A décor frame is neces sary for installation and can be obtained as an accessor...
Page 33: ...he threaded hose fitting DIN 259 on the water inlet hose to a tap with an external thread inch Handtighten the threaded hose fitting only 3 In order that access to the tap in the kitchen is not limited by the use of the dishwasher we recommend the installation of an additional tap or the fitting a two way adapter to the existing tap If you need a longer water inlet hose contact your local AEG Serv...
Page 34: ... 3 metres horizontally the maxi mum permitted height for the con nection for the drain hose is then 85 cm Sink outlet connection The outlet of the drain hose ø 19 mm fits all commonly available sink outlet spigot types The outer diameter of the spigot connection must be at least 15 mm The drain hose must be fixed to the sink outlet connection using the hose clamp supplied Discharging into a standp...
Page 35: ...etent person 1 WARNING This appliance must be earthed The manufacturer declines any responsibility should these safety measures not be observed Before switching on make sure the electricity supply voltage is the same as that indicated on the appliance rating plate To isolate the dishwasher from the mains remove the mains plug Important The plug must still be accessible after the appliance has been...
Page 36: ...ed to the terminal N or col oured black The wire coloured brown must be connected to the terminal marked L or coloured red Upon completion there must be no cut or stray strands of wire present and the cord clamp must be secure over the outer sheath 1 WARNING A cut off plug inserted into a 13 amp socket is a seri ous safety shock hazard Ensure that if it is necessary to cut off the plug it is dispo...
Page 37: ...ed beside the dishwasher as there is insufficient space behind the appliance The plumbing and electrical installation example given below can only be regarded as a recommendation Two 45 or Straight Connections Outer ø 19 mm Length 30 mm Double tap Water drain Water inlet Water drain Water inlet Mains cable Mains cable Mains socket ...
Page 38: ... Australia ANDI Co Pty Ltd 9 Kingston Town Close Oakleigh VIC 3166 Tel 03 9569 1235 Fax 03 9569 1450 Korea South Core Incorp 3 F Chewoo Bldg 200 Nonhyun Dong Kangnam Ku Seoul Telefon 82 2 549 89 61 Namibia AEG NAMIBIA PTY LIM ITED Jeppe Street Northern Industrial Area Windhoek Tel 061 21 6082 4 Fax 061 217838 Bahrain Arabian Gulf A A Zayani Sons P O Box 9 32 Bahrain Tel 261060 Croatia Electrolux D...
Page 39: ...5 937 7837 Fax 095 926 5513 Israel Evis Ltd P O Box 70 39 Tel Aviv 67013 Tel 3257311 Malaysia Arzbergh Engineering No 49A B Jalan Petaling Utama 7 4600 Petaling Jaya Tel 3 795 1084 Fax 3 795 1082 Saudi Arabia Alia Trading Corporation P O Box 4101 King Abdul Aziz Street Riyadh Tel 4645977 Al Nahas Est Musaidia Market I P O Box 1 15 29 Jeddah Tel 6606852 Japan Electrolux Japan Ltd Yasuda Warehouse 4...
Page 40: ...ary Electrolux Lehel KFT AEG Div Erzsebet Kiralyne Utja 87 1142 Budapest Tel 00361 251 84 44 USA ANDI Co Appl Inc East 65 Campus Plaza Edison New Jersey 0837 USA Tel 201 2258839 Syria Masri Shami P O Box 24 96 Damascus Tel 214080 ...
Page 41: ...es both labour and materials 5 Repairs carried out under guarantee do not extend the guarantee period for the appli ance Parts removed during guarantee repairs become the property of AEG 6 The purchaser s statutory rights are not affected by this guarantee European Guarantee If you should move to another country within Europe then your guarantee moves with you to your new home subject to the follo...
Page 42: ...les conditions de garantie des concessionnaires de la région sont valables Vous pouvez les consulter sur place Otros puntos de Postventa en el extranjero En estos países rigen las condiciones de nuestros representantes locales las cuales pueden ser consultadas allí mismo Ulteriori uffici del servizio tecnico assistenza clienti all estero In questi paesi sono valide le condizioni di garanzia dei pa...
Page 43: ...nd on the rating plate The rating plate is on the inner edge of the door on the right 5 Date of purchase Please note that it will be necessary to provide proof of purchase for any in guarantee service call In guarantee customers should ensure that the chapter headed What to do if has been read as the engineer will make a charge if the fault is not a mechanical or electrical breakdown Customer Care...
Page 44: ...AEG Hausgeräte GmbH Postfach 1036 D 90327 Nürnberg http www aeg hausgeraete de Copyright by AEG 822 945 530 00 0900 ...