


English
26
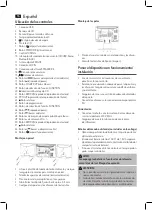
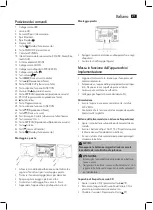
6 LCD display
7
I
/ button (Standby/Operation)
8 FM MODE button (stereo/mono)
9 TUNING control
10 Operating mode switch (CD/USB; Radio; Bluetooth/AUX)
11 FM ANT dipole antenna
12 AUX IN connection
13 SPEAKER R/L loudspeaker connections
14 Headset connection
15 / Volume buttons
16 / buttons (Search run backwards/forwards)
17
button (replay/pause)
18 FOLDER UP button (album upwards)
19 FUNKTION bunction select button
20 (opening/closing) CD tray
21 REP/RAN button (playback/shuffle playback)
22 PROG (Programming of the title playback)
23 Stop button
24 Programming button
25 FUNKTION Function selection button
26
button (replay/pause)
27 buttons (Search forward)
28 Folder Image buttons (upwards/downwards album)
29 VOL +/- Volume buttons
30 REP/RAN button (Playback/shuffle playback)
31 Stop button
32 buttons (search run backwards)
33
I
/ button (Standby/Operation)
Wall mounting
• Align the drill template horizontally and mark the holes
required for the wall mounting.
• Drill the mounting holes (6 mm in diameter).
• Push the plastic anchors into the boreholes
• Screw in the fastening screws up to ca. 4 - 5 mm.
• Hang the device and the loudspeakers into the screws.
Assembly of the feet
• Push the enclosed feet into the device and into the loud
-
speakers.
• Screw in the fastening screws (Picture)
Putting the device into operation/
Implementation
• Carefully read the operating instructions before the com
-
missioning.
• Select a suitable location for the device and the loud
-
speakers. Ensure an even and non-slip surface.
• Take care to provide sufficient ventilation for the device.
• Connect the loudspeakers to the intended connections
(13).
Power supply
• Plug the mains plug into the properly installed wall
socket, 230 V, 50 Hz.
• Ensure that the mains voltage corresponds with the type
plate.
Batteries of the remote control (not included in the scope
of delivery)
• Open the battery compartment on the rear side of the
remote control.
• Insert 2 batteries of the type “AAA” 1.5 V. Ensure the cor
-
rect polarity (Illustration bottom of battery compartment).
• If you do not use the remote control for a longer period
of time, remove the batteries.
WARNING:
Do not expose the batteries to any high heat input such
as direct sunlight, for example. There is a risk of
explosion.
CAUTION:
• Unequal batteries or new and spent batteries may not
be used together.
• Batteries must not be disposed off in the household
wate. Please dispose of spent batteries at the appropri-
ate collection points or return them to the distributor.