background image

warming pads, slippers, sponges, damp cloth and

similar may lead to risk of injury, ignition or fire.

If smoke is emitted, switch off or unplug the appliance

and keep the door closed in order to stifle any flames.

Microwave heating of beverages can result in delayed

eruptive boiling. Care must be taken when handling

the container.

The contents of feeding bottles and baby food jars

shall be stirred or shaken and the temperature

checked before consumption, in order to avoid burns.

Eggs in their shell and whole hard-boiled eggs should

not be heated in the appliance since they may

explode, even after microwave heating has ended.

The appliance should be cleaned regularly and any

food deposits removed.

Failure to maintain the appliance in a clean condition

could lead to deterioration of the surface that could

adversely affect the life of the appliance and possibly

result in a hazardous situation.

The temperature of accessible surfaces may be high

when the appliance is operating.

The microwave oven shall not be placed in a cabinet

unless it has been tested in a cabinet.

The rear surface of appliances shall be placed against

a wall.

Do not use harsh abrasive cleaners or sharp metal

scrapers to clean the glass door since they can scratch

the surface, which may result in shattering of the glass.

Do not activate the appliance when it is empty. Metal

parts inside the cavity can create electric arcing.

Pay attention to the minimum dimensions of the

cabinet (if applicable). Refer to the installation

chapter.

The appliance must be operated with the decorative

door open (if applicable).

ENGLISH

23

Downloaded from www.vandenborre.be

Summary of Contents for MBS3423CM

Page 1: ...bruiksaanwijzing 2 Magnetron EN User Manual 20 Microwave Oven FR Notice d utilisation 37 Four à micro ondes DE Benutzerinformation 55 Mikrowellenofen MBS3423CM D o w n l o a d e d f r o m w w w v a n d e n b o r r e b e ...

Page 2: ... er optimaal van kunt profiteren Ga naar onze website voor Advies over gebruik brochures het oplossen van problemen en onderhoudsinformatie www aeg com webselfservice Registreer uw product voor een betere service www registeraeg com Koop accessoires verbruiksartikelen en originele reserveonderdelen voor uw apparaat www aeg com shop KLANTENSERVICE Gebruik altijd originele onderdelen Als u contact o...

Page 3: ...t kinderen niet met het apparaat spelen Kinderen jonger dan 3 jaar moeten niet zonder toezicht in de buurt van het apparaat worden gelaten Houd alle verpakking uit de buurt van kinderen en gooi het op passende wijze weg Houd kinderen en huisdieren uit de buurt van het apparaat als het in werking is of afkoelt Het apparaat is heet Als het apparaat is voorzien van een kinderbeveiliging dan dient dit...

Page 4: ...oer beschadigd is moet de fabrikant een erkende serviceverlener of een gekwalificeerd persoon deze vervangen teneinde gevaarlijke situaties te voorkomen Alleen een vakkundig persoon kan onderhouds of reparatiewerkzaamheden uitvoeren waarvoor de afdekking moet worden verwijderd die beschermd tegen blootstelling aan magnetronenergie Bedien het apparaat niet met een externe timer of een apart afstand...

Page 5: ... voor consumptie worden gecontroleerd om brandwonden te voorkomen Eieren in de schaal en hele hardgekookte eieren mogen niet in het apparaat worden opgewarmd omdat ze dan kunnen ontploffen zelfs nadat de magnetronverwarming is beëindigd Het apparaat moet regelmatig worden gereinigd en voedselresten dienen te worden verwijderd Het niet schoonhouden van het apparaat kan leiden tot beschadigingen aan...

Page 6: ... apparaat moeten naast apparaten of units staan van dezelfde hoogte 2 2 Aansluiting aan het elektriciteitsnet WAARSCHUWING Gevaar voor brand en elektrische schokken Alle elektrische aansluitingen moeten door een gediplomeerd elektromonteur worden gemaakt Dit apparaat moet worden aangesloten op een geaard stopcontact Zorg ervoor dat de parameters op het vermogensplaatje overeenkomen met elektrische...

Page 7: ...in werking wordt gezet Reinig het apparaat met een vochtige zachte doek Gebruik alleen neutrale reinigingsmiddelen Gebruik geen schuurmiddelen schuursponsjes oplosmiddelen of metalen voorwerpen Raadpleeg als u een ovenspray gebruikt eerst de aanwijzingen op de verpakking 2 5 Verwijdering WAARSCHUWING Gevaar voor letsel of verstikking Haal de stekker uit het stopcontact Snijd het netsnoer vlak bij ...

Page 8: ...rten of de kooktijd te verlengen met 30 seconden op vol vermogen 5 Knop Stop Wissen Druk op om het apparaat uit te schakelen of kookinstellingen te verwijderen Bedieningsknop Symbool Functie Beschrijving Magnetron Om de magnetronfunctie te selecteren Grillen Om de grillfunctie te selec teren Ventilator Om de heteluchtfunctie te selecteren Combinatiekoken Om de grill en magnetron functie tegelijker...

Page 9: ...edsel ontdooien op tijd Klok Om de klok in te stellen Auto cooking Gebruik van auto cooking 3 3 Accessoires Set draaiplateau Gebruik altijd het draaiplateau om voedsel in de magnetron te bereiden Glazen plateau en wieltjes Grillrooster Gebruiken voor grillen combinatiekoken convectiekoken 4 VOORDAT U HET APPARAAT VOOR DE EERSTE KEER GEBRUIKT WAARSCHUWING Raadpleeg de hoofdstukken Veiligheid 4 1 Ee...

Page 10: ...mogelijk in stukjes van gelijke grootte Gebruik platte brede schalen of borden Gebruik geen kookgerei gemaakt van porselein keramisch materiaal of aardewerk met kleine gaatjes bijvoorbeeld op handgrepen Er kan vocht in deze openingen komen en bij het verwarmen het kookgerei laten barsten Het glazen plateau is noodzakelijk voor de werking van de magnetron Plaats het eten of de vloeistoffen op het p...

Page 11: ... met magnetronveilige af dichting 3 X Ovenschotels gemaakt van metaal d w z email gietijzer X X X Bakvormen zwarte lak of siliconen laag 3 X X X Bakplaat X X X Braadkookgerei bijv Crostino of Crunch bord X X Kant en klare maaltijden in de verpak king 3 1 Zonder zilveren gouden platinum of metalen laag versieringen 2 Zonder quartz of metalen onderdelen of glas dat metalen bevat 3 U dient de instruc...

Page 12: ...met iedere extra druk op de knop Draai om de kooktijd in stand by in te stellen Knop gewicht tijd naar links en druk daarna op om de magnetron op vol vermogen te activeren 5 5 Ontdooien U kunt uit twee ontdooiwijzen kiezen Ontdooien gewicht Ontdooien tijd Gebruik ontdooien gewicht niet voor voedsel dat meer dan 20 minuten uit de vriezer is genomen of voor ingevroren kant en klaar voedsel Om ontdoo...

Page 13: ... 600 g 100 A2 Aardappel 1 ongeveer 230 g 2 ongeveer 460 g 3 ongeveer 690 g 100 A3 Vlees 150 g 300 g 450 g 600 g 100 A4 Groente 150 g 350 g 500 g 100 Menu Bedrag Geschat percentage vermogen A5 Vis 150 g 250 g 350 g 450 g 650 g 80 A6 Pasta 50 g voeg 450 ml water toe 100 g voeg 800 ml water toe 150 g voeg 1200 ml wa ter toe 80 A7 Soep 200 g 400 g 600 g 100 A8 Cake1 475 g Voorverwar men op 160 C A9 Pi...

Page 14: ...ieltjes 7 2 Het grillrek plaatsen Plaats het grillrek op het draaiplateau 8 EXTRA FUNCTIES 8 1 Kinderslot Het kinderslot voorkomt dat de magnetron per ongeluk in werking wordt gesteld Druk gedurende 3 seconden in Er klinkt een geluidssignaal Als het kinderslot actief is toont het display de huidige tijd Druk om het kinderslot uit te schakelen gedurende 3 seconden op 9 AANWIJZINGEN EN TIPS WAARSCHU...

Page 15: ...braadstukken altijd met de vetkant omlaag Ontdooi afgedekt vlees niet want dit kan leiden tot bereiden in plaats van ontdooien Ontdooi heel gevogelte altijd met de borstkant omlaag 9 3 Meer Haal gekoeld vlees en gevogelte minstens 30 minuten voor bereiden uit de koelkast Bewaar het vlees gevogelte en groente afgedekt tot de bereiding Doe een beetje olie of vloeibare boter op de vis Alle groenten m...

Page 16: ...wijderen meng een glas water met 2 theelepels citroensap en kook gedurende 5 minuten op de hoogste magnetronstand 11 PROBLEEMOPLOSSING WAARSCHUWING Raadpleeg de hoofdstukken Veiligheid 11 1 Problemen oplossen Probleem Mogelijke oorzaak oplossing Het apparaat werkt niet Het apparaat is uitgeschakeld Schakel het apparaat in Het apparaat werkt niet De stekker zit niet in het stop contact Sluit het ap...

Page 17: ...tje Het typeplaatje bevindt zich op het apparaat Verwijder het typeplaatje niet van het apparaat Wij adviseren u om de gegevens hier te noteren Model MOD Productnummer PNC Serienummer S N 12 MONTAGE WAARSCHUWING Raadpleeg de hoofdstukken Veiligheid 12 1 Algemene informatie LET OP Blokkeer de luchtopeningen niet Als u dat wel doet kan het apparaat oververhit raken LET OP Sluit het apparaat niet aan...

Page 18: ... kans op het krijgen van een elektrische schok 12 3 De magnetron installeren 1 Controleer of de afmetingen van het meubel voldoen aan de montage afmetingen D B A C Montageafmetingen Afmetingen mm A 450 2 B 560 8 C minimum 550 Afmetingen mm D 45 2 Leg het sjabloom onderin het kastje en controleer of deze past Zo ja markeer de schroefpunten Verwijder het sjabloon en bevestig de beugel d m v de schro...

Page 19: ...en de volksgezondheid en recycleer op een correcte manier het afval van elektrische en elektronische apparaten Gooi apparaten gemarkeerd met het symbool niet weg met het huishoudelijk afval Breng het product naar het milieustation bij u in de buurt of neem contact op met de gemeente NEDERLANDS 19 D o w n l o a d e d f r o m w w w v a n d e n b o r r e b e ...

Page 20: ...dvice brochures trouble shooter service information www aeg com webselfservice Register your product for better service www registeraeg com Buy Accessories Consumables and Original spare parts for your appliance www aeg com shop CUSTOMER CARE AND SERVICE Always use original spare parts When contacting our Authorised Service Centre ensure that you have the following data available Model PNC Serial ...

Page 21: ...must not be left unsupervised in the vicinity of the appliance Keep all packaging away from children and dispose of it appropriately Keep children and pets away from the appliance when it operates or when it cools down Accessible parts are hot If the appliance has a child safety device this should be activated Children shall not carry out cleaning and user maintenance of the appliance without supe...

Page 22: ...l hazard Only a qualified person can carry out any service or repair operation that involves the removal of a cover which gives protection against exposure to microwave energy Do not operate the appliance by means of an external timer or separate remote control system Do not heat liquids and other foods in sealed containers They are liable to explode Metallic containers for food and beverages are ...

Page 23: ...liance in a clean condition could lead to deterioration of the surface that could adversely affect the life of the appliance and possibly result in a hazardous situation The temperature of accessible surfaces may be high when the appliance is operating The microwave oven shall not be placed in a cabinet unless it has been tested in a cabinet The rear surface of appliances shall be placed against a...

Page 24: ...aged mains cable Do not pull the mains cable to disconnect the appliance Always pull the mains plug 2 3 Use WARNING Risk of injury burns and electric shock or explosion Do not change the specification of this appliance Do not let the appliance stay unattended during operation Do not apply pressure on the open door Make sure that the ventilation openings are not blocked Do not use the appliance as ...

Page 25: ... cover 6 Grill 7 Turntable shaft 3 2 Control Panel 1 2 3 4 5 Function Description 1 Display Shows the settings and current time 2 Control knob Turn to set the power level 3 Weight Time knob Turn to set the cooking time or weight 4 Start 30 seconds button Press to start the appliance or increase the cooking time by 30 seconds at full power ENGLISH 25 D o w n l o a d e d f r o m w w w v a n d e n b ...

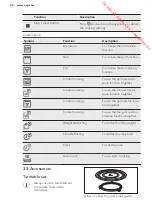
Page 26: ... Combi Cooking To use the fan and micro wave function together Combi Cooking To use the grill and fan func tion together Combi Cooking To use the fan grill and mi crowave function together Weight Defrosting To defrost food by weight Time Defrosting To defrost food by time Clock To set the clock Auto Cook To use Auto Cooking 3 3 Accessories Turntable set Always use the turntable set to prepare food...

Page 27: ... yolks first Pierce the skin or peel of potatoes tomatoes sausages and similar types of food with a fork several times before cooking so that the food does not burst For chilled or frozen food set a longer cooking time Dishes which contain sauce must be stirred from time to time Vegetables that have a firm structure such as carrots peas or cauliflower must be cooked in water Turn larger pieces of ...

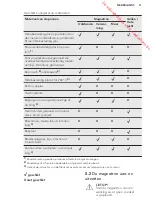
Page 28: ...e manufacturer s instructions printed on the packaging e g remove the metal cover and pierce the plastic film Suitable cookware and materials Cookware Material Microwave Grilling Convec tion Defrosting Heating Cooking Ovenproof glass and porcelain with no metal components e g Pyrex heat proof glass Non ovenproof glass and porcelain 1 X X X Glass and glass ceramic made of oven proof frost proof mat...

Page 29: ...ps automatically Close the door and press to continue cooking Use this option to check if the food is ready press When the microwave deactivates automatically an acoustic signal sounds 5 3 Power setting for Microwave function Display Percentage of full power P100 100 Display Percentage of full power P 80 80 P 50 50 P 30 30 P 10 10 5 4 Quick Start The maximum cooking time is 95 minutes To activate ...

Page 30: ... to easily cook favourite food The microwave automatically sets the optimum settings 1 Turn the Control knob clockwise to choose the desired menu 2 Press to confirm 3 Turn the Weight Time knob to set the weight of the menu 4 Press to confirm and activate the microwave Menu Amount Approxi mate per centage of power A1 Auto reheat 150 g 250 g 350 g 450 g 600 g 100 A2 Potato 1 about 230 g 2 about 460 ...

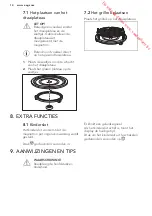
Page 31: ...microwave Never cook food directly on the glass cooking tray 1 Place the roller guide around the turntable shaft 2 Place the glass cooking tray on the roller guide 7 2 Inserting the grill rack Place the grill rack on the turntable set 8 ADDITIONAL FUNCTIONS 8 1 Child Safety Lock The Child Safety Lock prevents an accidental operation of the microwave Press and hold for 3 seconds An acoustic signal ...

Page 32: ... instead of defrosting Always defrost whole poultry breast side down 9 3 Cooking Always remove chilled meat and poultry from the refrigerator at least 30 minutes before cooking Let the meat poultry fish and vegetables stay covered after cooking Brush a little oil or melted butter over the fish All vegetables should be cooked at the full microwave power Add 30 45 ml of cold water for every 250 g of...

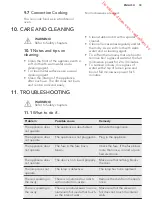
Page 33: ...nutes 11 TROUBLESHOOTING WARNING Refer to Safety chapters 11 1 What to do if Problem Possible cause Remedy The appliance does not operate The appliance is deactivated Activate the appliance The appliance does not operate The appliance is not plugged in Plug in the appliance The appliance does not operate The fuse in the fuse box is blown Check the fuse If the fuse blows more than once contact a qu...

Page 34: ...UTION Do not connect the appliance to adapters or extension leads This can cause overloading and risk of fire CAUTION The minimum installation height is 85 cm Put the microwave far away from steam hot air and water splashes If the microwave is too close to a radio or TV set it may cause interference in the received signal If you transport the microwave in the cold weather do not activate it immedi...

Page 35: ...plate on the bottom of cabinet and check if it fits If yes mark the spots for screws Remove the template and fix the bracket with the screws A in the marked spot A 3 Install the microwave If you fixed the bracket make sure it locks the back of the appliance 4 Open the door and fix the microwave to the cabinet with a screw B B ENGLISH 35 D o w n l o a d e d f r o m w w w v a n d e n b o r r e b e ...

Page 36: ... the environment and human health by recycling waste of electrical and electronic appliances Do not dispose of appliances marked with the symbol with the household waste Return the product to your local recycling facility or contact your municipal office www aeg com 36 D o w n l o a d e d f r o m w w w v a n d e n b o r r e b e ...

Page 37: ...x votre appareil Visitez notre site Internet pour Obtenir des conseils d utilisation des brochures de l aide des informations www aeg com webselfservice Enregistrez votre produit pour obtenir un meilleur service www registeraeg com Acheter des accessoires consommables et pièces de rechange d origine pour votre appareil www aeg com shop SERVICE APRÈS VENTE Utilisez toujours des pièces d origine Ava...

Page 38: ...s ont été appréhendés Ne laissez pas les enfants jouer avec l appareil Les enfants de moins de 3 ans ne doivent pas être laissés sans surveillance à proximité de l appareil Ne laissez pas les emballages à la portée des enfants et jetez les convenablement Tenez les enfants et les animaux éloignés de l appareil lorsqu il est en cours de fonctionnement ou lorsqu il refroidit Les parties accessibles s...

Page 39: ...ur Si la porte ou les joints de la porte sont endommagés vous ne devez pas utiliser l appareil tant qu il n a pas été réparé par un professionnel qualifié Si le câble d alimentation est endommagé il doit être remplacé par le fabricant un service de maintenance agréé ou un technicien qualifié afin d éviter tout danger lié à l électricité Toute opération de maintenance ou réparation nécessitant le r...

Page 40: ...lles ci peuvent entrer en ébullition après être sorties de l appareil Soyez prudent lorsque vous manipulez le récipient Mélangez ou remuez le contenu des biberons et des petits pots pour bébés puis vérifiez la température avant de nourrir votre enfant afin d éviter les brûlures Les œufs dans leur coquille et les œufs durs entiers ne doivent pas être chauffés dans l appareil car ils pourraient expl...

Page 41: ... appareil par la poignée Respectez l espacement minimal requis par rapport aux autres appareils et éléments Vérifiez que l appareil est installé sous et à proximité de structures sûres Les côtés de l appareil doivent rester à côté d appareils ou d éléments ayant la même hauteur 2 2 Branchement électrique AVERTISSEMENT Risque d incendie ou d électrocution L ensemble des branchements électriques doi...

Page 42: ...liments dans l appareil peuvent provoquer un incendie et un arc électrique lorsque la fonction micro ondes est en cours Nettoyez l appareil avec un chiffon doux humide Utilisez uniquement des produits de lavage neutres N utilisez pas de produits abrasifs de tampons à récurer de solvants ni d objets métalliques Si vous utilisez un spray pour four suivez les consignes de sécurité figurant sur l emba...

Page 43: ...marche ou augmenter le temps de cuisson de 30 secondes à pleine puissance 5 Touche Arrêter Annuler Appuyez sur pour éteindre l appareil ou supprimer les réglages de cuisson Manette de commande Symbole Fonction Description Micro ondes Pour choisir la fonction Mi cro ondes Gril Pour choisir la fonction Gril Ventilateur Pour choisir la fonction Cha leur tournante Cuisson combinée Pour utiliser les fo...

Page 44: ... heure Cuisson automatique Pour utiliser la Cuisson auto matique 3 3 Accessoires Ensemble du plateau tournant Utilisez toujours l ensemble du plateau tournant pour cuire des aliments dans le micro ondes Plateau de cuisson en verre et support à roulettes Grille Utilisez la pour faire griller des aliments cuisson combinée convection naturelle 4 AVANT LA PREMIÈRE UTILISATION AVERTISSEMENT Reportez vo...

Page 45: ...ats larges et à fond plat N utilisez pas d ustensile de cuisine en porcelaine en céramique ou en faïence dont le fond n est pas verni ou avec de petits trous par exemple sur les poignées L humidité peut s infiltrer dans ces ouvertures et fissurer le récipient une fois chauffé Le plateau de cuisson en verre est nécessaire au fonctionnement du four à micro ondes Placez les aliments ou les liquides d...

Page 46: ... de cuisson avec fermeture de sûreté pour micro ondes3 X Plats à rôtir composés de métal par exemple en émail ou en fonte X X X Moules laqués noirs ou revêtement en silicone3 X X X Plateau de cuisson X X X Ustensiles de cuisine pour dorer par exemple plat Crisp ou plateau Crunch X X Plats préparés et emballés3 1 Sans couches décorations en argent or platine ou métal 2 Sans composants en quartz ou ...

Page 47: ...chaque fois que vous appuyez sur la touche Pour régler le temps de cuisson en mode Veille tournez la Manette du poids temps vers la gauche puis appuyez sur pour démarrer le micro ondes à pleine puissance 5 5 Décongélation Vous pouvez choisir 2 modes de décongélation Décongélation selon le poids Décongélation selon la durée La décongélation selon le poids ne doit pas être utilisée avec des aliments...

Page 48: ...utomatique 150 g 250 g 350 g 450 g 600 g 100 A2 Pomme s de terre 1 environ 230 g 2 environ 460 g 3 environ 690 g 100 A3 Viande 150 g 300 g 450 g 600 g 100 Menu Montant Pourcenta ge approxi matif de puissance A4 Légumes 150 g 350 g 500 g 100 A5 Poisson 150 g 250 g 350 g 450 g 650 g 80 A6 Gratin de pâtes 50 g ajouter 450 ml d eau 100 g ajou ter 800 ml d eau 150 g ajou ter 1 200 ml d eau 80 A7 Soupe ...

Page 49: ...upport à roulettes 7 2 Installation de la grille Placez la grille sur le plateau tournant 8 FONCTIONS SUPPLÉMENTAIRES 8 1 Sécurité enfants La fonction Sécurité enfants permet d éviter une utilisation involontaire du micro ondes Maintenez la touche enfoncée pendant 3 secondes Un signal sonore retentit Lorsque la Sécurité enfants est activée l heure s affiche Pour désactiver la Sécurité enfants main...

Page 50: ...e couvrez pas la viande pour la décongeler car elle risquerait de cuire Décongelez toujours la volaille entière poitrail vers le bas 9 3 Cuisson Sortez toujours la viande et la volaille froides du réfrigérateur au moins 30 minutes avant de les cuire Après la cuisson laissez reposer la viande la volaille ou les légumes en les couvrant Huilez ou beurrez légèrement le poisson Tous les légumes doivent...

Page 51: ... pleine puissance de micro ondes pendant 2 ou 3 minutes Pour éliminer les odeurs versez 2 cuillères à café de jus de citron dans un verre d eau puis faites bouillir ce mélange à pleine puissance de micro ondes pendant 5 minutes 11 DÉPANNAGE AVERTISSEMENT Reportez vous aux chapitres concernant la sécurité 11 1 En cas d anomalie de fonctionnement Problème Cause probable Solution L appareil ne fonc t...

Page 52: ...res au service après vente figurent sur la plaque signalétique La plaque signalétique est apposée sur l appareil Ne retirez pas la plaque signalétique de l appareil Nous vous recommandons de noter ces informations ici Modèle MOD Référence du produit PNC Numéro de série S N 12 INSTALLATION AVERTISSEMENT Reportez vous aux chapitres concernant la sécurité 12 1 Informations générales ATTENTION Ne bouc...

Page 53: ...a terre réduit le risque d électrocution 12 3 Installation du micro ondes 1 Vérifiez que les dimensions du meuble respectent les distances d installation D B A C Distances d installation Dimensions mm A 450 2 B 560 8 C minimum 550 Dimensions mm D 45 2 Posez le gabarit dans le fond du meuble pour vérifier s il rentre Si oui faites une marque pour indiquer l emplacement des vis Retirez le gabarit et...

Page 54: ...tribuez à la protection de l environnement et à votre sécurité recyclez vos produits électriques et électroniques Ne jetez pas les appareils portant le symbole avec les ordures ménagères Emmenez un tel produit dans votre centre local de recyclage ou contactez vos services municipaux www aeg com 54 D o w n l o a d e d f r o m w w w v a n d e n b o r r e b e ...

Page 55: ...nen zu lernen Besuchen Sie uns auf unserer Website um Sich Anwendungshinweise Prospekte Fehlerbehebungs und Service Informationen zu holen www aeg com webselfservice Ihr Produkt für einen besseren Service zu registrieren www registeraeg com Zubehör Verbrauchsmaterial und Original Ersatzteile für Ihr Gerät zu kaufen www aeg com shop REPARATUR UND KUNDENDIENST Bitte verwenden Sie ausschließlich Orig...

Page 56: ...ändige Person beaufsichtigt werden oder in die sichere Verwendung des Geräts eingewiesen wurden und die mit dem Gerät verbundenen Gefahren verstanden haben Kinder dürfen nicht mit dem Gerät spielen Kinder unter 3 Jahren dürfen sich nicht unbeaufsichtigt in der Nähe des Geräts aufhalten Halten Sie sämtliches Verpackungsmaterial von Kindern fern und entsorgen Sie es auf angemessene Weise Halten Sie ...

Page 57: ... und ziehen Sie den Netzstecker aus der Steckdose bevor Reinigungsarbeiten durchgeführt werden Sind die Tür oder die Türdichtungen beschädigt darf das Gerät erst nach der Reparatur durch Fachpersonal in Betrieb genommen werden Wenn das Netzkabel beschädigt ist muss es vom Hersteller seinem autorisierten Kundenservice oder einer gleichermaßen qualifizierten Person ausgetauscht werden um Gefahren du...

Page 58: ...ch aus dem Gerät austritt schalten Sie das Gerät aus oder ziehen Sie den Stecker heraus und halten Sie die Tür geschlossen um Flammenbildung zu vermeiden bzw bereits vorhandene Flammen zu ersticken Das Erwärmen von Getränken in der Mikrowelle kann zu einem verzögerten Überkochen führen Seien Sie bei der Handhabung des Behälters vorsichtig Der Inhalt von Milchfläschchen und Gläsern mit Babynahrung ...

Page 59: ...ntage WARNUNG Die Montage des Geräts darf nur von einer qualifizierten Fachkraft durchgeführt werden Entfernen Sie das gesamte Verpackungsmaterial Montieren Sie ein beschädigtes Gerät nicht und benutzen Sie es nicht Halten Sie sich an die mitgelieferte Montageanleitung Seien Sie beim Umsetzen des Gerätes vorsichtig da es sehr schwer ist Tragen Sie stets Sicherheitshandschuhe und festes Schuhwerk Z...

Page 60: ...e Risiko von Schäden am Gerät Schalten Sie das Gerät immer aus und ziehen Sie den Netzstecker aus der Steckdose bevor Reinigungsarbeiten durchgeführt werden Reinigen Sie das Gerät regelmäßig um eine Verschlechterung des Oberflächenmaterials zu verhindern Es dürfen sich keine Lebensmittelspritzer oder Reste von Reinigungsmitteln auf den Türdichtflächen befinden Fett und Lebensmittelrückstände im Ge...

Page 61: ...llungen und der aktuellen Uhrzeit 2 Einstellknopf Einstellen der Leistungsstufe 3 Gewichts Zeit Einstellknopf Einstellen der Gardauer oder des Gewichts 4 Taste Start 30 Sekunden Drücken Sie um das Gerät einzuschalten oder die Gardauer um 30 Sekunden bei voller Leistung zu verlängern 5 Taste Stopp Löschen Drücken Sie zum Ausschalten des Geräts oder Löschen der Gareinstellungen DEUTSCH 61 D o w n l ...

Page 62: ...en Zur gemeinsamen Verwen dung der Grill und Heißluft funktion Kombi Garen Zur gemeinsamen Verwen dung der Heißluft Grill und Mikrowellenfunktion Auftauen nach Gewicht Auftauen von Speisen nach Gewicht Auftauen nach Zeit Auftauen von Speisen nach Zeit Uhr Einstellen der Uhr Auto Kochen Verwenden von Auto Ko chen 3 3 Zubehör Drehteller Set Verwenden Sie beim Zubereiten von Speisen in der Mikrowelle...

Page 63: ...ocknen verbrennen oder an manchen Stellen Feuer fangen Das Gerät eignet sich nicht zum Kochen von Eiern in der Schale oder zum Zubereiten von Schnecken im Schneckenhaus da diese platzen können Beim Zubereiten von Spiegeleiern zuerst den Dotter anstechen Stechen Sie Lebensmittel mit Haut oder Schale wie Kartoffeln Tomaten Würstchen oder ähnliches vor dem Garen mit einer Gabel mehrfach an damit sie ...

Page 64: ...t auftauen Bei Zimmertemperatur auftauen lassen Durch Einstellen einer höheren Mikrowellenleistung kann Obst und Gemüse ohne vorheriges Auftauen gegart werden Fertiggerichte Sie können Fertiggerichte im Gerät nur zubereiten wenn ihre Verpackung mikrowellengeeignet ist Befolgen Sie die Herstelleranweisungen auf der Verpackung z B Metalldeckel entfernen und Kunststofffolie einstechen Geeignetes Koch...

Page 65: ...lle einzuschalten Drücken Sie zum Löschen der Einstellungen Ausschalten der Mikrowelle Warten Sie bis die Mikrowelle nach Ablauf der eingestellten Gardauer automatisch ausgeschaltet wird Öffnen Sie die Tür Die Mikrowelle wird automatisch ausgeschaltet Schließen Sie die Tür und drücken Sie zum Weitergaren Mit dieser Option können Sie überprüfen ob das Gericht gar ist Drücken Sie Wenn die Mikrowelle...

Page 66: ...rsinn um die Zeit einzustellen Beim Auftauen nach Gewicht wird die Zeit automatisch eingestellt Nach ein paar Sekunden startet die Mikrowelle automatisch 3 Drücken Sie um Ihre Auswahl zu bestätigen und die Mikrowelle einzuschalten 6 AUTOMATIKPROGRAMME WARNUNG Siehe Kapitel Sicherheitshinweise 6 1 Auto Kochen Benutzen Sie diese Funktion zum einfachen Garen Ihrer Lieblingsspeisen Die Mikrowelle wähl...

Page 67: ...200 g C 4 1 Im Fall von Kuchen muss der Mikroellenofen vorgeheizt werden 7 VERWENDUNG DES ZUBEHÖRS WARNUNG Siehe Kapitel Sicherheitshinweise 7 1 Einsetzen des Drehteller Sets VORSICHT Lebensmittel nicht ohne das Drehteller Set garen Verwenden Sie ausschließlich das mit der Mikrowelle gelieferte Drehteller Set Lebensmittel niemals direkt auf dem Glasteller garen 1 Legen Sie die Rollenführung um die...

Page 68: ...eiß oder gegart Längere Garzeit einstellen oder höhere Leistung wählen Beachten Sie dass für die Zubereitung größerer Gargutmengen eine längere Gardauer erforderlich ist Nach Ablauf der Gardauer ist die Spei se außen überhitzt aber im Inneren noch nicht gar Stellen Sie das nächste Mal eine niedrigere Leis tung und längere Zeit ein Flüssigkeiten nach der Hälfte der Zeit umrühren z B Suppe Reis wird...

Page 69: ...ausgeschaltet 10 REINIGUNG UND PFLEGE WARNUNG Siehe Kapitel Sicherheitshinweise 10 1 Hinweise und Tipps zur Reinigung Feuchten Sie ein weiches Tuch mit warmem Wasser und etwas Reinigungsmittel an und reinigen Sie damit die Vorderseite des Geräts Reinigen Sie die Metalloberflächen mit einem handelsüblichen Reinigungsmittel Reinigen Sie den Innenraum des Geräts nach jedem Gebrauch So brennen Verschm...

Page 70: ... Gerät Im Garraum bilden sich Funken Im Garraum befindet sich ein Metallspieß oder Alufolie die die Innenwände berührt Stellen Sie sicher dass der Me tallspieß oder die Folie nicht die Innenwände berühren Das Drehteller Set macht Kratz oder Mahlgeräusche Unter dem Glasteller befinden sich Gegenstände oder Schmutz Reinigen Sie die Fläche unter dem Glasteller Das Gerät funktio niert ohne ersichtli c...

Page 71: ... von einer qualifizierten Fachkraft vorgenommen werden Der Hersteller haftet nicht für Schäden die aufgrund der Nichtbeachtung der Sicherheitsvorkehrungen des Kapitels Sicherheitshinweise entstehen Die Mikrowelle wird mit einem Netzkabel mit Netzstecker geliefert Das Kabel besitzt einen Erdungsleiter mit einem Erdungsstecker Der Stecker muss in eine ordnungsgemäß montierte und geerdete Steckdose g...

Page 72: ...TIPPS Recyceln Sie Materialien mit dem Symbol Entsorgen Sie die Verpackung in den entsprechenden Recyclingbehältern Recyceln Sie zum Umwelt und Gesundheitsschutz elektrische und elektronische Geräte Entsorgen Sie Geräte mit diesem Symbol nicht mit dem Hausmüll Bringen Sie das Gerät zu Ihrer örtlichen Sammelstelle oder wenden Sie sich an Ihr Gemeindeamt www aeg com 72 D o w n l o a d e d f r o m w ...

Page 73: ...DEUTSCH 73 D o w n l o a d e d f r o m w w w v a n d e n b o r r e b e ...

Page 74: ...www aeg com 74 D o w n l o a d e d f r o m w w w v a n d e n b o r r e b e ...

Page 75: ...DEUTSCH 75 D o w n l o a d e d f r o m w w w v a n d e n b o r r e b e ...

Page 76: ...www aeg com shop 867300848 A 232019 D o w n l o a d e d f r o m w w w v a n d e n b o r r e b e ...

Reviews: