background image

The appliance must be connected to the water mains

using the new supplied hose sets, or other new hose

sets supplied by the Authorised Service Centre.

Old hose sets must not be reused.

If the mains power supply cable is damaged, it must

be replaced by the manufacturer, its Authorised

Service Centre or similarly qualified persons to avoid

an electrical hazard.

Before any maintenance operation, deactivate the

appliance and disconnect the mains plug from the

socket.

Do not use high pressure water sprays and/or steam

to clean the appliance.

Clean the appliance with a moist cloth. Use only

neutral, detergents. Do not use abrasive products,

abrasive cleaning pads, solvents or metal objects.

2. 

SAFETY INSTRUCTIONS

2.1 

Installation

• Remove all the packaging and the

transit bolts.

• Keep the transit bolts in a safe place.

If the appliance is to be moved in

future they must be reattached to lock

the drum to prevent internal damage.

• Always take care when moving the

appliance as it is heavy. Always use

safety gloves and enclosed footwear.

• Do not install or use a damaged

appliance.

• Follow the installation instruction

supplied with the appliance.

• Do not install or use the appliance

where the temperature can be less

than 0°C or where it is exposed to the

weather.

• The floor area where the appliance is

to be installed must be flat, stable,

heat resistant and clean.

• Make sure that there is air circulation

between the appliance and the floor.

• Adjust the feet to have the necessary

space between the appliance and the

flooring.

• Do not install the appliance where the

appliance door cannot be fully

opened.

2.2 

Electrical connection

• The appliance must be earthed.

• Always use a correctly installed

shockproof socket.

• Make sure that the electrical

information on the rating plate agrees

with the power supply. If not, contact

an electrician.

• Do not use multi-plug adapters and

extension cables.

• Make sure not to cause damage to

the mains plug and to the mains

cable. Should the mains cable need

to be replaced, this must be carried

out by our Authorised Service Centre.

• Connect the mains plug to the mains

socket only at the end of the

installation. Make sure that there is

access to the mains plug after the

installation.

• Do not touch the mains cable or the

mains plug with wet hands.

www.aeg.com

4

Summary of Contents for LAVAMAT 69490FL

Page 1: ...EN User Manual Washing Machine LAVAMAT 69490FL LAVAMAT 69490VFL ...

Page 2: ...n ordinary appliances Please spend a few minutes reading to get the very best from it Visit our website for Get usage advice brochures trouble shooter service information www aeg com webselfservice Register your product for better service www registeraeg com Buy Accessories Consumables and Original spare parts for your appliance www aeg com shop CUSTOMER CARE AND SERVICE Always use original spare ...

Page 3: ...o not let children play with the appliance Children aged 3 years and under must be kept away from this appliance when it is in operation at all times Keep all packaging away from children and dispose of it appropriately Keep detergents away from children Keep children and pets away from the appliance door when it is open Children shall not carry out cleaning and user maintenance of the appliance w...

Page 4: ...install or use a damaged appliance Follow the installation instruction supplied with the appliance Do not install or use the appliance where the temperature can be less than 0 C or where it is exposed to the weather The floor area where the appliance is to be installed must be flat stable heat resistant and clean Make sure that there is air circulation between the appliance and the floor Adjust th...

Page 5: ...y instructions on the detergent packaging Do not put flammable products or items that are wet with flammable products in near or on the appliance Make sure that all metal objects are removed from the laundry Do not put a container to collect possible water leakage under the appliance Contact the Authorised Service Centre to ensure which accessories can be used Do not touch the glass door while a p...

Page 6: ... placing a waterproof wooden panel at least 15 mm thick under the appliance It should be screwed to at least 2 floor beams and should extend beyond the front feet If possible install the appliance where the floor is more stable 4 CONTROL PANEL 4 1 Control panel description Finish In 1400 1200 800 Cotton Cotton Eco Synthetics Delicates Wool Handwash 30 Min 3Kg Mix 20 Easy Iron Prewash Quick Super Q...

Page 7: ...erature range Maximum load Maximum spin speed Programme description Type of load and soil level Cotton 90 C Cold 9 kg 1400 rpm White cotton and coloured cotton Normal soil and light soil Cotton Eco1 60 C 40 C 9 kg 1400 rpm White cotton and fast coloured cotton Normal soil The energy consumption decreases and the time of the washing programme is extended Synthetics 60 C Cold 3 5 kg 1200 rpm Synthet...

Page 8: ...umption for washing normally soiled cotton laundry The water temperature of the washing phase may differ from the temperature declared for the selected programme 2 During this cycle the drum rotates slowly to ensure a gentle wash It can seem that the drum doesn t rotate or doesn t rotate properly but this is normal for this programme 3 No temperature indicator is on 4 To reduce creasing this cycle...

Page 9: ...f the programme the display shows the programme dura tion for the maximum load capacity During the washing phase the programme duration is automatically cal culated and can be greatly reduced if the laundry load is lower than the maximum load capacity e g Cotton 60 C maximum load capacity 9 kg the programme duration exceeds 2 hours actual load 1 kg the pro gramme duration will be less than 1 hour ...

Page 10: ...n you can change the default spin speed The indicator of the set speed comes on Additional spin options Set this option to deactivate all spin phases Only the drain phase is available The related indicator comes on Set this option for very delicate fabrics The rinses phase uses more water for some washing programmes Set this option to prevent the laundry creases The related indicator comes on Ther...

Page 11: ...the button Finish In is on 7 9 Extra Rinse With this option you can add some rinses to a washing programme Use this option for persons allergic to detergents and in areas where the water is soft The related indicator comes on 1 8 SETTINGS 8 1 Permanent Extra Rinse With this option you can permanently have an extra rinse when you set a new programme To activate deactivate this option touch the butt...

Page 12: ...aundry 1 Open the appliance door 2 Put the laundry in the drum one item at a time 3 Shake the items before you put them in the appliance Make sure not to put too much laundry in the drum 4 Close the door firmly CAUTION Make sure that no laundry stays between the seal and the door There is a risk of water leakage or damage to the laundry 10 2 Using detergent and additives 1 Measure out the detergen...

Page 13: ...n you use the liquid detergent Do not use gelatinous or thick liquid detergents Do not put more liquid then the maximum level Do not set the prewash option Do not set the delay start or Finish in option 10 5 Activating the appliance Press and hold for a couple of seconds the On Off button to activate or deactivate the appliance A tune sounds when the appliance is activated The display shows the wo...

Page 14: ...e appliance starts the countdown When the countdown is completed the programme starts automatically You can cancel or change the set of the Finish In option before you touch the button Start Pause After touching the button Start Pause you can only cancel the Finish In option To cancel the Finish In option a Touch the button Start Pause to set the appliance to pause The indicator of button Start Pa...

Page 15: ...k indicator is on The indicator of button Start Pause flashes The door stays locked You must drain the water to open the door Draining the water 1 To drain the water Touch the button Start Pause The appliance drains the water and spins with the maximum spin speed for selected washing programme Alternatively touch the button Spin to change the spin speed and then touch the button Start Pause The ap...

Page 16: ...id detergents preferably for low temperature wash programmes 60 C max for all types of fabric or special for woollens only Do not mix different types of detergents To help the environment do not use more than the correct quantity of detergent Obey the instructions that you find on the on packaging of these products Use the correct products for the type and colour of the fabric the programme temper...

Page 17: ...es use only special products for washing machines Do this separately from the laundry wash Always obey the instructions that you find on the packaging of the product 12 3 Maintenance wash With the low temperature programmes it is possible that some detergent stays in the drum Perform a maintenance wash regularly To do this Remove all laundry from the drum Select the cotton programme with the highe...

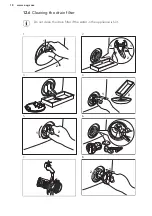
Page 18: ...12 6 Cleaning the drain filter Do not clean the drain filter if the water in the appliance is hot 1 2 1 2 2 1 1 3 4 1 2 5 1 2 6 7 8 2 1 www aeg com 18 ...

Page 19: ...ecessary clean the pump When you drain the water with the emergency drain procedure you must activate the drain system again 1 Put 2 litres of water in the main wash compartment of the detergent dispenser 2 Start the programme to drain the water 12 9 Frost precautions If the appliance is installed in an area where the temperature can be less than 0 C remove the remaining water from the inlet hose ...

Page 20: ...ot start or it stops during operation First try to find a solution to the problem refer to the table If the problem persists contact the Authorised Service Centre With some problems the acoustic signals operate and the display shows an alarm code The appliance does not fill with water properly The appliance does not drain the water The appliance door is open or not closed correctly Please check th...

Page 21: ... inlet hose and the filter of the valve are not clogged Refer to Care and cleaning Make sure that the inlet hose has no kinks or bends Make sure that the connection of the water inlet hose is cor rect The appliance does not fill with water and drain immediately Make sure that the drain hose is in the correct position The hose may be too low The appliance does not drain the water Make sure that the...

Page 22: ... Refer to Installation Add more laundry in the drum The load may be too small The cycle is shorter than the time displayed The appliance calculates a new time according to the laundry load See the Consumption Values chapter The cycle is longer than the time displayed An unbalanced laundry load increases the duration time This is a normal behaviour of the appliance The washing results are not satis...

Page 23: ...ressure is not lower than 0 05 MPa 0 5 bar If you cannot connect the water inlet hose to the cold water tap of the primary hydraulic system connect it to your domestic cold water storage system Make sure not to exceed a distance of 5 02 m 16 5 ft between the appliance inlet hose and the bottom of the water storage tank 2 Connect the water inlet hose to a water tap with a 3 4 thread 15 ENVIRONMENTA...

Page 24: ...www aeg com shop 192968041 A 502015 ...

Reviews: