background image

Problem

Possible solution

The spin phase does

not operate or the

washing cycle lasts

longer than usual.

• Make sure that the drain filter is not clogged. Clean the filter, if

necessary. Refer to "Care and cleaning".

• Adjust manually the items in the tub and start the spin phase

again. This problem may be caused by balance problems.

There is water on the

floor.

• Make sure that the couplings of the water hoses are tight and

there is not water leakages.

• Make sure that the water inlet hose and the drain hose have

no damages.

• Make sure you use the correct detergent and the correct

quantity of it.

You cannot open the

appliance door.

• Make sure that a washing programme that ends with water in

tub, has not been selected.

• Make sure that the washing programme is finished.

• Make sure that the appliance receives electrical power.

• This problem may be caused by a failure of the appliance.

Contact the Authorised Service Centre.

If you need to open the door, please read carefully "Emergen‐

cy door opening".

The appliance makes

an unusual noise and

vibrates.

• Make sure the levelling of the appliance is correct. Refer to

"Installation instruction".

• Make sure that the packaging and/or the transit bolts are re‐

moved. Refer to "Installation instruction".

• Add more laundry in the drum. The load may be too small.

The programme dura‐

tion increases or de‐

creases during pro‐

gramme execution.

• The ProSense System is able to adjust the programme dura‐

tion according to the type and the laundry load size. Refer to

"The ProSense System load detection" in "Daily Use" chapter.

The washing results

are not satisfactory.

• Increase the detergent quantity or use a different detergent.

• Use special products to remove the stubborn stains before

you wash the laundry.

• Make sure that you set the correct temperature.

• Decrease the laundry load.

Too much foam in the

drum during the wash‐

ing cycle.

• Reduce the quantity of detergent.

After the washing cy‐

cle, there are some

detergent residues in

the dispenser drawer.

• Make sure that the flap is in the correct position (UP for pow‐

der detergent - DOWN for liquid detergent).

• Make sure you have used the detergent dispenser according

the indications given in this user manual.

The appliance does

not dry or does not dry

correctly.

• Turn the water tap on.

• Make sure the drain filter is not clogged.

• Reduce the laundry load.

• Make sure you have set the correct cycle. if necessary, set

again a short drying time.

www.aeg.com

44

Summary of Contents for L7WBG741R

Page 1: ...USER MANUAL EN User Manual Washer Dryer L7WBG741R ...

Page 2: ...chnologies that help make life simpler features you might not find on ordinary appliances Please spend a few minutes reading to get the very best from it Visit our website to Get usage advice brochures trouble shooter service and repair information www aeg com support Register your product for better service www registeraeg com Buy Accessories Consumables and Original spare parts for your applianc...

Page 3: ... have been given supervision or instruction concerning the use of the appliance in a safe way and understand the hazards involved Children between 3 and 8 years of age and persons with very extensive and complex disabilities shall be kept away from the appliance unless continuously supervised Children of less than 3 years of age should be kept away from the appliance unless continuously supervised...

Page 4: ... plug to the mains socket only at the end of the installation process Make sure that the mains plug is accessible after installation The ventilation opening in the base must not be covered by a carpet mat or any floor covering CAUTION The appliance must not be supplied through an external switching device such as a timer or connected to a circuit that is regularly switched on and off by a utility ...

Page 5: ... extra amount of detergent before being dried in the washer dryer Do not use the appliance if items have been soiled with industrial chemicals Do not dry unwashed items in the wash dryer Items such as foam rubber latex foam shower caps waterproof textiles and rubber backed articles and clothes or pillows fitted with foam rubber pads should not be dried in the washer dryer Fabric softeners or simil...

Page 6: ...he appliance as it is heavy Always use safety gloves and enclosed footwear Do not install or use a damaged appliance Do not install the appliance where the appliance door cannot be fully opened Adjust the feet to have the necessary space between the appliance and the flooring When the appliance is in its permanent position check if it is levelled correctly with the aid of a spirit level If it is n...

Page 7: ...that self repair or non professional repair can have safety consequences and might void the guarantee The following spare parts will be available for 10 years after the model has been discontinued motor and motor brushes transmission between motor and drum pumps shock absorbers and springs washing drum drum spider and related ball bearings heaters and heating elements including heat pumps piping a...

Page 8: ... Inlet hose connection 10 Mains cable 11 Transit bolts 12 Hose support 00000000 00A Mod xxxxxxxxx 000V 00Hz 0000 W 910000000 00 A B C Prod No D The rating plate reports the model name A product number B electrical ratings C and serial number D 4 TECHNICAL DATA Dimension Width Height Total depth 59 7 cm 84 7 cm 57 5 cm Electrical connection Voltage Overall power Fuse Frequency 230 240 V 2200 W 13 A...

Page 9: ...ld water storage system Make sure not to exceed a distance of 5 02 m 16 5 ft between the appliance inlet hose and the bottom of the water storage tank 5 ACCESSORIES 5 1 Available in www aeg com shop or from authorised dealer Read carefully the instructions supplied with the accessory Only appropriate accessories approved by AEG ensure the safety standards of the appliance If unapproved parts are u...

Page 10: ...s rear side 6 Put the front polystyrene packaging element on the floor under the appliance Make sure not to damage the hoses 7 Remove the polystyrene protection from the bottom 1 2 8 Pull up the appliance in vertical position 9 Remove the power supply cable and the drain hose from the hose holders It is possible to see water flowing from the drain hose This is due to the testing with water of the ...

Page 11: ...sible install the appliance where the floor is more stable 6 3 Positioning and levelling 1 Install the appliance on a flat hard floor Make sure that carpets do not stop the air circulation below the appliance Make sure that the appliance does not touch the wall or other units 2 Loosen or tighten the feet to adjust the level WARNING Do not put cardboard wood or equivalent materials below the applia...

Page 12: ...hose if the inlet hose is too short Contact the service centre for the replacement of the inlet hose 6 5 Water drainage The drain hose should be positioned at a height of not less than 60 cm and not more than 100 cm from the floor You can extend the drain hose to maximum 400 cm Contact the authorized service centre for the other drain hose and the extension It is possible to connect the drain hose...

Page 13: ...got and tighten it with a clamp Refer to the illustration Make sure that the drain hose makes a loop to prevent particles going into the appliance from the sink 6 Position the hose directly to a built in drain pipe in the room wall and tighten it with a clamp 6 6 Electrical connection At the end of installation you can connect the mains plug to the mains socket The rating plate and the Technical D...

Page 14: ...ry Wash Stains Prewash Mode Temp Spin Auto Drying Time Drying On Off Quick Delay Start Start Pause Stains Prewash 2 3 6 12 11 10 8 1 4 5 7 9 1 Programme dial 2 Display 3 Drying time touch button Time Drying 4 Drying level touch button Auto Drying 5 Washing and drying mode touch button Mode Wash Dry 6 Start and pause touch button Start Pause 7 Option touch button Stains Prewash 8 Delay Start touch ...

Page 15: ...g and or drying phase Delay time e g or Cycle end Warning code Washing phase indicator It flashes during prewash and wash phase Rinsing phase indicator It flashes during rinse phase The permanent Extra Rinse option one additional rinse two additional rinses Spinning and draining phase indicator It flashes during spin and drain phase Steam phase indicator Drying phase indicator Child safety lock in...

Page 16: ... temperature Touch this button repeatedly until the desired temperature value appears on the display When the display shows the indicators and the appliance does not heat the water 8 5 Spin When you set a programme the appliance automatically sets the maximum spin speed allowed Touch repeatedly this button to Decrease the spin speed The display shows only the spin speeds available for the set prog...

Page 17: ...on is set the led above the button is on This option can also be used to shorten the Steam programme duration 8 9 Time Drying Touch this button to set the time that suits the fabrics you have to dry refer to Timed drying table The display shows the set value Each time you touch this button the time value increases by 5 minutes You cannot set all time values for different types of fabrics 8 10 Auto...

Page 18: ...g White cotton and fast coloured cotton Cottons 40 C 95 C Cold 1400 rpm 1400 rpm 400 rpm 7 kg White cotton and coloured cotton Nor mally heavily and lightly soiled items Synthetics 40 C 60 C Cold 1200 rpm 1200 rpm 400 rpm 3 kg Synthetic items or mixed fabric items Normally soiled items Delicates 30 C 40 C Cold 1200 rpm 1200 rpm 400 rpm 2 kg Delicate fabrics such as acrylics viscose and mixed fabri...

Page 19: ... sport fabrics waterproof and breathable jackets shell jackets with a removable fleece or inner insulation By performing a combined wash and dry programme the drying phase also acts as wa ter repellent restorer Make sure that the garment care label permits tumble drying NonStop 60min 30 C 40 C 30 C 1200 rpm 1200 rpm 1 kg Complete programme composed of a wash ing phase and of a drying phase for a s...

Page 20: ...move stains by washing or using localized stain removal Steam programmes do not perform any hygienic cycle Do not set a Steam programme with these types of items Items to be washed at a temperature low er than 40 C Items where it is not specified on the care label as being suitable for tumble drying Items with label Dry clean only Rinse 1400 rpm 1400 rpm 400 rpm 7 kg To rinse and spin the laundry ...

Page 21: ...s programme at default temperature and spin speed in washing and drying mode with rated capacity 4 kg and with Cupboard dry level performs the wash and dry cycle able to clean normally soiled cotton laundry declared to be washable at 40 C or 60 C together in the same cycle and after drying phase the laundry can be immediately stored in a cupboard 4 This programme is the drying reference programme ...

Page 22: ...ater 2 This option is not available with temperature lower than 40 C 3 If you set the shortest duration we recommend that you decrease the load size It is possible to fully load the appliance however the washing results can be less satisfactory 4 Iron Dry is not available with this programme Suitable detergents for each programme Programme Universal powder1 Liquid Uni versal Liquid for coloureds D...

Page 23: ...d by the manufacturer of this washing machine Follow the garment care label for drying and other laundry instructions M1664 The wool drying cycle of this machine has been approved by The Woolmark Company for the drying of wool garments labelled as hand wash provided that the garments are dried according to the instructions issued by the manufacturer of this machine Follow the garment care label fo...

Page 24: ...s waterproof and breathable jackets shell jackets up to 2 kg Iron Dry Suitable for ironing Cottons and Linen sheets tablecloths shirts etc up to 4 kg 9 4 Timed drying Dryness Level Type of fabric Load kg Spin spee d rpm Suggested duration mins Extra Dry For towelling materials Cottons and Linen bathrobes bath towels etc 4 1400 190 210 2 1400 105 120 1 1400 60 70 Cupboard Dry For items to be stored...

Page 25: ...his option you can prevent children from playing with the control panel To activate deactivate this option touch the Spin and the Stains Prewash buttons simultaneously until the indicator comes on goes off on the display You can activate this option After you touch the Start Pause button all the buttons and the programme dial are deactivated except On Off button Before you touch the Start Pause bu...

Page 26: ...tres of water into the detergent compartment marked by This action activates the drain system 4 Pour a small quantity of detergent into the compartment marked by 5 Set and start a programme for cotton at the highest temperature without any laundry in the drum This removes all possible dirt from the drum and the tub 12 DAILY USE WASHING ONLY WARNING Refer to Safety chapters 12 1 Activating the appl...

Page 27: ...imum level for quantity of liquid additives Flap for powder or liquid detergent Always follow the instructions that you find on the packaging of the detergent products but we recommend that you do not exceed the maximum indicated level This quantity will however guarantee the best washing results After a washing cycle if necessary remove any detergent residue from the detergent dispenser 12 4 Chec...

Page 28: ...ed set one or more options by touching the related buttons The related indicators come on in the display and the given information changes accordingly To perform washing only make sure that only the Wash indicator is on above the Mode button In case a selection is not possible no indicator comes on and an acoustic signal sounds 12 6 Starting a programme Touch the Start Pause button to start the pr...

Page 29: ...er filling starts At the end of the load detection in case of drum overload the indicator is flashing in the display In this case for 30 seconds it is possible to pause the appliance and remove the exceeding garments Once removed the exceeding garments touch the Start Pause button to start the programme again The ProSense phase can be repeated up to three times see point 1 Important If the laundry...

Page 30: ...tinues 4 The door can be opened when the programme is complete or set Spin Drain programme and than press Start Pause button 12 13 End of the programme When the programme has finished the appliance stops automatically The acoustic signals operate if they are active In the display all washing phase indicators become steady and the time area shows The indicator of the Start Pause button goes off The...

Page 31: ... the laundry one item at a time 3 Put the detergent and the additives in the appropriate compartment 4 Turn the programme dial to the washing programme The display shows the default temperature and spin If necessary change them according to your laundry The display also shows the maximum recommended load for washing phase 5 Set the desired options if there are available 6 Touch the Mode button onc...

Page 32: ... to deactivate the appliance After some minutes from the end of the programme the energy saving function deactivates the appliance automatically 1 Remove the laundry from the appliance 2 Make sure that the drum is empty After drying phase clean the drum the seal and the inside of the door with a wet cloth 14 DAILY USE DRYING ONLY WARNING Refer to Safety chapters This appliance is an automatic wash...

Page 33: ... comes on The indicator of button Start Pause goes off The door locked goes off Press the button On Off for some seconds to deactivate the appliance After some minutes from the end of the programme the energy saving function deactivates the appliance automatically 1 Remove the laundry from the appliance 2 Make sure that the drum is empty After drying phase clean the drum the seal and the inside of...

Page 34: ...leading to excessive vibration If this occurs a interrupt the programme and open the door refer to Daily Use chapter b manually redistribute the load so that the items are spaced evenly around the tub c press the Start Pause button The spin phase continues Button up pillowcases close zippers hooks and poppers Tie up belts cords shoelaces ribbons and any other loose elements Do not wash laundry wit...

Page 35: ...ause sudsing reduced washing effect inadequate rinsing a greater impact for the environment 16 4 Ecological hints To save water energy and to help protect the environment we recommend that you follow these tips Normally soiled laundry may be washed without prewash in order to save detergent water and time the environment is protected too Loading the appliance to the maximum capacity indicated for ...

Page 36: ...age do not overdry the laundry 16 11 General Tips Refer to the Drying programmes table to find the average drying times Experience will help you to dry the laundry better Take note of the duration of the cycles done before To avoid the static charge at the end of the drying cycle 1 Use fabric conditioner in the washing cycle 2 Use special fabric conditioner for tumble dryers When the drying progra...

Page 37: ...t 17 4 Descaling If the water hardness in your area is high or moderate we recommend that you use a water descaling product for washing machines Regularly examine the drum to check for limescale The regular detergents already contain water softening agents but we recommend to run a cycle with empty drum and a descaling product occasionally Always follow the instructions that you find on the packag...

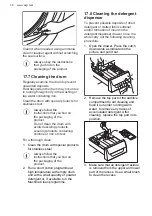
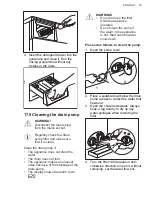
Page 38: ...instructions that you find on the packaging of the product 2 Run a short cotton programme at high temperature with empty drum and with a small quantity of powder detergent or if available run the Machine Clean programme 17 8 Cleaning the detergent dispenser To prevent possible deposits of dried detergent or clotted fabric softener and or formation of mould in the detergent dispenser drawer once in...

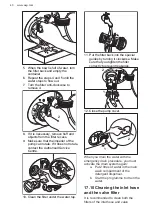
Page 39: ...cause of the blockage of the drain pump The display shows the alarm code WARNING Do not remove the filter while the appliance operates Do not clean the pump if the water in the appliance is hot Wait until the water cools down Proceed as follows to clean the pump 1 Open the pump cover 1 2 2 Place a suitable bowl below the drain pump access to collect the water that flows out 3 Open the chute downwa...

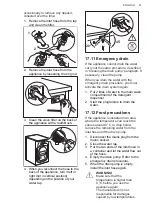
Page 40: ... 10 Clean the filter under the water tap 11 Put the filter back into the special guides by turning it clockwise Make sure that you tighten the filter correctly to prevent leakages 2 1 12 Close the pump cover 2 1 When you drain the water with the emergency drain procedure you must activate the drain system again a Put 2 litres of water in the main wash compartment of the detergent dispenser b Start...

Page 41: ...n procedure you must activate the drain system again 1 Put 2 litres of water in the main wash compartment of the detergent dispenser 2 Start the programme to drain the water 17 12 Frost precautions If the appliance is installed in an area where the temperature can reach the values around 0 C or drop below remove the remaining water from the inlet hose and the drain pump 1 Disconnect the mains plug...

Page 42: ... keep pressed the door while touching the Start Pause button until the indicator stops flashing see the picture below Problem Possible solution The appliance does not fill with water prop erly Make sure that the water tap is open Make sure that the pressure of the water supply is not too low For this information contact your local water authority Make sure that the water tap is not clogged Make su...

Page 43: ...e The anti flood device is on Disconnect the appliance and close the water tap Contact the Authorised Service Centre If the display shows other alarm codes deactivate and activate the appliance If the problem continues contact the Authorised Service Centre In case of different problem with the washing machine check the table below for possible solutions Problem Possible solution The programme does...

Page 44: ...tallation instruction Make sure that the packaging and or the transit bolts are re moved Refer to Installation instruction Add more laundry in the drum The load may be too small The programme dura tion increases or de creases during pro gramme execution The ProSense System is able to adjust the programme dura tion according to the type and the laundry load size Refer to The ProSense System load de...

Page 45: ...ower is restored If the door remains locked in case of failure it is possible to open it using the emergency unlock function Before opening the door CAUTION Risk of burns Make sure that the water temperature is not too high and the laundry is not hot If necessary wait until they cool down CAUTION Risk of injury Make sure that the drum is not rotating If necessary wait until the drum stops rotating...

Page 46: ...of the appliance in the EU EPREL database Keep the energy label for reference together with the user manual and all other documents provided with this appliance It is also possible to find the same information in EPREL using the link https eprel ec europa eu and the model name and product number that you find on the rating plate of the appliance Refer to Product description chapter for the positio...

Page 47: ...Cupboard dry level kg kWh Litres h mm C rpm1 Full load 4 3 215 68 6 30 0 37 1351 Half load 2 1 825 48 5 05 0 31 1351 1 Maximum spin speed 19 4 According to 96 60 EC Directive Cottons energy saving pro gramme Load kg Energy consump tion kWh Water con sumption litres Approxi mate pro gramme du ration mi nutes Eco 40 60 at 60 C 7 0 59 52 262 19 5 Common programmes Washing only These values are indica...

Page 48: ...e for lightly soiled laundry 19 6 Common programmes Wash and dry These values are indicative only Programme kg kWh Litres h mm C rpm1 Synthetics 40 C 3 2 150 75 4 25 1 40 1200 1 Reference indicator of the spin speed 20 ENVIRONMENTAL CONCERNS Recycle materials with the symbol Put the packaging in relevant containers to recycle it Help protect the environment and human health by recycling waste of e...

Page 49: ......

Page 50: ......

Page 51: ......

Page 52: ...www aeg com shop 157024421 A 262020 ...

Reviews: