background image

27

D
GR
NL
F

GB

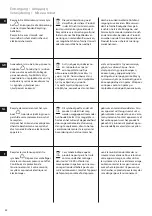
Other functions

A

D

A

B

C

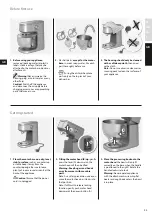
1.  Attachment hub: 

The appliance 

comes with a built in multipurpose 
attachment hub. You can remove the 
attachment cover (A) by pressing the 
attachment knob (D) upwards. It is 
possible to purchase meat mincer, 
pasta accessories and vegetable 
shredder as additional accessories.


Kindly see www.electrolux.com for 
more information.

2.  Adjusting the tool shaft:


The appliance is adjusted at the 
factory so that the attachment 
clears the bottom of the bowl. If the 
attachment hits the bottom of the 
bowl or is too far away from the sides, 
you can adjust it correctly.  

See 3 for further instructions.


Note: Make sure the attachment is as 
close to the bottom of the bowl as 
possible for best results.

3. 

Release the nut on the shaft of the 
tool.

 If the tool scrapes the bottom 

of the bowl: 

Loosen the nut (A), 

screw shaft (B) downward into the 
tool. Fasten the nut (A).

 If the tool is 

to far away from the sides/bottom 

of the bowl: 

Screw the shaft (B) 

upwards. Fasten the nut (A).

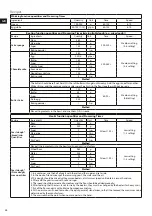
Cleaning and care 

1.  Switch the appliance off,

 remove 

the plug from the wall socket and 
wait until the tools have stopped 
completely.


Warning!

 Never immerse the 

housing, plug, or cord in water or any 

other fluid.

3.  The housing should only be cleaned 

with a soft damp cloth

, then dried 

with a cloth. 

Note:

 Do not use abrasive cleansers or 

scouring pads to clean the surfaces of 

your appliance.


Store the power cord in the cord 
storage (manual rewind) - push the 
cord inwards into the hole on the rear 
of the appliance.

2. 

Wash all parts, 

except for the motor 

base

, in warm soapy water. Dry each 

part thoroughly before use. 


 If using the dishwasher, place 

parts only on the top rack of your 

dishwasher.

  Note: The bowl lid* and bowl cover* 

are not dishwasher safe.

Summary of Contents for KM7 Series

Page 1: ...INSTRUCTION BOOK KM7xxx Kitchen Machine GB INSTRUCTION BOOK DE GEBRAUCHSANWEISUNG GR ΕΓΧΕΙΡΊΔΙΟ ΟΔΗΓΙΏΝ NL GEBRUIKSAANWIJZING FR MODE D EMPLOI ...

Page 2: ...22 FRANÇAIS 3 22 FOR PERFECT RESULTS Thank you for choosing this AEG product We have created it to give you impeccable performance for many years with innovative technologies that help make life simpler features you might not find on ordi nary appliances Please spend a few minutes reading to get the very best from it CUSTOMER CARE AND SERVICE When contacting Service ensure that you have the follow...

Page 3: ...met zachte rubberen spatel voor het mengen van vloeibare ingrediënten Q Metalen platte klopper voor het mengen van cakebeslag koek en taartdeeg R Deeghaak voor het kneden van deeg S Komdeksel Onderdelen A Κεφαλή μοτέρ με δυνατότητα κλίσης B Επιλογέας ταχύτητας C Περίβλημα D Μοχλός ασφάλισης κλίσης κεφαλής E Φωτισμός εργασίας F Κάλυμμα εξαρτημάτων G Κουμπί για άνοιγμα του καλύμματος εξαρτημάτων H Υ...

Page 4: ...nWasser oder andere Flüssigkeiten Das Kabel nicht über die Kante desTischs oder der Arbeitsfläche hängen lassen Das Kabel darf nicht mit einer heißen Fläche einschließlich Ofen in Kontakt kommen Niemals Zubehör oderTeile anderer Hersteller die nicht empfohlen oder verkauft werden verwenden Dies könnte zuVerletzungen führen Vergewissern Sie sich vor dem Auseinanderbauen und der Reinigung dass der M...

Page 5: ... Μην αφήνετε το καλώδιο να κρέμεται από την άκρη τραπεζιού ή πάγκου μην αφήνετε το καλώδιο να έρχεται σε επαφή με ζεστές επιφάνειες συμπεριλαμβανομένης της μονάδας εστιών μαγειρέματος Μην χρησιμοποιείτε ποτέ εξαρτήματα ή ανταλλακτικά από άλλους κατασκευαστές που δεν συνιστούνται ή πωλούνται Μπορεί να προκληθεί κίνδυνος τραυματισμού ατόμων Βεβαιωθείτε ότι το μοτέρ έχει σταματήσει τελείως πριν την α...

Page 6: ...t het snoer niet over de rand van een tafel of werkblad hangen en zorg dat het snoer niet in contact komt met een heet oppervlak inclusief het fornuis Gebruik nooit accessoires of onderdelen van andere fabrikanten die niet door ons worden aanbevolen of verkocht dit brengt het risico van persoonlijk letsel met zich mee Controleer of de motor volledig is gestopt voordat u het apparaat demonteert en ...

Page 7: ...l appareil soncordonousaprisedansl eaunidansaucunautreliquide Nelaissezpaslecordond alimentationdépasserduborddelatableouducomptoir Nelemettez pasencontactavecunesurfacechaude notammentsurunecuisinière N utilisezjamaisd accessoiresoupiècesfaitesparunautrefabriquantquin estpasrecommandéou vendu risquedeblessure Assurez vousquelemoteurestcomplètementarrêtéavantdedémonteretdenettoyerlespiècesde l app...

Page 8: ...chuursponsjes om de oppervlakken van het apparaat schoon te maken Voor het eerste gebruik Πριν από την πρώτη χρήση 3 Καθαρίστε το περίβλημα μόνο με μαλακό νωπό πανί και κατόπιν στε γνώστε το με ένα πανί Σημείωση Μην χρησιμοποιείτε λειαντικά καθαριστικά ή συρμάτινα σφουγγαράκια για τον καθαρισμό των επιφανειών της συσκευής 1 Προτού χρησιμοποιήσετε τη συσκευή αφαιρέστε όλα τα υλικά συσκευασίας τα πλ...

Page 9: ...ct is getrokken Het eerste gebruik Ξεκινώντας 1 Τοποθετήστε τη βάση του μοτέρ επάνω σε στεγνή επίπεδη σταθερή επιφάνεια όπως πάγκο κουζίνας ή τραπέζι Βεβαιωθείτε ότι βρίσκεται μακριά από την άκρη του πάγκου κουζίνας Φροντίστε να αφήσετε αρκετό χώρο γύρω από τα ανοίγματα αερισμού στο πίσω μέρος της συσκευής Προσοχή Βεβαιωθείτε ότι το καλώδιο τροφοδοσίας δεν είναι συνδεδεμένο στην πρίζα 2 Για να ανα...

Page 10: ...kking Meegeleverd bij specifieke modellen Het eerste gebruik 4 Τοποθετήστε το εργαλείο A στον άξονα εργαλείων Β Ευθυγραμμίστε το αξονάκι στο επάνω μέρος του εργαλείου χτυπητήρι γάντζος ζύμης αναδευτήρας με την υποδοχή του άξονα Σπρώξτε το εξάρτημα προς τα επάνω και στρέψτε το αριστερόστροφα έως ότου ο πείρος ασφαλίσει στη θέση του Για να αφαιρέσετε το εξάρτημα πιέστε προς τα πάνω γυρίστε το δεξιόσ...

Page 11: ...τητα 1 10 Όταν η ανάμιξη έχει ολοκληρωθεί στρέψτε τον επιλογέα ταχύτητας στη θέση OFF και αποσυνδέστε τη συσκευή από την πρίζα Σημείωση Ξεκινάτε πάντα με όσο το δυνατόν χαμηλότερη ταχύτητα για να αποφύγετε την εκτίναξη των υλικών έξω από το μπολ 8 Φωτισμός εργασίας και ενδεικτική λυχνία λειτουργίας Εάν η συσκευή είναι συνδεδεμένη στην πρίζα και επιλεγεί μια ταχύτητα ανάβει μια λευκή λυχνία LED γύρ...

Page 12: ...τημάτων Η συσκευή διαθέτει ενσωματωμένο υποδοχέα εξαρτημάτων πολλαπλών χρήσεων Μπορείτε να αφαιρέσετε το κάλυμμα εξαρτημάτων A πιέζοντας το κουμπί ανοίγματος του καλύμματος εξαρτημάτων D προς τα πάνω Μπορείτε να αγοράσετε τη μηχανή κοπής κιμά τα εξαρτήματα για ζυμαρικά και τον κόφτη λαχανικών ως πρόσθετα αξεσουάρ Επισκεφθείτε τη διεύθυνση www electrolux com για περισσότερες πληροφορίες 2 Ρύθμιση τ...

Page 13: ...oprollen duw het snoer in de opening aan de achterkant van het apparaat Καθαρισμός και φροντίδα 1 Απενεργοποιήστε τη συσκευή αφαιρέστε το φις από την πρίζα τοίχου και περιμένετε μέχρι να σταματήσουν να περιστρέφονται πλήρως τα εργαλεία Προειδοποίηση Μην βυθίζετε το περίβλημα το φις ή το καλώδιο σε νερό ή σε οποιοδήποτε άλλο υγρό 3 Καθαρίστε το περίβλημα μόνο με μαλακό νωπό πανί και κατόπιν στε γνώ...

Page 14: ...dauer Rezept Zutaten Menge Einheit Zeit Geschwindigkeit Brot Hefeteig Min Menge Mehl 252 g Min 120 s Niedrige Stufe Einstellung 1 3 Wasser 240 g Zucker 2 TL Margarine 1 EL Salz 1 TL Trockenhefe 2 TL Zubereitung Alle Zutaten in die Schüssel geben und kneten bis sie gewünschte Konsistenz erreicht ist Hefeteig Pizza teig Höchstmen gen Weizenmehl 960 g Min 120 s Niedrige Stufe Einstellung 1 3 Wasser 4...

Page 15: ...hlersuche Fehlersuche Symptom Ursache Abhilfe Der Motor verlangsamt sich während des Betriebs Die Teigmenge überschreitet möglicherweise die maximale Füllmenge Den Teig entfernen und in zwei Portionen aufteilen Der Teig ist möglicherweise zu feucht und klebt daher am Schüsselrand Mehr Mehl hinzugeben jeweils 1 Teelöffel bis der Motor wieder beschleunigt Solange weiterverarbeiten bis sich der Teig ...

Page 16: ...ιτουργίας άγκιστρων Συνταγή Υλικά Ποσότητα Χρόνος Ταχύτητα Ψωμί ζύμη μαγιάς Ελάχ ποσότητα αλεύρι 252 g Τουλάχιστον 120 δ Χαμηλή ρύθμιση ρύθμιση 1 3 νερό 240 g Ζάχαρη 2 κ γ Μαργαρίνη 1 κ σ Αλάτι 1 κ γ Ξηρή μαγιά 2 κ γ Εκτέλεση Τοποθετήστε όλα τα υλικά στο μπολ και ζυμώστε όσο χρειάζεται Ζύμη μαγιάς ζύμη πίτσας μέγ ποσότητες Σταρένιο αλεύρι 960 g Τουλάχιστον 120 δ Χαμηλή ρύθμιση ρύθμιση 1 3 Νερό 400...

Page 17: ...ριά ζύμη τυρί Αφαιρέστε τη μισή ποσότητα και επεξεργαστείτε την σε δύο δόσεις Ο φωτισμός εργασίας και η ενδεικτική λυχνία λειτουργίας αναβοσβήνουν Ο επιλογέας ταχύτητας έχει μείνει στη θέση ενεργοποίησης Στρέψτε τον επιλογέα ταχύτητας στη θέση OFF Συνταγές Ποσότητες και χρόνοι επεξεργασίας λειτουργίας άγκιστρων Συνταγή Υλικά Ποσότητα Χρόνος Ταχύτητα Μαλακή ζύμη Αλεύρι 1 9 g 120 δ Χαμηλή ρύθμιση ρύ...

Page 18: ...pt Ingrediënten Hoeveelheid Eenheid Tijd Snelheid Brood gistdeeg min hoeveelheid Bloem 252 g Ten minste 120 sec Lage stand stand 1 3 Water 240 g Suiker 2 tl Margarine 1 el Zout 1 tl Droge gist 2 tl Methode Doe alle ingrediënten in de kom en kneed tot u tevreden bent Gistdeeg Pizzadeeg max hoeveelheden Tarwebloem 960 g Ten minste 120 sec Lage stand stand 1 3 Water 400 g Olie 93 g Zout 3 tl Suiker 2...

Page 19: ...oog en netjes zijn Dit is normaal bij een zware belasting bijv zwaar deeg kaas Verwijder de helft van het deeg en verwerk het in twee delen De werkverlichting en het stroomlampje knipperen De snelheidsknop staat nog aan Draai de snelheidsknop op OFF Recepten Deeghaken hoeveelheden en verwerkingstijden Recept Ingrediënten Hoeveelheid Eenheid Tijd Snelheid Zacht deeg Bloem 1 9 kg 120 s Lage stand st...

Page 20: ...dients Quantité Unité Durée Vitesse Pain pâte levée quantités mini males farine 252 g Au moins 120 s Réglage bas position 1 2 eau 240 g Sucre 2 c à café Margarine 1 c à soupe Sel 1 c à café Levure sèche 2 c à café Préparation Placez tous les ingrédients dans le bol et pétrissez jusqu à obtenir un résultat satisfaisant Pâte levée pâte à pizza quantités maximales Farine de blé 960 g Au moins 120 s R...

Page 21: ... fonctionne ment et la LED du sélect eur de vitesse clignotent Le sélecteur est resté sur une vitesse Mettre le sélecteur de vitesse sur OFF Recettes Quantités à pétrir et durées de pétrissage Recette Ingrédients Quantité Unité Durée Vitesse Pâte molle de farine 1 9 kg 120 s Réglage bas position 2 d eau 1450 g de sel 3 c à café Quantités d ingrédients et temps de pétrissage Recette Ingrédients Qua...

Page 22: ...unt waar het product is gekocht Zij kunnen dit product op mi lieuvriendelijke manier laten recyclen Απόρριψη Ανακυκλώστε τα υλικά που φέρουν το σύμβολο Τοποθετήστε τα υλικά συσκευασίας σε κατάλληλα δοχεία για ανακύκλωση Συμβάλλετε στην προστασία του περιβάλλοντος και της ανθρώπινης υγείας ανακυκλώνοντας τις άχρηστες ηλεκτρικές και ηλεκτρονικές συσκευές GR Αυτή η σήμανση υποδεικνύει ότι το προϊόν δ...

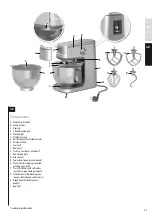
Page 23: ... cover H Attachment hub I Tool shaft J Bowl cover K Stainless steel bowl extra bowl L Bowl locking plate M Non slip feet N Power cord storage manual rewind O Wire whisk for whipping cream and whisking egg whites P Plastic flat beater with soft rubber spatula for mixing liquid ingredients Q Metal flat beater for blending cake sponges cookie dough and pie crusts R Dough Hook for kneading yeast dough...

Page 24: ...e the appliance cord or plug in water or any other liquid Do not let cord hang over edge of table or counter do not let cord contact hot surface including the stove Never use accessories or parts made by other manufactures not recommended or sold may cause a risk of injury to persons Make sure the motor has completely stopped before disassembling and cleaning Avoid contact with moving parts Contac...

Page 25: ...ck of your dishwasher 3 Place the processing bowl onto the motor base the bowl will only fit correctly on the base when the handle is positioned to the right Rotate the handle clockwise to lock Warning Never operate appliance with the attachments wire whip flat beater or dough hook unless the bowl is in place 2 Tilting the motor head B up gently press the lever A downwards the motor head will then...

Page 26: ...ve it clockwise and pull down and out 9 Note If the speed selector is already turned on before the appliance is plugged in the speed selector LED light will flash off and on to let you know the speed selector has been left on Turn the Speed selector to OFF and the lights will stop flashing Then resume operating normally 8 Work light and Power indicator light If the appliance is plugged in and a sp...

Page 27: ...tool If the tool scrapes the bottom of the bowl Loosen the nut A screw shaft B downward into the tool Fasten the nut A If the tool is to far away from the sides bottom of the bowl Screw the shaft B upwards Fasten the nut A Cleaning and care 1 Switch the appliance off remove the plug from the wall socket and wait until the tools have stopped completely Warning Never immerse the housing plug or cord...

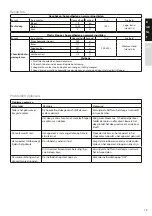
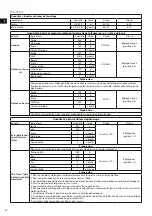
Page 28: ...ntities and Processing Times Recipe Ingredients Quantity Unit Time Speed Yeast dough bread min Quantities flour 252 g At least 120 s Low setting 1 3 setting water 240 g Sugar 2 tsp Margarine 1 tbs Salt 1 tsp Dry Yeast 2 tsp Method Place all the ingredients into the bowl and knead until satisfactory Yeast dough Pizza dough max quantities Wheat flour 960 g At least 120 s Low setting 1 3 setting Wate...

Page 29: ...or does not work The appliance is not connected to the mains Make sure to plug in the appliance before operation The appliance vibrates moves during operation The rubber feet are wet Make sure the rubber feet at the bottom of the unit are clean and dry It is normal for heavy loads e g heavy dough cheese Remove half and process in two batches The Work light and Power indicator light flashes on and ...

Page 30: ...Electrolux Hausgerate GmbH Further Strasse 246 D 90429 Nurnberg Germany Printed on recycled paper www aeg com www aeg com shop 3483 A KM7XXX 02 04 1017 ...

Reviews: