background image

Safety instructions

WARNING!

You must read these!

Make sure that the appliance is not damaged because of transportation. Do not connect a

damaged appliance. If it is necessary, speak to the supplier.

Only an authorised service technician can install, connect or repair this appliance. Use only

original spare parts.

Only use built-in appliances after you assemble the appliance into correct built-in units

and work surfaces that align to the standards.

Do not change the specifications or modify this product. Risk of injury and damage to the

appliance.

Fully obey the laws, ordinances, directives and standards in force in the country where you

use the appliance (safety regulations, recycling regulations, electrical safety rules etc.)!

Keep the minimum distances to other appliances and units!

Install anti-shock protection, for example install the drawers only with a protective floor

directly below the appliance!

Protect the cut surfaces of the worktop against moisture with a correct sealant!

Seal the appliance to the work top with no space left with a correct sealant!

Protect the bottom of the appliance from steam and moisture, e.g. from a dishwasher or

oven!

Do not install the appliance adjacent to doors and below windows! If not, hot cookware

can be hit off the hob when you open doors or windows.

WARNING!

Risk of injury from electrical current. Carefully obey the instructions for electrical connec

-

tions.

• The electrical mains terminal is live.

• Make electrical mains terminal free of voltage.

• Install correctly to give anti-shock protection.

• Loose and incorrect plug and socket connections can make the terminal become too hot.

• A qualified electrician must install the clamping connections correctly.

• Use a strain relief clamp on cable.

• Use the correct mains cable of type H05BB-F Tmax 90°C (or higher) for a single-phase

or two-phase connection.

• Replace the damaged mains cable with a special cable (type H05BB-F Tmax 90°C; or

higher). Speak your local Service Force Centre.

The appliance must have the electrical installation which lets you disconnect the appliance

from the mains at all poles with a contact opening width of minimum 3 mm.

You must have correct isolation devices: line protecting cut-outs, fuses (screw type fuses

removed from the holder), earth leakage trips and contactors.

4

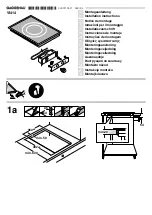
Installation instructions

Summary of Contents for HK764405PB

Page 1: ...HK764405PB User manual Ceramic glass induction hob ...

Page 2: ... and on the sounds 10 HELPFUL HINTS AND TIPS 11 CARE AND CLEANING 12 WHAT TO DO IF 13 ENVIRONMENT CONCERNS 14 Packaging material 14 Subject to change without notice SAFETY INFORMATION For your safety and correct operation of the appliance read this manual carefully before installation and use Always keep these instructions with the appliance even if you move or sell it Users must fully know the op...

Page 3: ...ful when you connect the appliance to the near sockets Do not let electricity bonds touch the appliance or hot cookware Do not let electricity bonds tangle How to prevent a damage to the appliance If the objects or cookware fall on the glass ceramic the surface can be damaged Cookware made of cast iron cast aluminium or with damaged bottoms can scratch the glass ceramic if you move them on the sur...

Page 4: ...ect sealant Protect the bottom of the appliance from steam and moisture e g from a dishwasher or oven Do not install the appliance adjacent to doors and below windows If not hot cookware can be hit off the hob when you open doors or windows WARNING Risk of injury from electrical current Carefully obey the instructions for electrical connec tions The electrical mains terminal is live Make electrica...

Page 5: ... mm 600 680 1 R5 490 1 min 25 mm min 5 mm min 20 mm min 38 mm min 5 mm If you use a protection box additional accessory thefrontventilationspace of 5mmand protective floor directly below the appliance are not neces sary Installation instructions 5 ...

Page 6: ...Control panel layout 9 10 8 7 6 5 4 1 2 3 Use the sensor fields to operate the appliance Indicators displays and sounds tell which functions operate sensor field function 1 starts and stops the hob 2 a heat setting display shows the heat setting 3 starts the Power function 4 a control bar to set the heat setting 5 increases or decreases the time 6 selects the cooking zone 7 the timer display shows...

Page 7: ...idual heat indicator WARNING Risk of burns from residual heat OptiHeat Control indicates the level of the residual heat The induction cooking zones make the heat necessary for cooking directly in the bottom of the cookware The glass ceramic is heated by the heat of the cookware OPERATING INSTRUCTIONS On and Off Touch for 1 second to start or stop the appliance Automatic Switch Off The function sto...

Page 8: ...not release before you have a correct heat setting Automatic Heat Up 1 2 3 4 5 6 7 8 9 10 11 12 0 1 2 3 4 5 6 7 8 9 10 11 12 13 14 You can get a necessary heat setting in a shorter time if you activate the Automatic Heat Up function This function sets the highest heat setting for some time see the graphic and then decreases to the necessary heat setting To start the Automatic Heat Up function for ...

Page 9: ...sary cooking zone comes on Starting the Count Down Timer touch of the timer to set the time 00 99 minutes When the indicator of the cooking zone flashes slower the time counts down Checking the remaining time select the cooking zone with The indicator of the cooking zone flashes faster Display shows the remaining time Changing the Count Down Timer select the cooking zone with touch or Stopping the...

Page 10: ...l comes on for 4 seconds The Timer still operates Touch the symbol to switch off this function The heat setting that you set before comes on When you switch off the appliance you also switch off this function The child safety device This function prevents an accidental operation of the hob Starting the child safety device Start the hob with Do not set the heat settings Touch for 4 seconds The symb...

Page 11: ...almost instant heat inside the cookware Cookware material correct cast iron steel enamelled steel stainless steel a multi layer bottom marked as correct by a manufacturer not correct aluminium copper brass glass ceramic porcelain Cookware is correct for an induction hob if some water boils very quickly on a zone set to the highest heat setting a magnet pulls on to the bottom of the cookware The bo...

Page 12: ...s of liquid 7 9 Steam potatoes 20 60 min Use max l water for 750 g of po tatoes 7 9 Cook larger quantities of food stews and soups 60 150 min Up to 3 l liquid plus ingredients 9 12 Gentle fry escalope veal cordon bleu cutlets rissoles sausages liver roux eggs pancakes doughnuts as re quired Turn halfway through 12 13 Heavy fry hash browns loin steaks steaks 5 15 min Turn halfway through 14 Boil la...

Page 13: ...tart the appliance or operate it You touched 2 or more sensor fields at the same time Only touch one sensor field There is water or fat stains on the control panel Clean the control panel Start the appliance again and set the heat setting in 10 sec onds The child safety device or key lock or Stop Go operates See the chapter Operating the appliance A sound operates when the ap pliance is off You co...

Page 14: ...ent Give the data from the rating plate three digit letter code for the glass ceramic it is in the corner of the cooking surface and an error message that comes on If you operated the appliance incorrectly the servicing by a customer service technician or dealer will not be free of charge even during the warranty period The instructions about the customer service and conditions of guarantee are in...

Page 15: ...15 ...

Page 16: ...www aeg electrolux com shop 892931708 C 042010 ...

Reviews: