AEG Competence 6292D-M Operating And Installation Instructions Download Page 5


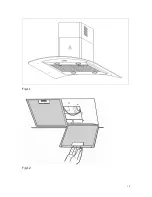
Before proceeding with the assembly operations, remove the anti-grease 

filter(s) (Fig.11) so that the unit is easier to handle. 


In the case of assembly of the appliance in the venting version prepare the 

hole for evacuation of the air.


Hood assembly


Remove the structure from the packaging and separate the upper part from 

the lower part. 


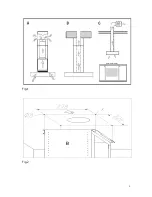
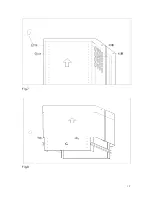
Refer to Fig.2 and ensure that the arrow is positioned on the same side as 

the appliance controls. Make 4, Ø8 holes in the ceiling and drive in 3 screws 

without completely tightening them.   


Do not insert the screw into the hole marked with an X on the hole template 

(the screws and expansion plugs must be suitable for the type of wall). 


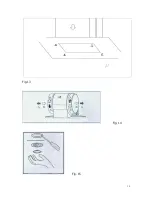
Take the upper part of the structure B and insert the 3 slots onto the 3 

screws that are not completely tightened. (Fig3) 


Rotate slightly to fit. 


Drive in the fourth screw X and tighten the remaining 3 to allow definitive 

blocking of the upper part of structure B. 


Take the lower part of the telescopic structure C and insert it into the upper 

structure B. 


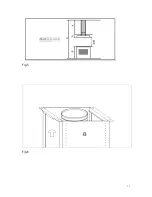
Adjust the height (Fig.5) by referring to the amounts indicated in and block 

it using the 8 unit screws G that are supplied (Fig.4) 


Venting version 


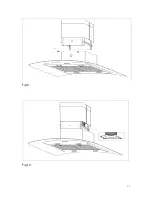
Fix the flexible pipe to the prepared air evacuation hole (Fig.6) 


Take the upper chimney piece and fix it with 4 unit screws G. (Fig.7) 


Take the lower chimney and fix it with 2 unit screws G, drive in hood to 

avoid it down (Fig.8) 


Insert the venting unit inside the structure and set in 4 mounting hole, drive 

in 4 unit screw N (Fig.9) 


5

Summary of Contents for Competence 6292D-M

Page 1: ...Operating and installation instructions Competence 6292D M Chimney Hood ...

Page 2: ...S 1 General Information Page 1 2 Safety Warnings Page 1 3 Installation Instructions Page 2 4 Use and Maintenance Information Page 4 5 Trouble shooting Page 6 6 Diagrams Page 7 7 Guarantee Conditions Page 11 2 ...

Page 3: ...ol It is extremely important to note that overheating can cause a fire Never carry out flambé cooking under the hood There must be adequate ventilation in the room when the range hood is used at the same time as appliances burning gas or other fuels It is very important to clean the hood and replace the filter at the recommended intervals Failure to do so could cause grease deposits to build up re...

Page 4: ... out as follows BROWN L line BLUE N neutral Yellow and green wire Earth lead The cooker hood must be installed so that that the plug is easily accessible An omnipolar switch with a minimum aperture of 3mm between contacts in line with the electrical load and local standards must be placed between the appliance and the network in the case of direct connection to the electrical network The minimum d...

Page 5: ... for the type of wall Take the upper part of the structure B and insert the 3 slots onto the 3 screws that are not completely tightened Fig3 Rotate slightly to fit Drive in the fourth screw X and tighten the remaining 3 to allow definitive blocking of the upper part of structure B Take the lower part of the telescopic structure C and insert it into the upper structure B Adjust the height Fig 5 by ...

Page 6: ...apours and odours The proper function of the cooker hood is conditioned by the regularity of the maintenance operations in particular the active carbon filter The anti grease filters capture the grease particles suspended in the air and are therefore subject to clogging according to the frequency of the use of the appliance In order to prevent fire hazard it is recommendable to clean the filter at...

Page 7: ...tion is designed for use during cooking and not for prolonged general illumination of the environment Prolonged use of the illumination installation notably reduces the duration of the bulb Use a one edged screwdriver or any other appropriate tool to lift and remove the overhead light fixture Replace the damaged lamp Use only halogen lamps of a maximum of 20w avoiding contact with hands Return the...

Page 8: ... air flow Butterfly valve jammed Contact technician High temperature safety device activated The kitchen is not sufficiently ventilated Motor cuts after a few minutes The hood is installed too near the cooking stove The hood must be least 65cm from stove Strong cooking smell Charcoal filters not installed In re circulating mode charcoal filters must be installed Oil cup missing or not installed Re...

Page 9: ...Fig 1 Fig 2 9 ...

Page 10: ...Fig 3 Fig 4 10 ...

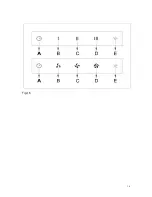
Page 11: ...Fig 5 Fig 6 11 ...

Page 12: ...Fig 7 Fig 8 12 ...

Page 13: ...Fig 9 Fig 10 13 ...

Page 14: ...Fig 11 Fig 12 14 ...

Page 15: ...Fig 13 Fig 14 Fig 15 15 ...

Page 16: ...Fig 16 16 ...

Page 17: ...is product The symbol on the product indicates that this product may not be treated as household waste Instead it shall be handed over to the applicable collection point for the recycling of electrical and electronic equipment Disposal must be carried out in accordance with local environmental regulations for waste disposal For more detailed information about treatment recovery and recycling of th...

Page 18: ...ly to light bulbs loose glass glass oven doors and enamelled surfaces or do dust bags filters and other parts subject to wear and tear 6 Electrolux Major Appliances shall not be responsible in terms of this guarantee for the replacement or repair of any part of the equipment which may have been damaged in transit 7 All gas appliances are to be fitted by a certified gas installer or the guarantee w...

Reviews: