background image

14

818 2113-00/4

Description of the appliance

View of the appliance

á

Control panel

à

Compartments with lid and drawer (for storage and freezing)

â

Compartments with drawers (for storage)

ä

Drawer (for frozen food storage only), can serve as a water 
collector when defrosting

Summary of Contents for ARCTIS

Page 1: ...ARCTIS Upright Freezer Operating Instructions 818 21 13 00 4 ...

Page 2: ...es you step by step in the operation of the appliance 3 Supplementary information regarding operation and practical applications of the appliance appear after this symbol 2 Tips and notes concerning economical and environmentally sound use of the appliance are marked with the cloverleaf Explanations of the technical terminology used in the operating instructions can be found at the end in the sect...

Page 3: ...0 Appliance Alignment 10 Electrical Connection 11 Reversing The Door 11 Description of the appliance 14 View of the appliance 14 Control panel 15 Prior to Initial Start Up 15 Initial Use Temperature Adjustment 16 Switching the Appliance Off 17 Opening the door 17 Freezing 18 Frozen Storage 19 Preparation of Ice Cubes 19 Storage Goods Symbols Freezing Calendar 20 Maximum Load Stacking Limit 20 Defr...

Page 4: ...13 00 4 Maintenance and Cleaning 22 Energy Saving Advice 23 Something not Working 24 Correcting Malfunctions 24 Noises during Operation 25 Regulations Standards Guidelines 26 Technical Terminology 26 Customer Service 27 ...

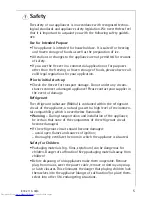
Page 5: ...ur supplier in the event of damage Refrigerant The refrigerant isobutane R600a is contained within the refrigerant circuit of the appliance a natural gas with a high level of environmen tal compatibility which is nevertheless flammable Warning During transportation and installation of the appliance be certain that none of the components of the refrigerant circuit become damaged If the refrigerant ...

Page 6: ...e injury Never touch frozen goods with wet hands Hands can freeze to the goods Warning Do not operate any electrical appliances in the appliance e g electric ice cream makers mixers etc unless they have been authorised by the manufacturer Warning In order not to impair the function of the appliance never cover or obstruct the ventilation openings Warning Do not use any mechanical devices or other ...

Page 7: ...re hydrocarbon compounds and can be recycled The carton parts are made from recycled paper Please dispose of the packaging with due care for the environment Old Appliances For environmental reasons refrigeration appliances must be disposed of properly This applies to your old appliance and at the end of its service life for your new appliance as well 1 Warning Before disposing of old appliances ma...

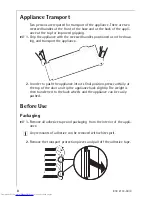
Page 8: ...raw ing and transport the appliance 2 In order to push the appliance into its final position press carefully at the top of the door and tip the appliance back slightly The weight is then transferred to the back wheels and the appliance can be easily pushed Before Use Packaging 0 1 Remove all adhesive tape and packaging from the interior of the appli ance 3 Any remnants of adhesive can be removed w...

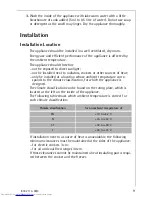
Page 9: ...talled at a location whose ambient temperature corre sponds to the climate classification for which the appliance is designed The climate classification can be found on the rating plate which is located at the left on the inside of the appliance The following table shows which ambient temperature is correct for each climate classification If installation next to a source of heat is unavoidable the...

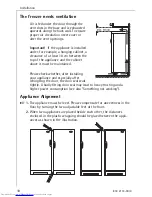
Page 10: ... cabinet above it must be maintained Please check whether after installing your appliance and especially after rehingeing the door the door seal seals tightly A badly fitting door seal may lead to heavy frosting and a higher power consumption see also Something not working Appliance Alignment 0 1 The appliance must be level Please compensate for unevenness in the floor by turning the two adjustabl...

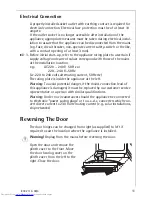
Page 11: ... 220 240 V 50 Hz or 220 240 V 50 Hz i e 220 to 240 volts alternating current 50 Hertz The rating plate is inside the appliance at the left Warning To avoid potential danger if the mains connection lead of this appliance is damaged it must be replaced by our customer service representative or a person with similar qualifications Warning Under no circumstances should the appliance be connected to el...

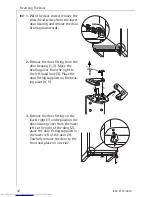
Page 12: ...ring 1 2 Move the bearing pivot from the right to the left hand hole 3 Place the door fitting supplied on the bear ing pivot 4 5 3 Remove the door fitting on the lower right 1 and reposition the door bearing cover from the lower left to the right of the door 2 place the door fitting supplied in the lower left of the door 3 Carefully remove the door to the front and place on one side 1 2 5 4 3 3 1 ...

Page 13: ...e the door onto the top bearing pivot and close 6 Place the lower door bearing with the bearing pivot in the lower left of the door and fasten 7 Move the door handle from the left to the right and cover the remaining holes with the hole cover pins attached 8 Open the door and fit the plinth cover ...

Page 14: ...he appliance View of the appliance á Control panel à Compartments with lid and drawer for storage and freezing â Compartments with drawers for storage ä Drawer for frozen food storage only can serve as a water collector when defrosting ...

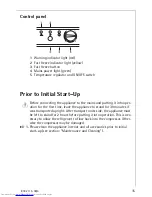
Page 15: ...putting it into oper ation for the first time leave the appliance to stand for 30 minutes if was transported upright After transport on its side the appliance must be left to stand for 2 hours before putting it into operation This is nec essary to allow the refrigerant to flow back into the compressor Other wise the compressor may be damaged 0 1 Please clean the appliance interior and all accessor...

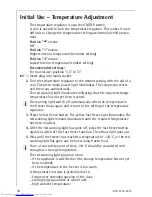
Page 16: ...light switch off automatically when the temperature in the freezer drops again and returns to the setting of the temperature regulator 3 Press the fast freeze button The yellow fast freeze light illuminates The red warning light remains illuminated until the required temperature has been reached 4 After the red warning light has gone off press the fast freeze button again to switch off the fast fr...

Page 17: ...freezer compartment and clean thoroughly see section Main tenance and Cleaning 4 Leave door open after defrosting to avoid accumulation of odours Opening the door If the door is closed when the appliance is in operation it cannot be immediately opened again because a vacuum occurs which holds the door closed until pressure has been equalised The door can be opened again after several minutes If yo...

Page 18: ...g or 4 to 6 hours for smaller quantities Yellow indicator light illuminates 3 The fast freeze button need not be pressed for freezing of small quanti ties of up to 3 kg 2 All foods must be packed air tight prior to freezing so that they do not dry out or lose their flavour and so that no flavour contamination of other frozen goods occurs Caution Do not touch frozen food with wet hands Your hands c...

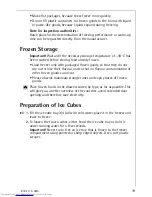
Page 19: ... they do not dry out or lose their flavour and so that no flavour contamination of other frozen goods can occur Please observe maximum storage times and expiry dates of frozen goods 2 Place frozen foods in the drawers sorted by type as far as possible This will give you a better overview of the contents avoid extended door opening and therefore save electricity Preparation of Ice Cubes 0 1 Fill th...

Page 20: ...ed storage time is valid depends on the quality of the foods and pre treating before freezing The lower value applies to foods with high fat content Maximum Load Stacking Limit In order to load large quantities or bulky freezer items you can remove the drawers except for the bottom one and place the freezer goods directly onto the evaporator grid However when the drawers are removed the freezer go...

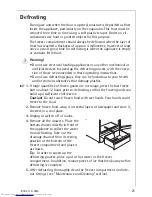
Page 21: ...r health and or contain substances that damage plastics 0 1 If large quantities of frozen goods are in storage press the fast freeze button about 12 hours prior to defrosting so that the frozen goods can build up a sufficient chill reserve Caution Do not touch frozen food with wet hands Your hands could freeze to the food 2 Remove frozen food wrap it in several layers of newspaper and store it cov...

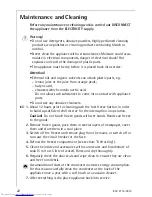
Page 22: ...brasive cleansers 0 1 About 12 hours prior to cleaning push the fast freeze button in order to build up sufficient chill reserve for the interruption in operation Caution Do not touch frozen goods with wet hands Hands can freeze to the goods 2 Remove frozen goods pack them in several layers of newspaper cover them and store them in a cool place 3 Switch off the freezer and remove plug from the mai...

Page 23: ...own to room temperature before placing in the freezer Try to avoid keeping the door open for long periods or opening the door too frequently as warm air will enter the cabinet and cause the compressor to switch on unnecessarily often Ensure there are no obstructions preventing the door from closing properly Place frozen goods into the refrigerator for thawing Cold from fro zen goods is thus used f...

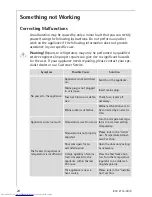
Page 24: ...ed on Switch on the appliance Mains plug is not plugged in or is loose Insert mains plug Fuse has blown or is defec tive Check fuse replace if necessary Mains socket is defective Mains malfunctions are to be corrected by an electri cian Appliance cools too much Temperature is set too cold Turn the temperature regu lator to a warmer setting temporarily The freezer compartment temperature is insuffi...

Page 25: ...e compressor has been switched off this noise can be heard for a short time Heavy build up of frost possibly also on the door seal Door seal is not air tight possibly after changing over the hinges Carefully warm the leak ing sections of the door seal with a hair dryer not hotter than approx 50 C At the same time shape the warmed door seal by hand such that it sits correctly The compressor does no...

Page 26: ...can cause the refrigerant to boil and vaporise Refrigerant Circuit Closed circulation system that contains the refrigerant The refri gerant circuit comprises primarily of an evaporator a compressor a condenser and pipe work Evaporator The refrigerant is evaporated in the evaporator Similar to all other liquids refrigerant requires heat to evaporate This heat is removed from the interior of the app...

Page 27: ...ce Locations Selective ordering of replacement parts can save unnecessary travel and costs For this reason always provide the following appliance infor mation This information can be found on the rating plate in the interior at the left of the appliance We recommend that you enter this information here so that it is handy if needed Note The customer bears the costs of unjustified customer service ...

Page 28: ... RR ãáääáçå bäÉÅíêçäìñ dêçìé éêçÇìÅíë EëìÅÜ ë êÉÑêáÖÉê íçêëI ÅççâÉêëI ï ëÜáåÖ ã ÅÜáåÉëI î Åììã ÅäÉ åÉêëI ÅÜ áå ë ïë åÇ ä ïå ãçïÉêëF êÉ ëçäÇ É ÅÜ óÉ ê íç î äìÉ çÑ ééêçñK rpa NQ Äáääáçå áå ãçêÉ íÜ å NRM ÅçìåíêáÉë êçìåÇ íÜÉ ïçêäÇK AEG Hausgeräte GmbH Postfach 1036 D 90327 Nürnberg http www aeg hausgeraete de Copyright by AEG 818 2113 00 4 1102 Subject to change without notice ...

Reviews: