6
6
and possible injury.
Ensure that the fan is switched off from the supply mains before
removing the guar.
WARNING
If unusual oscillating movement is observed, immediately stop
using the fan and contact the manufacturer, its service agent or
suitably qualified persons.
The replacement of parts of the safety suspension system device
shall be performed by the manufacturer, its service agent or suitably
qualified persons.
The fixing means for attachment to the ceiling such as hooks or
other devices shall be fixed with a sufficient strength to withstand 4
times the weight of the fan.
ADDITIONAL BATTERY SAFETY WARNINGS
WARNING!
To reduce the risk of fire, personal injury, and
product damage due to a short circuit, never immerse your tool,
battery pack or charger in fluid or allow a fluid to flow inside them.
Corrosive or conductive fluids, such as seawater, certain industrial
chemicals, and bleach or bleach containing products, etc., can
cause a short circuit.
ASSEMBLY
WARNING
Do not use this product if it is not completely assembled or if any
parts appear to be missing or damaged. Use of a product that
is not properly and completely assembled or with damaged or
missing parts could result in serious personal injury.
WARNING
Do not attempt to modify this product or create accessories or
attachments not recommended for use with this product. Any
such alteration or modification is misuse and could result in a
hazardous condition leading to possible serious personal injury.
OPERATION
WARNING
Do not allow familiarity with tools to make you careless.
Remember that a careless fraction of a second is sufficient to
inflict serious injury.
WARNING
Do not use any attachments or accessories not recommended
by the manufacturer of this tool. The use of attachments or
accessories not recommended can result in serious personal
injury.
APPLICATIONS
You may use this tool for the purpose listed below:
■ General ventilation of most household spaces.
This product is designed to be powered by either a 18V battery pack
(DC mode) or by electric power (AC mode). Either power source
can be used by installing an approved battery pack or power cord
into the product as described in this manual.
INSTALLING/REMOVING BATTERY PACK
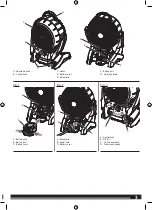
See Figure 1.
■ Turn the control knob to the OFF (0) position.
■ Open the battery cover.
■ Insert the battery pack into the product as shown.
■ Make sure the latches on each side of the battery pack snap
into place and the battery pack is secured before beginning
operation.
■ Depress the latches to remove the battery pack.
■ Close the battery cover.
WARNING
Always remove battery pack or unplug extension cord from your
product when you are assembling parts, making adjustments,
cleaning, or when not in use. Removing battery pack or
unplugging extension cord will prevent accidental starting that
could cause serious personal injury.
NOTE:
The battery pack should be recharged after approximately
5 hours of use to reduce the possibility of damage. Repeated deep
discharge of the battery may decrease storage capacity and battery
life.
INSTALLING/REMOVING POWER CORD
See Figure 2.
■ Turn the control knob to the OFF (0) position.
■ Open the battery cover.
■ Insert the female end of the power cord into the product as
shown.
■ Connect the male end of the power cord to the power source.
■ Make sure the power cord is secured before beginning
operation.
STARTING/STOPPING THE PORTABLE FAN
See Figure 3.
■ Connect the portable fan to a power cord or approved battery
pack.
■ Turn the control knob clockwise to turn the portable fan ON and
to adjust fan speed.
■ To stop the portable fan, turn the control knob counterclockwise
to the OFF (0) position.
WARNING
Hybrid tools are always in operating condition. Therefore, the
control knob should always be in the OFF (0) position when not
in use and the power source is removed.
CHANGING PORTABLE FAN SPEED
See Figure 3.
■ For low speeds, rotate the control knob clockwise.
■ For high speeds, rotate the control knob counterclockwise.
HANGING/MOUNTING PORTABLE FAN
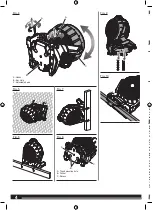
See Figures 4 – 10.
Your portable fan has a variety of hanging options. Choose the
option that is best suited for your location.
NOTE:
The portable fan can be hung in a vertical or horizontal
position. Be careful not to hang the fan in such a way that it prevents
normal fan operation or damages the cord.
Hanging the fan using the key hole:
■ Place the wide portion of the key hole over the head of a screw.
■ Slide the portable fan down until the screw is inside the narrow
portion of the key hole and the fan is secure.
Hanging the fan using the hooks:
■ Pull the hooks completely out of their slots and rotate them as
needed.
NOTE:
Hooks will not rotate until they are fully extended.
■ Hang the fan from a sturdy location.
Mounting the fan to 2x wood material using the hooks:
■ Pull the hooks completely out of their slots and rotate them
upward 180 degrees.
NOTE:
Hooks will not rotate until they are fully extended.
■ Put the wider side of the 2x wood material on the clamping
surface of the fan legs. The edge of the wood should rest
against the front surface of the legs.
■ Rotate the hooks down 180 degrees to clamp the fan to the 2x
wood material.
■ To remove the fan from the 2x wood material, rotate the hooks
180 degrees to the upward position.
Mounting the fan to rods using the rod pockets:
■ The fan can be mounted to rods, tubes, or rebar using the
pockets on the base of the fan.
NOTE:
The mounting posts must have a diameter between 13
and 22.6 mm.
Mounting the fan to a 2x4 using the 2x4 recess:
■ Place the fan onto a 2x4. Make sure the wood is seated
completely inside the 2x4 recess.
■ Secure the fan to the wood using bungee cords or tie downs.
ADJUSTING THE HEAD
See Figure 4.
The portable fan head can be rotated 240 degrees. To switch head
positions, adjust head to desired position.
BATTERIES
Battery packs which have not been used for some time should be
recharged before use.
Temperatures in excess of 50°C (122°F) reduce the performance
of the battery pack. Avoid extended exposure to heat or sunshine
(risk of overheating).
The contacts of chargers and battery packs must be kept clean.
For an optimum life-time, the battery packs have to be fully charged,
after used.
To obtain the longest possible battery life remove the battery pack
from the charger once it is fully charged.
For battery pack storage longer than 30 days:
• Store the battery pack where the temperature is below 27°C
and away from moisture.
• Store the battery packs in a 30% - 50% charged condition.
• Every six months of storage, charge the pack as normal.
TRANSPORTING LITHIUM BATTERIES
Lithium-ion batteries are subject to the Dangerous Goods
Legislation requirements.
Transportation of those batteries has to be done in accordance with
local, national and international provisions and regulations.
■ The user can transport the batteries by road without further
requirements.
■ Commercial transport of Lithium-Ion batteries by third parties is
subject to Dangerous Goods regulations. Transport preparation
and transport are exclusively to be carried out by appropriately.
trained persons and the process has to be accompanied by
corresponding experts.
When transporting batteries:
■ Ensure that battery contact terminals are protected and
insulated to prevent short circuit.
■ Ensure that battery pack is secured against movement within
packaging.


