background image

Some functional problems

might occur for some types

of models when operating

outside of that range. The

correct operation can only

be guaranteed within the

specified temperature

range. If you have any

doubts regarding where to

install the appliance, please

turn to the vendor, to our

customer service or to the

nearest Authorised Service

Centre.

8.3 

Ventilation requirements

The airflow behind the appliance must

be sufficient.

5 cm

min.

200 cm

2

min.

200 cm

2

8.4 

Electrical Connection

CAUTION!

Any electrical work required

to install this appliance

should be carried out by a

qualified electrician or

competent person.

WARNING!

This appliance must be

earthed.

The manufacturer declines

any liability should these

safety measures not be

observed.

The wires in the mains lead are coloured

in accordance with the following code:

A

B

C

D

E

A

 - green and yellow: Earth

C

 - brown: Live

D

 - blue: Neutral

As the colours of the wires in the mains

lead of this appliance may not

correspond with the coloured markings

identifying the terminals in your plug,

proceed as follows:

1.

Connect the wire coloured green and

yellow to the terminal marked either

with the letter “E“ or by the earth
symbol   or coloured green and

yellow.

2.

Connect the wire coloured blue to

the terminal either marked with the

letter “N“ or coloured black.

3.

Connect the wire coloured brown to

the terminal either marked with the

“L“ or coloured red.

4.

Check that no cut, or stray strands of

wire is present and the cord clamp

(

E

) is secure over the outer sheath.

Make sure the electricity supply

voltage is the same as that indicated

on the appliance rating plate.

5.

Switch on the appliance.

The appliance is supplied with a 13 amp

fuse (

B

). In the event of having to change

the fuse in the plug supplied, a 13 amp

ASTA approved (BS 1362) fuse must be

used.

WARNING!

A cut off plug inserted into a

13 amp socket is a serious

safety (shock) hazard. Ensure

that it is disposed of safely.

www.aeg.com

12

Summary of Contents for ABS6821LNF

Page 1: ...USER MANUAL EN User Manual Freezer ABS6821LNF ...

Page 2: ...roduct for better service www registeraeg com Buy Accessories Consumables and Original spare parts for your appliance www aeg com shop CUSTOMER CARE AND SERVICE Always use original spare parts When contacting our Authorised Service Centre ensure that you have the following data available Model PNC Serial Number The information can be found on the rating plate Warning Caution Safety information Gen...

Page 3: ...tchen areas in shops offices and other working environments By clients in hotels motels bed and breakfast and other residential type environments Keep ventilation openings in the appliance enclosure or in the built in structure clear of obstruction Do not use mechanical devices or other means to accelerate the defrosting process other than those recommended by the manufacturer Do not damage the re...

Page 4: ...rical shock The appliance must be earthed Make sure that the parameters on the rating plate are compatible with the electrical ratings of the mains power supply Always use a correctly installed shockproof socket Do not use multi plug adapters and extension cables Make sure not to cause damage to the electrical components e g mains plug mains cable compressor Contact the Authorised Service Centre o...

Page 5: ...ce and the recharging of the unit Regularly examine the drain of the appliance and if necessary clean it If the drain is blocked defrosted water collects in the bottom of the appliance 2 5 Disposal WARNING Risk of injury or suffocation Disconnect the appliance from the mains supply Cut off the mains cable and discard it Remove the door to prevent children and pets to be closed inside of the applia...

Page 6: ...ored the location of the appliance 3 5 FROSTMATIC function The FROSTMATIC function accelerates the freezing of fresh food and at the same time protects foodstuffs already stored from undesirable warming To activate this function press the FROSTMATIC button The FROSTMATIC indicator appears This function stops automatically after 52 hours You can deactivate the FROSTMATIC function before its automat...

Page 7: ...egulator when the compressor switches on or off 5 2 Hints for energy saving Do not open the door frequently or leave it open longer than absolutely necessary If foreseen do not remove the cold accumulators from the freezer basket 5 3 Hints for freezing To help you make the most of the freezing process here are some important hints the maximum quantity of food which can be frozen in 24 hours is sho...

Page 8: ...rst time the interior and all internal accessories should be washed with lukewarm water and some neutral soap to remove the typical smell of a brand new product then dried thoroughly CAUTION Do not use detergents abrasive powders chlorine or oil based cleaners as they will damage the finish 6 3 Periodic cleaning CAUTION Do not pull move or damage any pipes and or cables inside the cabinet CAUTION ...

Page 9: ...revent unpleasant smells WARNING If you want to keep the appliance switched on ask somebody to check it once in a while to prevent the food inside from spoiling in case of a power failure 7 TROUBLESHOOTING WARNING Refer to Safety chapters 7 1 What to do if Problem Possible cause Solution The appliance does not op erate The appliance is switched off Switch on the appliance The mains plug is not con...

Page 10: ... the tem perature This is normal no error has occurred The compressor starts after a period of time Water flows on the rear plate of the refrigerator During the automatic de frosting process frost melts on the rear plate This is correct Water flows into the refriger ator The water outlet is clogged Clean the water outlet Food products prevent that water flows into the water collector Make sure tha...

Page 11: ...oor If the advice does not lead to the desired result call the nearest Authorized Service Centre 7 2 Closing the door 1 Clean the door gaskets 2 If necessary adjust the door Refer to assembly instructions 3 If necessary replace the defective door gaskets Contact the Authorised Service Centre 8 INSTALLATION WARNING Refer to Safety chapters 8 1 Location Refer to the assembly instructions for the ins...

Page 12: ... Live D blue Neutral As the colours of the wires in the mains lead of this appliance may not correspond with the coloured markings identifying the terminals in your plug proceed as follows 1 Connect the wire coloured green and yellow to the terminal marked either with the letter E or by the earth symbol or coloured green and yellow 2 Connect the wire coloured blue to the terminal either marked wit...

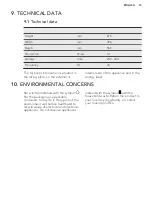
Page 13: ...e appliance and in the energy label 10 ENVIRONMENTAL CONCERNS Recycle the materials with the symbol Put the packaging in applicable containers to recycle it Help protect the environment and human health and to recycle waste of electrical and electronic appliances Do not dispose appliances marked with the symbol with the household waste Return the product to your local recycling facility or contact...

Page 14: ...www aeg com 14 ...

Page 15: ...ENGLISH 15 ...

Page 16: ...www aeg com shop 211623656 A 452016 ...

Reviews: