background image

2.5 Care and cleaning

WARNING!

Risk of injury or damage to

the appliance.

• Before maintenance, deactivate the

appliance and disconnect the mains

plug from the mains socket.

• This appliance contains hydrocarbons

in the cooling unit. Only a qualified

person must do the maintenance and

the recharging of the unit.

• Regularly examine the drain of the

appliance and if necessary, clean it. If

the drain is blocked, defrosted water

collects in the bottom of the

appliance.

2.6 Service

• To repair the appliance contact the

Authorised Service Centre. Use

original spare parts only.

• Please note that self-repair or non-

professional repair can have safety

consequences and might void the

guarantee.

• The following spare parts will be

available for 7 years after the model

has been discontinued: thermostats,

temperature sensors, printed circuit

boards, light sources, door handles,

door hinges, trays and baskets.

Please note that some of these spare

parts are only available to

professional repairers, and that not all

spare parts are relevant for all

models.

• Door gaskets will be available for 10

years after the model has been

discontinued.

2.7 Disposal

WARNING!

Risk of injury or suffocation.

• Disconnect the appliance from the

mains supply.

• Cut off the mains cable and discard it.

• Remove the door to prevent children

and pets to be closed inside of the

appliance.

• The refrigerant circuit and the

insulation materials of this appliance

are ozone-friendly.

• The insulation foam contains

flammable gas. Contact your

municipal authority for information on

how to discard the appliance

correctly.

• Do not cause damage to the part of

the cooling unit that is near the heat

exchanger.

3. INSTALLATION

WARNING!

Refer to Safety chapters.

WARNING!

Refer to installation

instruction document to

install your appliance.

WARNING!

Fix the appliance in

accordance with installation

instruction document to

avoid a risk of instability of

the appliance.

www.aeg.com

6

Summary of Contents for ABB688E1LS

Page 1: ...USER MANUAL EN User Manual 2 Freezer ES Manual de instrucciones 18 Congelador ABB688E1LS ...

Page 2: ...ervice and repair information www aeg com support Register your product for better service www registeraeg com Buy Accessories Consumables and Original spare parts for your appliance www aeg com shop CUSTOMER CARE AND SERVICE Always use original spare parts When contacting our Authorised Service Centre ensure that you have the following data available Model PNC Serial Number The information can be...

Page 3: ...d that they have been properly instructed Children of less than 3 years of age should be kept away from the appliance unless continuously supervised Do not let children play with the appliance Children shall not carry out cleaning and user maintenance of the appliance without supervision Keep all packaging away from children and dispose of it appropriately 1 2 General Safety This appliance is inte...

Page 4: ... the supply cord is damaged it must be replaced by the manufacturer its Authorised Service Centre or similarly qualified persons in order to avoid a hazard 2 SAFETY INSTRUCTIONS 2 1 Installation WARNING Only a qualified person must install this appliance Remove all the packaging Do not install or use a damaged appliance Do not use the appliance before installing it in the built in structure due to...

Page 5: ...erant circuit containing isobutane Do not change the specification of this appliance Do not put electrical appliances e g ice cream makers in the appliance unless they are stated applicable by the manufacturer If damage occurs to the refrigerant circuit make sure that there are no flames and sources of ignition in the room Ventilate the room Do not let hot items to touch the plastic parts of the a...

Page 6: ... door hinges trays and baskets Please note that some of these spare parts are only available to professional repairers and that not all spare parts are relevant for all models Door gaskets will be available for 10 years after the model has been discontinued 2 7 Disposal WARNING Risk of injury or suffocation Disconnect the appliance from the mains supply Cut off the mains cable and discard it Remov...

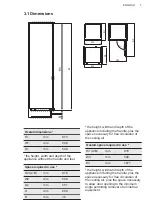
Page 7: ...height width and depth of the appliance including the handle plus the space necessary for free circulation of the cooling air Overall space required in use H3 A B mm 916 W3 mm 548 D3 mm 1071 the height width and depth of the appliance including the handle plus the space necessary for free circulation of the cooling air plus the space necessary to allow door opening to the minimum angle permitting ...

Page 8: ... accessible after installation 3 3 Electrical connection Before plugging in ensure that the voltage and frequency shown on the rating plate correspond to your domestic power supply The appliance must be earthed The power supply cable plug is provided with a contact for this purpose If the domestic power supply socket is not earthed connect the appliance to a separate earth in compliance with curre...

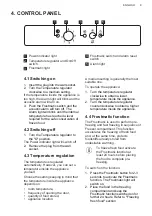
Page 9: ...g in mind that the temperature inside the appliance depends on room temperature frequency of opening the door quantity of food stored appliance location A medium setting is generally the most suitable one To operate the appliance 1 Turn the temperature regulator clockwise to obtain a lower temperature inside the appliance 2 Turn the temperature regulator counterclockwise to obtain a higher tempera...

Page 10: ...s temperature setting see Frostmatic Function 5 2 Storage of frozen food When activating an appliance for the first time or after a period out of use before putting the products in the compartment let the appliance run at least 3 hours with the Frostmatic function switched on The freezer drawers ensure that it is quick and easy to find the food package you want If large quantities of food are to b...

Page 11: ...ctly next to it Place food at room temperature in the part of the freezer compartment where there is no frozen food Do not eat ice cubes water ices or ice lollies immediately after taking them out of the freezer Risk of frostbites Do not re freeze defrosted food If the food has defrosted cook it cool it down and then freeze it 6 3 Hints for storage of frozen food Freezer compartment is the one mar...

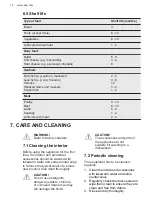
Page 12: ...e using the appliance for the first time the interior and all internal accessories should be washed with lukewarm water and some neutral soap to remove the typical smell of a brand new product then dried thoroughly CAUTION Do not use detergents abrasive powders chlorine or oil based cleaners as they will damage the finish CAUTION The accessories and parts of the appliance are not suitable for wash...

Page 13: ...the floor from the defrosting water e g with a cloth or a flat vessel 4 In order to speed up the defrosting process place a pot of warm water in the freezer compartment In addition remove pieces of ice that break away before defrosting is complete Use the supplied ice scraper for this purpose 5 When defrosting is complete dry the interior thoroughly Keep the ice scraper for the future use 6 Switch...

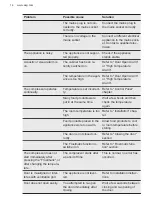
Page 14: ...er Many food products were put in at the same time Wait a few hours and then check the temperature again The room temperature is too high Refer to Installation chap ter Food products placed in the appliance were too warm Allow food products to cool to room temperature before storing The door is not closed cor rectly Refer to Closing the door section The Frostmatic function is switched on Refer to ...

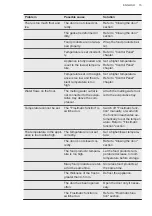
Page 15: ...or Attach the melting water out let to the evaporative tray Temperature cannot be set The Frostmatic function is switched on Switch off Frostmatic func tion manually or wait until the function deactivates au tomatically to set the temper ature Refer to Frostmatic function section The temperature in the appli ance is too low too high The temperature is not set correctly Set a higher lower tempera t...

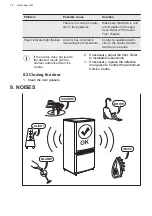
Page 16: ...ing the temperature Contact a qualified electri cian or the nearest Author ized Service Centre If the advice does not lead to the desired result call the nearest Authorized Service Centre 8 2 Closing the door 1 Clean the door gaskets 2 If necessary adjust the door Refer to installation instructions 3 If necessary replace the defective door gaskets Contact the Authorised Service Centre 9 NOISES SSS...

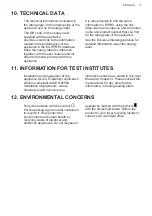
Page 17: ...nk www theenergylabel eu for detailed information about the energy label 11 INFORMATION FOR TEST INSTITUTES Installation and preparation of the appliance for any EcoDesign verification shall be compliant with EN 62552 Ventilation requirements recess dimensions and minimum rear clearances shall be as stated in this User Manual at Chapter 3 Please contact the manufacturer for any other further infor...

Page 18: ...jos folletos soluciones a problemas e información de servicio y reparación www aeg com support Registrar su producto para recibir un mejor servicio www registeraeg com Comprar accesorios artículos de consumo y piezas de recambio originales para su aparato www aeg com shop ATENCIÓN AL CLIENTE Y SERVICIO Le recomendamos que utilice recambios originales Cuando se ponga en contacto con nuestro Centro ...

Page 19: ...nstruidos Este aparato puede ser utilizado por personas con discapacidades muy extensas y complejas siempre que hayan sido instruidas adecuadamente Es necesario mantener alejados del aparato a los niños de menos de 3 años salvo que estén bajo supervisión continua No deje que los niños jueguen con el aparato La limpieza y mantenimiento de usuario del producto no podrán ser realizados por niños sin ...

Page 20: ...partimientos para alimentos del aparato salvo si son del tipo recomendado por el fabricante No utilice pulverizadores ni vapor de agua para limpiar el aparato Limpie el aparato con un paño suave humedecido Utilice solo detergentes neutros No utilice productos abrasivos estropajos duros disolventes ni objetos metálicos Cuando el aparato esté vacío durante un largo período apáguelo descongélelo límp...

Page 21: ...l producto asegúrese de que el cable de alimentación no queda atrapado o doblado ADVERTENCIA No utilice adaptadores de enchufes múltiples ni cables prolongadores El aparato debe conectarse a tierra Asegúrese de que los parámetros de la placa de características son compatibles con los valores eléctricos del suministro eléctrico Utilice siempre una toma con aislamiento de conexión a tierra correctam...

Page 22: ...frir lesiones o dañar el aparato Antes de proceder con el mantenimiento apague el aparato y desconecte el enchufe de la red Este equipo contiene hidrocarburos en la unidad de refrigeración Solo una persona cualificada debe realizar el mantenimiento y la recarga de la unidad Examine periódicamente el desagüe del aparato y límpielo si fuera necesario Si el desagüe se bloquea el agua descongelada se ...

Page 23: ...tercambiador de calor 3 INSTALACIÓN ADVERTENCIA Consulte los capítulos sobre seguridad ADVERTENCIA Consulte el documento de instrucciones de instalación para instalar su aparato ADVERTENCIA Fije el aparato de acuerdo con las instrucciones de instalación para evitar el riesgo de inestabilidad 3 1 Dimensiones B A H1 W1 D1 W2 D2 W3 D3 9 0 Dimensiones generales H1 mm 873 Dimensiones generales W1 mm 54...

Page 24: ...parato está destinado a ser utilizado a una temperatura ambiente que oscila entre 10 C y 43 C Solo se puede garantizar el correcto funcionamiento del aparato dentro del rango de temperatura especificado Si tiene cualquier duda respecto al lugar de instalación del aparato consulte al vendedor a nuestro servicio de atención al cliente o al servicio técnico autorizado más cercano Puede que en algún m...

Page 25: ...Luz de alarma 4 1 Encendido 1 Introduzca el enchufe en la toma de pared 2 Gire el regulador de temperatura hacia la derecha a un ajuste intermedio Si la temperatura interior del aparato es muy elevada parpadea la luz de alarma y suena una alarma acústica 3 Pulse el interruptor Frostmatic para desactivar la alarma acústica El indicador luminoso de alarma parpadeará hasta que la temperatura interna ...

Page 26: ...limentos frescos La función se detiene automáticamente después de 52 horas La función se puede desactivar en cualquier momento pulsando el interruptor Frostmatic durante 2 3 segundos 4 5 Alarma de temperatura alta Cuando se produce un aumento de la temperatura en el compartimento congelador por ejemplo debido a un fallo de alimentación la luz de la alarma parpadea y el sonido se activa El sonido s...

Page 27: ... agua fría Esta operación depende del tiempo disponible y del tipo de alimento Los trozos pequeños pueden incluso cocinarse aún congelados 5 4 Producción de cubitos de hielo Este aparato cuenta con una o varias bandejas para la producción de cubitos de hielo No utilice instrumentos metálicos para retirar las bandejas del congelador 1 Rellene estas bandejas con agua 2 Ponga las bandejas de hielo en...

Page 28: ... conservación de los alimentos congelados Una temperatura más alta en el interior del aparato puede reducir la vida útil Todo el compartimento congelador es adecuado para el almacenamiento de alimentos congelados Deje suficiente espacio alrededor de los alimentos para permitir que el aire circule libremente Para un almacenamiento adecuado consulte la etiqueta de los envases de los alimentos para v...

Page 29: ... los productos nuevos A continuación seque todo bien PRECAUCIÓN No utilice detergentes polvos abrasivos ni limpiadores a base de cloro o aceite ya que podrían dañar el acabado PRECAUCIÓN Los accesorios y las piezas del aparato no deben lavarse en el lavavajillas 7 2 Limpieza periódica El equipo debe limpiarse de forma regular 1 Limpie el interior y los accesorios con agua templada y un jabón neutr...

Page 30: ...ador Además retire los trozos de hielo que se desprendan antes de que finalice la descongelación Utilice para ello el raspador de hielo suministrado 5 Cuando la descongelación haya terminado seque a fondo el interior del aparato Guarde el raspador de hielo para su uso futuro 6 Encienda el aparato y cierre la puerta 7 Ajuste el regulador de temperatura para obtener el máximo frío y haga funcionar e...

Page 31: ...ala ción Los alimentos introducidos en el aparato estaban dema siado calientes Deje que los alimentos se enfríen a temperatura am biente antes de guardarlos La puerta no está bien cerra da Consulte la sección Cierre de la puerta La función Frostmatic está activada Consulte la sección Función Frostmatic El compresor no se pone en marcha inmediatamente después de pulsar Frostma tic o tras cambiar la...

Page 32: ... puede ajustar la tem peratura La función Frostmatic está activada Apague la función Frostma tic manualmente o espere hasta que la función se de sactive automáticamente an tes de ajustar la temperatu ra Consulte la sección Fun ción Frostmatic La temperatura del aparato es demasiado baja alta La temperatura no se ha ajustado correctamente Seleccione una temperatura más alta más baja La puerta no es...

Page 33: ...e a un electricista ho mologado o al centro de ser vicio técnico autorizado más cercano Si el consejo anterior no ofrece resultados llame al servicio técnico autorizado más cercano 8 2 Cierre de la puerta 1 Limpie las juntas de la puerta 2 Si es necesario ajuste la puerta Consulte las instrucciones de instalación 3 Si es necesario cambie las juntas defectuosas Póngase en contacto con el servicio t...

Page 34: ...ara obtener información detallada sobre la etiqueta energética 11 INFORMACIÓN PARA LOS INSTITUTOS DE PRUEBAS La instalación y la preparación del aparato para cualquier verificación de EcoDiseño deberá cumplir con EN 62552 Los requisitos de ventilación las dimensiones de los huecos y las distancias mínimas traseras serán los indicados en el Capítulo 3 de este Manual de Usuario Por favor póngase en ...

Page 35: ......

Page 36: ...www aeg com shop 211627771 A 092020 ...

Reviews: