background image

Do not use water spray and steam to clean the

appliance.

Clean the appliance with a moist soft cloth. Only use

neutral detergents. Do not use abrasive products,

abrasive cleaning pads, solvents or metal objects.

Do not store explosive substances such as aerosol

cans with a flammable propellant in this appliance.

If the supply cord is damaged, it must be replaced by

the manufacturer, its Authorised Service Centre or

similarly qualified persons in order to avoid a hazard.

2. 

SAFETY INSTRUCTIONS

2.1 

Installation

WARNING!

Only a qualified person must

install this appliance.

• Remove all the packaging.

• Do not install or use a damaged

appliance.

• Obey the installation instruction

supplied with the appliance.

• Always be careful when you move the

appliance because it is heavy. Always

wear safety gloves.

• Make sure the air can circulate around

the appliance.

• Wait at least 4 hours before

connecting the appliance to the

power supply. This is to allow the oil

to flow back in the compressor.

• Do not install the appliance close to

radiators or cookers, oven or hobs.

• The rear of the appliance must stand

against the wall.

• Do not install the appliance where

there is direct sunlight.

• Do not install this appliance in areas

that are too humid or too colds, such

as the construction appendices,

garages or wine cellars.

• When you move the appliance, lift it

by the front edge to avoid scratching

the floor.

2.2 

Electrical connection

WARNING!

Risk of fire and electrical

shock.

• The appliance must be earthed.

• Make sure that the electrical

information on the rating plate agrees

with the power supply. If not, contact

an electrician.

• Always use a correctly installed

shockproof socket.

• Do not use multi-plug adapters and

extension cables.

• Make sure not to cause damage to

the electrical components (e.g. mains

plug, mains cable, compressor).

Contact the Authorised Service

Centre or an electrician to change the

electrical components.

• The mains cable must stay below the

level of the mains plug.

• Connect the mains plug to the mains

socket only at the end of the

installation. Make sure that there is

access to the mains plug after the

installation.

• Do not pull the mains cable to

disconnect the appliance. Always pull

the mains plug.

2.3 

Use

WARNING!

Risk of injury, burns,

electrical shock or fire.

www.aeg.com

20

Summary of Contents for A51100TSW1

Page 1: ...NL Gebruiksaanwijzing 2 Vriezer EN User Manual 18 Freezer FR Notice d utilisation 33 Congélateur DE Benutzerinformation 49 Gefriergerät A51100TSW1 ...

Page 2: ... een paar minuten de tijd om het door te lezen zodat u er optimaal van kunt profiteren Ga naar onze website voor Advies over gebruik brochures het oplossen van problemen en onderhoudsinformatie www aeg com Registreer uw product voor een betere service www registeraeg com Koop accessoires verbruiksartikelen en originele reserveonderdelen voor uw apparaat www aeg com shop KLANTENSERVICE Gebruik alti...

Page 3: ... begrijpen Laat kinderen niet met het apparaat spelen Reiniging en onderhoud mag niet worden uitgevoerd door kinderen zonder toezicht Houd alle verpakkingsmaterialen uit de buurt van kinderen 1 2 Algemene veiligheid Dit apparaat is bedoeld voor huishoudelijk gebruik of gelijksoortige toepassingen zoals Boerderijen personeelskeukens in winkels kantoren of andere werkomgevingen Door gasten in hotels...

Page 4: ... nabijheid van radiators fornuizen ovens of kookplaten De achterzijde van het apparaat moet tegen de muur worden geplaatst Installeer het apparaat niet op een plaats met direct zonlicht Gebruik dit apparaat niet in gebieden die te vochtig of te koud zijn zoals bijgebouwen garages of kelders Til de voorkant van het apparaat op als u hem wilt verplaatsen om krassen op de vloer te voorkomen 2 2 Aansl...

Page 5: ...nden items uit het vriesvak verwijderd of aanraakt Vries ontdooide voedingswaren nooit opnieuw in Bewaar de voedingswaren volgens de instructies op de verpakking 2 4 Onderhoud en reiniging WAARSCHUWING Gevaar voor letsel of schade aan het apparaat Schakel het apparaat uit en trek de stekker uit het stopcontact voordat u onderhoudshandelingen verricht Het koelcircuit van dit apparaat bevat koolwate...

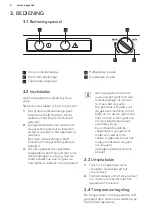
Page 6: ...e is uit pas dan de thermostaatknop aan volgens de hoeveelheid voedsel in het apparaat Als het apparaat een paar uur aan staat gaat het rode indicatielampje uit om aan te tonen dat de juiste temperatuur is bereikt voor de gekozen instelling en het blijft uit om aan te geven dat alles in orde is Het gaat aan als de vriezertemperatuur overmatig stijgt bijvoorbeeld nadat de vriezerdeur is geopend of ...

Page 7: ...adigen de lak 5 DAGELIJKS GEBRUIK WAARSCHUWING Raadpleeg de hoofdstukken Veiligheid 5 1 Invriezen van vers voedsel Het bovenste vriesvak is geschikt voor het invriezen van vers voedsel en voor het voor een lange periode bewaren van ingevroren en diepgevroren voedsel Om verse voeding in te vriezen plaats het in het vriescompartiment bovenaan en laat het daar gedurende 24 uur liggen Plaats het bevro...

Page 8: ...n strikt noodzakelijk 6 3 Tips voor het invriezen Om u te helpen het voedsel zo goed mogelijk in te vriezen volgen hier een paar belangrijke tips de maximale hoeveelheid voedsel die in 24 uur ingevroren kan worden staat vermeld op het typeplaatje het invriesproces duurt 24 uur Tijdens deze periode moet er geen ander in te vriezen voedsel worden toegevoegd vries alleen vers en grondig schoongemaakt...

Page 9: ...g ervoor dat u het koelsysteem niet beschadigt LET OP Til de voorkant van de koelkast op als u hem wilt verplaatsen om krassen op de vloer te voorkomen Het apparaat moet regelmatig worden schoongemaakt 1 Maak de binnenkant en de accessoires schoon met lauw water en wat neutrale zeep 2 Controleer de afdichtingen regelmatig en wrijf ze schoon om u ervan te verzekeren dat ze schoon en vrij van restje...

Page 10: ...svak zetten Verwijder bovendien stukken ijs die afbreken voordat het ontdooien voltooid is 4 Na afloop van het ontdooien de binnenkant grondig droog maken en de schraper bewaren voor toekomstig gebruik 5 Zet het apparaat aan 6 Draai de thermostaatknop naar de stand Volgeladen en wacht minimaal 8 uur 7 Zet nadat het rode indicatielampje is uit gegaan het eerder verwijderde voedsel terug in het vrie...

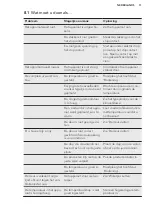
Page 11: ...mperatuur De omgevingstemperatuur is te hoog Zie het typeplaatje voor de klimaatklasse Het voedsel dat in het appa raat werd geplaatst was te warm Laat voedsel afkoelen tot ka mertemperatuur voordat u het bewaart De deur is niet goed geslo ten Zie De deur sluiten Er is te veel rijp en ijs De deur is niet correct gesloten of de deurpakking is vervormd vies Zie De deur sluiten De dop van de waterafv...

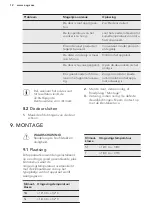
Page 12: ...ig is Bel wanneer het advies niet tot resultaten leidt de dichtstbijzijnde klantenservice voor dit merk 8 2 De deur sluiten 1 Maak de afdichtingen van de deur schoon 2 Stel de deur indien nodig af Raadpleeg Montage 3 Vervang indien nodig de defecte deurafdichtingen Neem contact op met de klantenservice 9 MONTAGE WAARSCHUWING Raadpleeg de hoofdstukken Veiligheid 9 1 Plaatsing Dit apparaat kan worde...

Page 13: ...rvoor dat het apparaat waterpas staat wanneer u het plaatst Deze stand kan bereikt worden met de twee afstelbare voetjes die aan de voorkant en onderkant van het apparaat bevestigd zijn 9 4 Locatie De stroomtoevoer aan het apparaat moet verbroken kunnen worden de stekker moet daarom na de installatie gemakkelijk toegankelijk zijn Het apparaat moet ver van hittebronnen zoals radiatoren boilers dire...

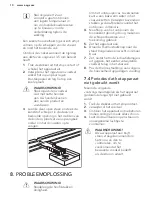
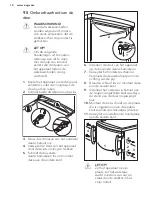
Page 14: ... door deze iets omlaag te trekken 5 Schroef de bovenste deurscharnierpen los en monteer deze aan de andere kant 2 1 6 Installeer de deur van het apparaat op de bovenste deurscharnierpen 7 Verwijder het onderste scharnier Verplaats de deurscharnierpen in de richting van de pijl 8 Draai de schroef los en monteer deze aan de andere kant 9 Installeer het onderste scharnier aan de tegenovergestelde kan...

Page 15: ...t elektriciteitsnet Zorg er vóór het aansluiten voor dat het voltage en de frequentie op het typeplaatje overeenkomen met de stroomtoevoer in uw huis Dit apparaat moet worden aangesloten op een geaard stopcontact De netsnoerstekker is voorzien van een contact voor dit doel Als het stopcontact niet geaard is sluit het apparaat dan aan op een afzonderlijk aardepunt in overeenstemming met de geldende...

Page 16: ...panning Volt 230 240 Tijd Hz 50 De technische gegevens staan op het typeplaatje aan de binne of buitenkant van het apparaat en op het energielabel 12 MILIEUBESCHERMING Recycle de materialen met het symbool Gooi de verpakking in een geschikte verzamelcontainer om het te recyclen Help om het milieu en de volksgezondheid te beschermen en recycle het afval van elektrische en www aeg com 16 ...

Page 17: ...tronische apparaten Gooi apparaten gemarkeerd met het symbool niet weg met het huishoudelijk afval Breng het product naar het milieustation bij u in de buurt of neem contact op met de gemeente NEDERLANDS 17 ...

Page 18: ...e spend a few minutes reading to get the very best from it Visit our website for Get usage advice brochures trouble shooter service information www aeg com Register your product for better service www registeraeg com Buy Accessories Consumables and Original spare parts for your appliance www aeg com shop CUSTOMER CARE AND SERVICE Always use original spare parts When contacting our Authorised Servi...

Page 19: ...en play with the appliance Cleaning and user maintenance shall not be made by children without supervision Keep all packaging away from children 1 2 General Safety This appliance is intended to be used in household and similar applications such as Farm houses staff kitchen areas in shops offices and other working environments By clients in hotels motels bed and breakfast and other residential type...

Page 20: ...rs oven or hobs The rear of the appliance must stand against the wall Do not install the appliance where there is direct sunlight Do not install this appliance in areas that are too humid or too colds such as the construction appendices garages or wine cellars When you move the appliance lift it by the front edge to avoid scratching the floor 2 2 Electrical connection WARNING Risk of fire and elec...

Page 21: ...our hands are wet or damp Do not freeze again food that has been thawed Obey the storage instructions on the packaging of frozen food 2 4 Care and cleaning WARNING Risk of injury or damage to the appliance Before maintenance deactivate the appliance and disconnect the mains plug from the mains socket This appliance contains hydrocarbons in the cooling unit Only a qualified person must do the maint...

Page 22: ...Regulator according to the quantity of the stored foods A few hours after starting up the Red Indicator Light will go out to show that the correct temperature has been reached for the setting chosen and will stay out to indicate that everything is in order It will come on if the freezer temperature rises unduly for instance after opening the freezer door or placing food inside the cabinet but the ...

Page 23: ...rozen food for a long time To freeze fresh food place it in the freezing top compartment and leave it there for 24 hours Move frozen food in the storing lower compartments to make room for another freezing The maximum amount of food that can be frozen in 24 hours is specified on the rating plate a label located on the inside of the appliance The freezing process lasts 24 hours during this period d...

Page 24: ... small portions to enable it to be rapidly and completely frozen and to make it possible subsequently to thaw only the quantity required wrap up the food in aluminium foil or polythene and make sure that the packages are airtight do not allow fresh unfrozen food to touch food which is already frozen thus avoiding a rise in temperature of the latter lean foods store better and longer than fatty one...

Page 25: ...formance of the appliance and save electricity consumption 7 3 Defrosting the freezer CAUTION Never use sharp metal tools to scrape off frost from the evaporator as you could damage it Do not use a mechanical device or any artificial means to speed up the thawing process other than those recommended by the manufacturer A temperature rise of the frozen food packs during defrosting may shorten their...

Page 26: ... 2 Remove all food 3 Defrost if necessary and clean the appliance and all accessories 4 Leave the door doors open to prevent unpleasant smells WARNING If the cabinet will be kept on ask somebody to check it once in a while to prevent the food inside from spoiling in case of a power failure 8 TROUBLESHOOTING WARNING Refer to Safety chapters 8 1 What to do if Problem Possible cause Solution The appl...

Page 27: ...perly Wrap the food products bet ter Temperature is set incorrect ly Refer to Operation chap ter Door is misaligned or inter feres with ventilation grill The appliance is not level led Refer to Levelling The temperature in the ap pliance is too low too high The temperature regulator is not set correctly Set a higher lower tempera ture The door is not closed cor rectly Refer to Closing the door The...

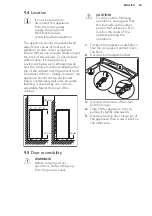
Page 28: ...C to 43 C Some functional problems might occur for some types of models when operating outside of that range The correct operation can only be guaranteed within the specified temperature range If you have any doubts regarding where to install the appliance please turn to the vendor to our customer service or to the nearest Authorised Service Centre 9 2 Rear spacers In the bag with the documentatio...

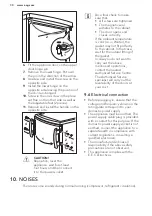
Page 29: ... not be positioned below overhanging wall units Accurate levelling is ensured by one or more adjustable feet at the base of the cabinet 100 mm 15 mm 15 mm 9 5 Door reversibility WARNING Before carrying out any operations remove the plug from the power socket CAUTION To carry out the following operations we suggest that this be made with another person that will keep a firm hold on the doors of the...

Page 30: ...t perfectly to the cabinet In that case wait for the natural fitting of the gasket In case you do not want to carry out the above mentioned operations contact the nearest Authorised Service Centre The Authorised Service specialist will carry out the reversibility of the doors at your cost 9 6 Electrical connection Before plugging in ensure that the voltage and frequency shown on the rating plate c...

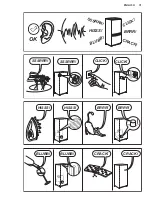
Page 31: ...BRRR HISSS CLICK BLUBB CRACK SSSRRR OK CLICK CLICK SSSRRR SSSRRR BRRR BRRR HISSS HISSS BLUBB BLUBB CRACK CRACK ENGLISH 31 ...

Page 32: ...f the appliance and in the energy label 12 ENVIRONMENT CONCERNS Recycle the materials with the symbol Put the packaging in applicable containers to recycle it Help protect the environment and human health and to recycle waste of electrical and electronic appliances Do not dispose appliances marked with the symbol with the household waste Return the product to your local recycling facility or conta...

Page 33: ...uillez prendre quelques instants pour lire cette notice afin d utiliser au mieux votre appareil Visitez notre site Internet pour Obtenir des conseils d utilisation des brochures de l aide des informations www aeg com Enregistrer votre produit pour obtenir un meilleur service www registeraeg com Acheter des accessoires consommables et pièces de rechange d origine pour votre appareil www aeg com sho...

Page 34: ...rité leur ont été données et si les risques encourus ont été appréhendées Les enfants ne doivent pas jouer avec l appareil Le nettoyage et l entretien par l usager ne doivent pas être effectués par des enfants sans surveillance Ne laissez pas les emballages à la portée des enfants 1 2 Consignes générales de sécurité Cet appareil est conçu uniquement pour un usage domestique et des utilisations tel...

Page 35: ...n appareil endommagé Suivez scrupuleusement les instructions d installation fournies avec l appareil Soyez toujours vigilants lorsque vous déplacez l appareil car il est lourd Portez toujours des gants de sécurité Assurez vous que l air circule autour de l appareil Attendez au moins 4 heures avant de brancher l appareil sur le secteur Cela permet à l huile de refouler dans le compresseur N install...

Page 36: ...appareil Ne placez jamais de boissons gazeuses dans le congélateur Cela engendrerait une pression sur le récipient de la boisson Ne stockez jamais de gaz ou de liquide inflammable dans l appareil Ne placez pas de produits inflammables ou d éléments imbibés de produits inflammables à l intérieur ou à proximité de l appareil ni sur celui ci Ne touchez pas le compresseur ni le condenseur Ils sont cha...

Page 37: ...er pendant 8 heures avant d y placer des aliments pour lui permettre d atteindre la température idéale Le voyant rouge restera allumé jusqu à ce que l appareil atteigne la bonne température 3 Lorsque l appareil a atteint la température sélectionnée le voyant rouge s est éteint réglez le thermostat selon la quantité d aliments entreposés dans l appareil Quelques heures après la mise en marche le vo...

Page 38: ... odeur de neuf puis séchez les soigneusement ATTENTION N utilisez jamais de produits abrasifs ou caustiques car ils pourraient endommager le revêtement 5 UTILISATION QUOTIDIENNE AVERTISSEMENT Reportez vous aux chapitres concernant la sécurité 5 1 Congeler les aliments frais La zone de congélation partie supérieure est idéale pour congeler des denrées fraîches et conserver à long terme des aliments...

Page 39: ...onomie d énergie Évitez d ouvrir trop souvent la porte du congélateur et ne la laissez ouverte que le temps nécessaire 6 3 Conseils pour la congélation Voici quelques conseils importants pour obtenir un processus de congélation optimal respectez la quantité maximale de denrées fraîches que vous pouvez congeler par 24 heures figurant sur la plaque signalétique le processus de congélation durant 24 ...

Page 40: ...son circuit de réfrigération l entretien et la recharge ne doivent donc être effectués que par du personnel qualifié Les pièces et accessoires de l appareil ne doivent pas être lavés au lave vaisselle 7 2 Nettoyage périodique ATTENTION Ne tirez pas ne déplacez pas n endommagez pas les tuyaux et ou câbles qui se trouvent à l intérieur de l appareil ATTENTION Attention à ne pas endommager le système...

Page 41: ...d arrachement de la peau 3 Maintenez la porte ouverte et utilisez la spatule en plastique comme gouttière en l insérant dans l emplacement prévu à cet effet Placez au dessous un récipient dans lequel s écoulera l eau de dégivrage Le dégivrage peut être accéléré en plaçant un récipient d eau chaude dans le compartiment congélateur Retirez également les morceaux de glace au fur et à mesure qu ils se...

Page 42: ...âble d alimentation dans la prise de courant La prise de courant n est pas alimentée Branchez un autre appareil électrique à la prise de cou rant Contactez un électri cien qualifié L appareil est bruyant L appareil n est pas stable Assurez vous de la stabilité de l appareil Le compresseur fonctionne en permanence Il y a une erreur dans le rég lage de la température Reportez vous au chapitre Foncti...

Page 43: ...sse élevée Le thermostat n est pas ré glé correctement Augmentez réduisez la tem pérature La porte n est pas fermée correctement Reportez vous au chapitre Fermeture de la porte La température des produits est trop élevée Laissez les aliments refroidir à température ambiante avant de les placer dans l appareil Trop de produits ont été in troduits simultanément Introduisez moins de pro duits en même...

Page 44: ... entretoises qui doivent être mises en place comme sur l illustration 1 Introduisez les entretoises dans les orifices Veillez à ce que la flèche A se trouve dans la position illustrée sur l image 45 45 A 1 2 2 2 Tournez les entretoises de 45 vers la gauche jusqu à ce qu elles se bloquent 9 3 Mise de niveau Lorsque vous installez l appareil veillez à le placer de niveau Servez vous des deux pieds r...

Page 45: ...férieure de la porte 4 Retirez la porte de l appareil en la tirant légèrement vers le bas 5 Dévissez la goupille de la charnière de porte supérieure de l appareil puis revissez la de l autre côté 2 1 6 Installez la porte de l appareil sur la goupille de la charnière de porte supérieure 7 Retirez la charnière inférieure Placez la goupille dans le sens de la flèche 8 Dévissez et installez la vis sur...

Page 46: ... Branchement électrique Avant de brancher l appareil assurez vous que la tension et la fréquence indiquées sur la plaque signalétique correspondent à celles de votre réseau électrique domestique L appareil doit être relié à la terre La fiche du cordon d alimentation est fournie avec un contact à cette fin Si la prise de courant n est pas mise à la terre branchez l appareil à une mise à la terre sé...

Page 47: ...RR SSSRRR BRRR BRRR HISSS HISSS BLUBB BLUBB CRACK CRACK 11 CARACTÉRISTIQUES TECHNIQUES 11 1 Caractéristiques techniques Hauteur mm 850 Largeur mm 550 Profondeur mm 612 Autonomie de fonctionnement Heures 22 FRANÇAIS 47 ...

Page 48: ...E L ENVIRONNEMENT Recyclez les matériaux portant le symbole Déposez les emballages dans les conteneurs prévus à cet effet Contribuez à la protection de l environnement et à votre sécurité recyclez vos produits électriques et électroniques Ne jetez pas les appareils portant le symbole avec les ordures ménagères Emmenez un tel produit dans votre centre local de recyclage ou contactez vos services mu...

Page 49: ...sich ein paar Minuten Zeit zum Lesen um seine Vorzüge kennen zu lernen Besuchen Sie uns auf unserer Website um Anwendungshinweise Prospekte Fehlerbehebungs und Service Informationen zu erhalten www aeg com Ihr erworbenes Produkt zu registrieren um den besten Service dafür zu gewährleisten www registeraeg com Zubehör Verbrauchsmaterial und Original Ersatzteile für Ihr Gerät zu erwerben www aeg com ...

Page 50: ...es Geräts eingewiesen wurden und die mit dem Gerät verbundenen Gefahren verstanden haben Kinder dürfen nicht mit dem Gerät spielen Wartung oder Reinigung des Geräts dürfen nicht von Kindern ohne Aufsicht erfolgen Alle Verpackungsmaterialien von Kindern fernhalten 1 2 Allgemeine Sicherheit Dieses Gerät ist für die Verwendung im Haushalt und ähnliche Zwecke vorgesehen wie z B Bauernhöfe Personalküch...

Page 51: ... ein beschädigtes Gerät nicht auf und benutzen Sie es nicht Halten Sie sich an die mitgelieferte Montageanleitung Seien Sie beim Umsetzen des Geräts vorsichtig denn es ist schwer Tragen Sie stets Sicherheitshandschuhe Stellen Sie sicher dass die Luft um das Gerät zirkulieren kann Warten Sie mindestens 4 Stunden bevor Sie das Gerät an das Stromnetz anschließen Dies ist erforderlich damit das Öl in ...

Page 52: ...llen Sie bitte sicher dass es keine Flammen und Zündquellen im Raum gibt Belüften Sie den Raum Stellen Sie keine heißen Gegenstände auf die Kunststoffteile des Geräts Legen Sie Erfrischungsgetränke nicht in das Gefrierfach Dadurch entsteht Druck auf den Getränkebehälter Bewahren Sie keine entzündbaren Gase und Flüssigkeiten im Gerät auf Platzieren Sie keine entflammbaren Produkte oder Gegenstände ...

Page 53: ...teckdose 1 Die grüne Kontrolllampe leuchtet und bleibt eingeschaltet bis das Gerät ausgeschaltet wird 2 Lassen Sie das Gerät 8 Stunden eingeschaltet bis die richtige Temperatur erreicht ist bevor Sie Lebensmittel einlagern Die rote Kontrolllampe leuchtet ebenfalls bis die richtige Temperatur erreicht ist 3 Stellen Sie den Temperaturregler gemäß der eingelagerten Menge Lebensmittel ein sobald die e...

Page 54: ... besten durch Auswaschen der Innenteile mit lauwarmem Wasser und einer neutralen Seife Sorgfältig nachtrocknen ACHTUNG Verwenden Sie keine Reinigungsmittel oder Scheuerpulver da diese die Oberfläche beschädigen 5 TÄGLICHER GEBRAUCH WARNUNG Siehe Kapitel Sicherheitshinweise 5 1 Einfrieren frischer Lebensmittel Der obere Tiefkühlbereich eignet sich zum Einfrieren von frischen Lebensmitteln und zum L...

Page 55: ...urreglers wenn sich der Kompressor ein oder ausschaltet 6 2 Energiespartipps Öffnen Sie die Tür nicht zu häufig und lassen Sie diese nicht länger offen als notwendig 6 3 Hinweise zum Einfrieren Im Folgenden finden Sie einige wertvolle Tipps für einen optimalen Gefriervorgang Die maximale Menge an Lebensmitteln die in 24 Stunden eingefroren werden kann ist auf dem Typschild angegeben Der Gefriervor...

Page 56: ... diesem Grund dürfen die Wartung und das Nachfüllen ausschließlich durch autorisiertes Fachpersonal erfolgen Das Zubehör des Geräts und die Innenteile eignen sich nicht für die Reinigung im Geschirrspüler 7 2 Regelmäßige Reinigung ACHTUNG Ziehen Sie nicht an Leitungen und oder Kabeln im Innern des Geräts und achten Sie darauf diese nicht zu verschieben oder zu beschädigen ACHTUNG Bitte achten Sie ...

Page 57: ...en an den Lebensmitteln festfrieren 3 Lassen Sie die Tür des Geräts offen stehen und setzen Sie den Kunststoffschaber in die entsprechende Aufnahme unten in der Mitte ein Stellen Sie eine Schale zum Auffangen des Tauwassers darunter Stellen Sie eine Schale mit warmem Wasser in das Gefrierfach um den Abtauprozess zu beschleunigen Entfernen Sie bereits während des Abtauprozesses vorsichtig Eisstücke...

Page 58: ...an der Steckdose an Testen Sie ob ein anderes Gerät an dieser Steckdose funktioniert Wenden Sie sich an eine Elektrofachkraft Das Gerät erzeugt Geräu sche Das Gerät ist nicht ord nungsgemäß aufgestellt Kontrollieren Sie ob das Gerät stabil steht Der Kompressor arbeitet ständig Die Temperatur ist nicht richtig eingestellt Siehe Kapitel Betrieb Es wurden viele Lebensmit tel gleichzeitig zum Einfrie ...

Page 59: ... Tür ist nicht richtig ges chlossen Siehe Schließen der Tür Die Temperatur der zu küh lenden Lebensmittel ist zu hoch Lassen Sie die Lebensmittel auf Raumtemperatur abküh len bevor Sie sie in das Ger ät stellen Es wurden zu viele Leben smittel gleichzeitig einge legt Legen Sie weniger Leben smittel gleichzeitig ein Die Reifschicht ist dicker als 4 5 mm Tauen Sie das Gerät ab Die Tür wurde zu häufi...

Page 60: ...n befinden sich zwei Distanzstücke die wie in der Abbildung gezeigt angebracht werden müssen 1 Setzen Sie die Distanzstücke in die Öffnungen ein Stellen Sie sicher dass der Pfeil A wie in der Abbildung gezeigt ausgerichtet ist 45 45 A 1 2 2 2 Drehen Sie die Distanzstücke um 45 nach links bis sie einrasten 9 3 Ausrichten Bei der Aufstellung des Geräts ist dieses waagerecht auszurichten Dies lässt s...

Page 61: ...te sodass der Kompressor den Boden nicht berührt 2 Schrauben Sie beide Schraubfüße ab 3 Lösen Sie die Schrauben des unteren Türscharniers 4 Nehmen Sie die Gerätetür ab indem Sie sie vorsichtig nach unten ziehen 5 Schrauben Sie den Stift des oberen Türscharniers ab und schrauben Sie ihn an der gegenüberliegenden Seite wieder an 2 1 6 Hängen Sie die Gerätetür in den Stift des oberen Scharniers ein 7...

Page 62: ...tigkeiten nicht selber durchführen möchten Ein autorisierter Kundendiensttechniker wird die Türen dann auf Ihre Kosten umbauen 9 6 Elektrischer Anschluss Kontrollieren Sie vor der ersten Benutzung des Geräts ob die Netzspannung und frequenz Ihres Hausanschlusses mit den auf dem Typenschild angegebenen Anschlusswerten übereinstimmen Das Gerät muss geerdet sein Zu diesem Zweck ist der Netzstecker mi...

Page 63: ...BRRR HISSS CLICK BLUBB CRACK SSSRRR OK CLICK CLICK SSSRRR SSSRRR BRRR BRRR HISSS HISSS BLUBB BLUBB CRACK CRACK DEUTSCH 63 ...

Page 64: ...nnenseite des Geräts sowie auf der Energieplakette 12 UMWELTTIPPS Recyceln Sie Materialien mit dem Symbol Entsorgen Sie die Verpackung in den entsprechenden Recyclingbehältern Recyceln Sie zum Umwelt und Gesundheitsschutz elektrische und elektronische Geräte Entsorgen Sie Geräte mit diesem Symbol nicht mit dem Hausmüll Bringen Sie das Gerät zu Ihrer örtlichen Sammelstelle oder wenden Sie sich an I...

Page 65: ...DEUTSCH 65 ...

Page 66: ...www aeg com 66 ...

Page 67: ...DEUTSCH 67 ...

Page 68: ...www aeg com shop 212001100 A 062015 ...

Reviews: