


www.aeg-automotive.com
26
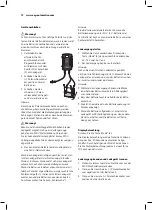
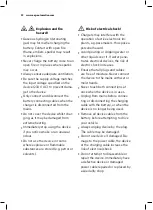
Connecting the device
Warning!
Always ensure correct polarity and firmly seated
battery clamps when connecting the device to a
battery, and prevent short-circuits from the battery
clamps touching.
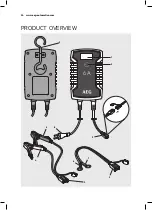
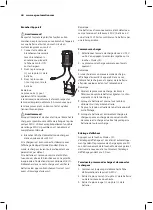
1. Connect the required
terminal connection
cable (with rings or
clamps) to the device’s
comfort plug connec-
tion (3).
2. Attach the red (+)
clamp to the (+) battery
terminal.
3. Attach the black (-)
clamp to the (-) battery
terminal.
Note:
The black (-) clamp can also be connected to the
vehicle chassis (Please refer to the auto maker‘s in-
structions!). Be sure both clamps have good contact
and are securely seated.
Warning!
Risk of fire and electric shock! If possible, connect
the charger to the 230 V power socket without
extension cable. In exceptions, use the shortest
possible undamaged and unrolled 230 V extension
cable.
4. Plug the charger plug into a 230V power socket.
With the charger correctly connected, the charger
will start, showing the start-up display (standby
mode). In this mode the charger will automatically
reset to the default settings.
If the battery is recognised to be defective or con
-
nected with the poles reversed, the error indicator
(Er 1) will light up. In this case, unplug the charger
and check the battery and the correct connection
(also see “Troubleshooting”).
Note:
A battery is recognised to be defective if the battery
voltage is below 3.0 V (6 V battery or 12 V battery).
Have the battery checked by a speciality repair
shop.
6 A
Mode
Start charging
1.
Repeatedly press the „Mode“ (2) button to select
the desired charging mode 6 V, 12 V or 24 V.
2.
The charging process will start automatically.
Note:
If an incorrect charging mode was selected, the
error code (Er 1) will appear. In this case unplug the
charger, wait briefly, and plug in again.
Note:
•
During the charging process the blocks inside the
battery symbol will flash based on the charging
status.
•
With the battery fully charged, all blocks inside
the battery symbol will light up.
•
In addition, the display will show the current
battery voltage.
•
Once the battery is fully charged, the charger will
switch to trickle charge to maintain the charging
status and protect the battery from overcharging.
Display light
Press the “Mode” button (2).
The display light will automatically switch off after
approx. 30 seconds whilst charging. Press the Mode
button at any time to light the display for approx.
30 seconds.
Complete charging and disconnect charger
1.
Always first unplug the power plug from the
230V alternating current socket.
2. Disconnect the black (-) clamp from the (-)
battery terminal or the vehicle chassis.
3. Disconnect the red (+) clamp from the (+)
battery terminal.
Summary of Contents for 10616
Page 10: ...www aeg automotive com 10 Produktübersicht 6 A Mode 1 2 3 3 3 8 5 6 7 4 9 ...
Page 16: ...www aeg automotive com 16 ...
Page 24: ...www aeg automotive com 24 Product Overview 6 A Mode 1 2 3 3 3 8 5 6 7 4 9 ...
Page 30: ...www aeg automotive com 30 ...
Page 38: ...www aeg automotive com 38 Aperçu du produit 6 A Mode 1 2 3 3 3 8 5 6 7 4 9 ...
Page 44: ...www aeg automotive com 44 ...
Page 52: ...www aeg automotive com 52 Descrizione del prodotto 6 A Mode 1 2 3 3 3 8 5 6 7 4 9 ...
Page 58: ...www aeg automotive com 58 ...
Page 66: ...www aeg automotive com 66 Popis výrobku 6 A Mode 1 2 3 3 3 8 5 6 7 4 9 ...
Page 72: ...www aeg automotive com 72 ...
Page 80: ...www aeg automotive com 80 Zarys produktu 6 A Mode 1 2 3 3 3 8 5 6 7 4 9 ...
Page 86: ...www aeg automotive com 86 ...
Page 94: ...www aeg automotive com 94 Prehľad produktu 6 A Mode 1 2 3 3 3 8 5 6 7 4 9 ...
Page 100: ...www aeg automotive com 100 ...
Page 101: ...Slovenčina 101 ...
Page 102: ...www aeg automotive com 102 ...
Page 103: ...AEG is a registered trademark used under license from AB Electrolux publ Made in China ...


