background image

30

Cihaz

ı

n

ı

z havaya ihtiyaç

duyar

Güvenlik nedenlerinden

ötürü, 

ş

ekilde gösterildi

ğ

i

gibi minimum havaland

ı

rma

sa

ğ

lanmal

ı

d

ı

r.

Dikkat: Havaland

ı

rma

menfezlerini, t

ı

kanmas

ı

n

ı

önleyerek temiz halde

tutunuz;

50 mm

min.

200 cm

2

200 cm

2

min.

D567

Kap

ı

 mente

ş

esinin yeniden

tak

ı

lmas

ı

Montaj yerinden ötürü mecbur

kal

ı

nmas

ı

 halinde, kap

ı

n

ı

n

ı

lma yönü sa

ğ

 yerine (fabrika

ayar

ı

) sola aç

ı

lacak 

ş

ekilde

de

ğ

i

ş

tirilebilir.

Uyar

ı

Kap

ı

n

ı

n aç

ı

lma yönünü

de

ğ

i

ş

tirirken, cihaz

ı

n fi

ş

i prize

tak

ı

l

ı

 olmamal

ı

d

ı

r. 

İş

leme

ba

ş

lamadan önce fi

ş

i prizden

çekiniz.

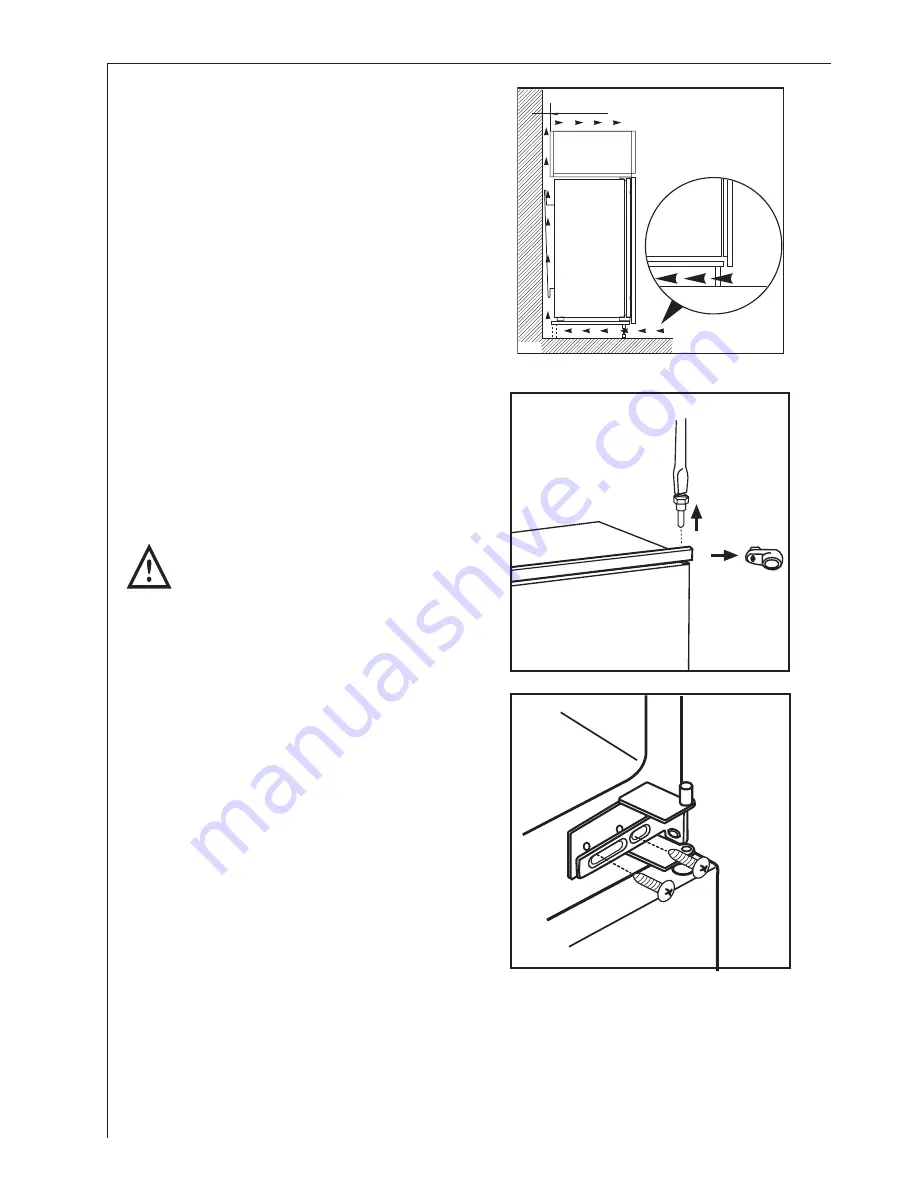
1.

Üstteki pimi sökünüz ve

aralay

ı

c

ı

y

ı

 (pulu) ç

ı

kart

ı

n

ı

z.

2.

Üst pimi ve üst kap

ı

y

ı

 ç

ı

kart

ı

n

ı

z.

3.

Orta mente

ş

eyi ve kapaklar

ı

sökerek kar

ş

ı

 tarafa tak

ı

n

ı

z.

4.

Alt kap

ı

y

ı

 sökünüz.

5.

Alt pimi sökünüz ve kar

ş

ı

 tarafa

tak

ı

n

ı

z.

6.

Alt kap

ı

y

ı

 geri tak

ı

n

ı

z.

7.

Orta mente

ş

eyi ve kapaklar

ı

kar

ş

ı

 tarafa tekrar vidalay

ı

n

ı

z.

Summary of Contents for Santo C 7 18 40-6i

Page 1: ...Fridge Freezer Kullanma Kýlavuzu User manual Buzdolabý SANTO C 7 18 40 6i ...

Page 2: ...an integral part of our products To ensure optimal and regular performance of your appliance please read this instruction manual carefully It will enable you to navigate all processes perfectly and most efficiently To refer to this manual any time you need to we recommend you to keep it in a safe place And please pass it to any future owner of the appliance We wish you much joy with your new appli...

Page 3: ...n 14 Prior to Initial Start Up 14 Starting up and temperature regulation 14 Interior Accessories 15 Storage shelves 15 Variable Inner Door 15 Variable Storage Box 16 Fresh food refrigeration 16 Freezing and storing frozen food 17 Preparation of Ice Cubes 18 Ice packs 18 Freezing Calendar 18 Defrosting 18 Switching off the appliance 19 Cleaning and Care 19 Energy Saving Tips 21 What to do if 21 Cor...

Page 4: ...initial start up Check the refrigerator for transport damage Under no circumstance should a damaged appliance be plugged in In the event of damage please contact the vendor Refrigerant The refrigerant isobutane R600a is contained within the refrigerant circuit of the appliance a natural gas with a high level of environmental compa tibility which is nevertheless flammable During transportation and ...

Page 5: ...ine etc in the freezer compartment Exception high alcohol content spirits can be stored in the freezer compartment Do not put ice creams or ice cubes in the mouth immediately after remo val from the freezer compartment Very cold ice can freeze to the lips or tongue and cause injury Do not touch frozen food with wet hands Your hands could freeze to the food Do not operate any electrical appliances ...

Page 6: ...r destroy any snap or latch closures This eliminates the danger that playing children lock them selves into the appliance danger of suffocation or place themselves into other life endangering situations Disposal The appliance may not be disposed of with domestic waste or bulky refu se The refrigerant circuit especially the heat exchanger at the back of the appliance may not be damaged The symbol o...

Page 7: ...fication for an ambient temperature of SN 10 bis 32 C N 16 bis 32 C ST 18 bis 38 C T 18 bis 43 C If installation next to a source of heat is unavoidable the following mini mum clearances must be maintained at the sides of the appliance for electric cookers 3 cm for oil and coal fired ranges 30 cm If these clearances cannot be maintained a heat insulating pad is required between the cooker and the ...

Page 8: ...side if the installation site requires Warning When changing the side at which the door opens the appliance may not be connected to the mains Remove plug from the mains beforehand 1 Unscrew the upper pin and remove the spacer 2 Remove the upper pin and the upper door 3 Unscrew the middle hinge und the covers on the opposite side 4 Remove the lower door 5 Unscrew the lower pin and refit it on the o...

Page 9: ... pin and the spacer on the opposite side Make sure that a distance of 44 mm is maintained in the lower part bet ween the kitchen furniture and the border of the appliance The lower hinge cover inserted in the accessories bag is useful to guaran tee the exact position of the kitchen furniture and the appliance Also make sure that the appliance does not clamp the mains cable 1 2 44mm D765 ...

Page 10: ...the appliance I I From the plastic cover E which is used to cover the hinge with the pivot pin you must take away the part as indicated in the drawing This operation is made easer since there is in the internal part of the cover hinge lid a groove that facila tes the removal of this coomponent Remove the part marked with DX if the pivot pin is inserted in the right hinge SX in opposite case ...

Page 11: ...re door up and down as shown in the figure and mark the position of exter nal holes After having drilled holes fix the guide with the screws supplied 21 mm 21 mm ca 50 mm 90 90 ca 50 mm PR266 Ha Hb Hc Hd Separate parts Ha Hb Hc Hd as shown in the figure ...

Page 12: ...ur niture door at 90 Insert the small square Hb into guide Ha Put together the appliance door and the furniture door and mark the holes as indicated in the figure PR167 Ha Hb 8mm Remove the brackets and mark a distance of 8 mm from the outer edge of the door where the nail must be fitted K Ha 8mm K ...

Page 13: ... of slots At the end of operations it is neces sary to check if the door of the fur niture closes properly PR167 1 Hd Hb Fix cover Hd on guide Hb until it clips into place D E D734 If the appliance is fixed to the side of the kitchen unit simply slacken the screws in the fixing brackets D move the brackets as shown in figu re and re tighten the screws Fit cover E ...

Page 14: ...ctrical installation must include suitable means of isolating the appliance from the mains e g fuse cut out current trip or similar with a minimum contact separation of 3 mm Attention The mains connection cable may only be replaced by a skilled electrician Please contact your dealer or our customer service department for repairs Starting up and temperature regulation Insert the plug into the plug ...

Page 15: ...able Inner Door The door compartments can be pulled up and removed and inserted at other positions as needed D338 The temperatures in the refrigerator compartment and freezer co partment cannot be independently regulated If you want the freeze fresh food rapidly select setting 6 ensuring that the temperature in the refrigerator compartment does not drop blow 0 C You should also promptly reset the ...

Page 16: ...ter and cheese these should be placed in special airtight containers or wapped in aluminium foil or polythene bags to exclude as much air as pos sible Milk bootles these should have a cap and should be stored in the bottle rack on the door Bananas potatoes onions and garlic if not packed must not be kept in the refrigerator Variable Storage Box Some models are equipped with a variable storage box ...

Page 17: ... under any circumstances be frozen a second time Containers with flammable gases or liquids can leak at low temperatures There is a risk of an explosion Do not store any containers with flamma ble materials such as for example spray cans fire extinguisher refill car tridges etc in the refrigerator freezer Bottles and cans must not be placed in the freezer They can burst when the contents freeze hi...

Page 18: ... use The defrost water drains out through a trough into a special container at the back of the appliance located over the motor compressor where it evaporates Freezer The freezer compartment however will become progressively covered with frost This should be removed with the special plastic scraper provided whenever the thickness of the frost exceeds 4 mm During this operation it is not necessary ...

Page 19: ...ment and clean thoroughly see section Cleaning and Care 5 Leave the door open to avoid the build up of odours 2 Switch off the appliance and pull out the plug or turn the temperature control knob to 0 3 Leave the freezer compartment door open 4 Insert the plastic scraper into the recess provided under the defrost water channel and place a collecting basin under it 5 Once defrosting is completed ke...

Page 20: ...e refrigerator Wrap frozen food in several layers of newspaper Store it in a cool place well covered 2 Defrost the freezer compartment prior to cleaning see Defrosting sec tion 3 Switch the appliance off and remove the plug from the mains or switch off or turn out the circuit breaker or fuse 4 Clean the appliance and the interior accessories with a cloth and lukewarm water Commercially available d...

Page 21: ...any colder than necessary Keep the heat emitting condenser the metall grille on the rear wall of your appliance always clean What to do if Correcting Malfunctions A malfunction may be caused by only a minor fault that you can rectify yourself using the following instructions Do not perform any other work on the appliance if the following information does not provide assistance in your specific cas...

Page 22: ...ctions of the door seal with a hair dryer not hotter than approx 50 C At the same time shape the warmed door seal by hand such that it sits correctly Malfunction Possible Cause Remedy Appliance does not work Appliance is not switched on Switch on the appliance Mains plug is not plugged in or is loose Insert mains plug Fuse has blown or is defective Check fuse replace if neces sary Socket is defect...

Page 23: ...and slide it backwards 5 Change the defective light bulb 6 Refit the light bulb cover and the screw 7 Put the refrigerator back into operation AEG65 Malfunction Possible Cause Remedy Regulations Standards Guidelines This appliance was designed for household use and was manufactured in accordance with the appropriate standards The necessary measures in accordance with appliance safety legislation r...

Page 24: ...geliştirildiklerini göreceksiniz Cihazınızın performansını sürekli aynı seviyede korumak için bu kullanma kılavuzunu dikkatlice okumanızı tavsiye ederiz Böylelikle bütün süreçleri kusursuz ve etkili olarak takip edebilirsiniz İhtiyacınız olan herhangi bir zamanda kılavuza başvurabilmek için onu güvenilir bir yerde saklamanızı tavsiye ederiz Ürününüzü güle güle kullanmanızı dileriz Aşağıdaki sembol...

Page 25: ... İlk çalıştırma öncesi 36 Çalıştırma ve sıcaklık ayarlaması 36 Dahili aksesuarlar 37 Muhafaza rafları 37 Portatif iç kapak 37 Çok amaçlı muhafaza kutusu 38 Taze yiyeceklerin soğutulması 38 Yiyeceklerin dondurulması ve dondurulmuş yiyeceklerin muhafazası 39 Buz küplerinin hazırlanması 40 Buz paketleri 40 Dondurma takvimi 40 Buz çözme 40 Cihazın kapatılması 41 Temizlik ve bakım 41 Enerji tasarrufu i...

Page 26: ...nım şeklinize uyan ilgili tüm yasal düzenlemelere riayet ediniz İlk çalıştırma öncesi Buzdolabınızı olası nakliye hasarlarına karşı kontrol ediniz Hasar görmüş bir cihaz hiçbir şekilde çalıştırılmamalıdır Bir hasar tespit etmeniz halinde lütfen cihazı satın aldığınız satıcıyla temasa geçiniz Soğutucu gaz Cihazın soğutucu devresinde çevreyle oldukça dost doğal bir gaz olan ve bununla birlikte yanıc...

Page 27: ...imonata meyve suları bira şarap köpüklü şarap vs gibi içecekleri asla dondurucu bölmesinde muhafaza etmeyiniz İstisnai durumlar Yüksek alkol içerikli sıvılar dondurucu bölmesinde saklanabilir Dondurma veya buz küplerini dondurucu bölmesinden çıkarır çıkarmaz ağzınıza almayınız Çok soğuk olan buz dudakları veya dili dondurabilir ve yaralanmanıza neden olabilir Donmuş yiyeceğe ıslak ellerle dokunmay...

Page 28: ...ablosunu kesiniz mevcut kilit ve kilit dillerini çıkartınız veya imha ediniz Böylece çocukların oyun oynarken kendilerini cihazın içine kilitlemeleri boğulma riski veya kendilerini hayati tehlike arz eden başka bir duruma sokmaları önlenmiş olur Elden çıkarma Bu cihaz normal ev çöpleriyle veya büyük atıklarla birlikte atılamaz Soğutucu devresine özellikle de cihazın arkasındaki ısı eşanjörüne hasa...

Page 29: ... arası N 16 ile 32 C arası ST 18 ile 38 C arası T 18 ile 43 C arası Eğer cihazın bir ısı kaynağının yakınına monte edilmesi kaçınılmazsa aşağıda belirtilen minimum mesafeler cihazın yanlarında bırakılmalıdır elektrikli fırınlar için 3 cm petrol ve kömür yakıtlı cihazlar için 30 cm Eğer bu mesafeler sağlanamazsa fırın ısı kaynağı ile soğutma cihazı arasında bir ısı yalıtım pedi yerleştirilmelidir E...

Page 30: ...inde kapının açılma yönü sağ yerine fabrika ayarı sola açılacak şekilde değiştirilebilir Uyarı Kapının açılma yönünü değiştirirken cihazın fişi prize takılı olmamalıdır İşleme başlamadan önce fişi prizden çekiniz 1 Üstteki pimi sökünüz ve aralayıcıyı pulu çıkartınız 2 Üst pimi ve üst kapıyı çıkartınız 3 Orta menteşeyi ve kapakları sökerek karşı tarafa takınız 4 Alt kapıyı sökünüz 5 Alt pimi sökünü...

Page 31: ...geri takınız ve menteşe pimini ve aralayıcıyı karşı tarafa tekrar vidalayınız Alt kısımda mutfak mobilyası ile cihazın kenarı arasında 44 mm lik bir mesafe bırakınız Aksesuar torbasında bulunan alt menteşe kapağı mutfak mobilyasının ve cihazın doğru konumlandırılmasını sağlamak için faydalıdır Ayrıca cihazın ana elektrik kablosunu sıkıştırmadığından emin olunuz 1 2 44mm D765 ...

Page 32: ...narak cihazı sabitleyiniz I I Menteşeyi pivot pimle kapatmak için kullanılan plastik kapaktan E çizimde gösterildiği gibi ilgili parçayı çıkartmanız gerekir Bu işlem menteşe kapağının iç kısmında bu parçanın çıkartılmasını kolaylaştıran bir oyuk olması sayesinde oldukça basittir Eğer pivot pim sağ menteşeye takılacaksa DX harfleri ile işaretli parçayı tersi durumda SX ile işaretli parçayı çıkartın...

Page 33: ...a gelecek şekilde kılavuzu Ha takınız ve harici deliklerin yerini işaretleyiniz Delikleri deldikten sonra beraberinde verilmiş vidalarla kılavuzu sabitleyiniz 21 mm 21 mm ca 50 mm 90 90 ca 50 mm PR266 Ha Hb Hc Hd Ha Hb Hc Hd parçalarını şekilde gösterildiği gibi ayırınız ...

Page 34: ... kapağını 90 açınız Küçük kare parçayı Hb kılavuza Ha takınız Cihazın kapısı ile mobilya kapağını bir arada tutunuz ve şekilde gösterildiği gibi delikleri işaretleyiniz PR167 Ha Hb 8mm Braketleri çıkartınız ve kapının dış kenarından 8 mm mesafedeki bir noktayı tırnağın K takılması gereken yer işaretleyiniz Ha 8mm K ...

Page 35: ...u işlemler tamamlandığında mobilya kapağının düzgün kapanıp kapanmadığı kontrol edilmelidir PR167 1 Hd Hb Kapağı Hd kılavuz Hb üzerine geçirip yerine oturacak şekilde sabitleyiniz D E D734 Eğer cihaz mutfak mobilyasının yan tarafına sabitlenecekse sabitleme braketlerindeki D vidaları basit bir şekilde gevşetiniz braketleri şekilde gösterildiği gibi kaydırınız ve vidaları geri sıkınız Kapağı E takı...

Page 36: ...ısı cihazı ana elektrik tesisatından yalıtan bir aygıt içermelidir örneğin bir sigorta şalter akım rölesi veya kontakları arasındaki açıklık en az 3 mm olan benzer bir devre kesici Dikkat Elektrik kablosu sadece tecrübeli bir elektrikçi tarafından değiştirilmelidir Tamir işlemleri için lütfen satıcınızla veya müşteri hizmetleri departmanımızla iletişime geçiniz Çalıştırma ve sıcaklık ayarlaması Fi...

Page 37: ...f iç kapak Kapı bölmeleri yukarıya kaldırılabilir ve çıkarılabilir ve istenilen diğer konumlara yerleştirilebilir D338 Soğutucu ve dondurucu bölmelerindeki sıcaklıklar birbirinden bağımsız şekilde ayarlanamaz Eğer taze yiyecekleri hızlı bir şekilde dondurmak istiyorsanız soğutucu bölmesindeki sıcaklığın 0 C nin altına düşmemesine dikkat ederek 6 ayarını seçiniz Ayrıca sıcaklık ayar düğmesini hemen...

Page 38: ...lmelidir Tereyağı ve peynir Bunlar içine havanın mümkün olduğunca girmemesi için özel hava geçirmeyen kaplara konulmalı veya alüminyum folyoya sarılmalı ya da polietilen torbalara konulmalıdır Süt şişeleri Bunlar ağızları kapaklı şekilde kapıdaki şişe raflarına yerleştirilmelidir Muzlar patatesler soğanlar ve sarımsaklar paketli değilse buzdolabına konulmamalıdır Çok amaçlı muhafaza kutusu Bazı mo...

Page 39: ...cekler pişmiş asla ikinci bir kez dondurulmamalıdır İçinde yanıcı gaz veya sıvı bulunan kaplar düşük ısılarda sızıntı yapabilir Patlama riski söz konusudur İçinde yanıcı maddelerin bulunduğu kapları örneğin sprey kutularını yangın söndürücü doldurma kartuşlarını vs buzdolabınıza dondurucunuza koymayınız Şişe ve konserveler dondurucuya konulmamalıdır İçindekiler donduğunda bunlar çatlayabilir hatta...

Page 40: ...or kompresörü her durduğunda otomatik olarak giderilir Buz çözme suyu bir kanal vasıtasıyla motor kompresörü üzerinden geçerek buharlaştırıldığı yer olan cihazın arka tarafındaki özel bir kaba boşaltılır Dondurucu Bununla birlikte dondurucu bölmesi devamlı şekilde karla buzla kaplanacaktır Bu karlanma kalınlığı 4 mm yi geçtiğinde özel plastik raspa kazıyıcı ile temizlenmelidir Bu işlemi yaparken c...

Page 41: ...ritiniz ve iyice temizleyiniz bkz Temizlik ve bakım 5 Kötü kokuların oluşmasını önlemek için kapıyı açık bırakınız 2 Cihazı kapatınız ve fişini çekiniz veya sıcaklık kontrol düğmesini 0 konumuna getiriniz 3 Dondurucu bölümünün kapısını açık bırakınız 4 Plastik raspayı buz çözme suyu kanalının altındaki bölmeye sokunuz ve altına bir toplama kabı yerleştiriniz 5 Buz çözme işlemi tamamlandığında iler...

Page 42: ...ecekleri birkaç kat gazete kağıdına sarınız Kapalı bir halde soğuk bir yerde muhafaza ediniz 2 Temizlik işleminden önce dondurucu bölümünün buzunu çözünüz bkz Buz çözme bölümü 3 Cihazı kapatınız ve fişini prizden çekiniz veya şalteri ya da sigortayı attırınız veya çıkartınız 4 Cihazı ve dahili aksesuarlarını bir bez ve ılık suyla temizleyiniz Piyasada bulabileceğiniz bulaşık deterjanlarını da kull...

Page 43: ...ı gerektiğinden daha soğuk bir değere ayarlamayınız Isı yayıcı kondansatörü cihazın arka panelindeki metal ızgarayı daima temiz tutunuz Servis çağırmadan önce Arızaların giderilmesi Bir arıza aşağıdaki talimatları uygulayarak çözebileceğiniz ufak bir hatadan kaynaklanıyor olabilir Eğer aşağıdaki bilgiler durumu düzeltmeniz için faydalı olmadıysa cihaz üzerinde herhangi başka bir işlem yapmayınız U...

Page 44: ...katlice temizleyiniz yaklaşık 50 C yi geçmemeye dikkat ediniz Aynı zamanda kapı contasının doğru bir şekilde yerine oturması için ısınan kısımlarını elinizle düzeltiniz Sorun Olası sebep Çözüm Cihaz çalışmıyor Cihaz açılmamıştır Cihazı açınız Elektrik fişi prize takılmamıştır veya gevşektir Fişi prize takınız Sigorta yanmıştır atmıştır veya arızalıdır Sigortayı kontrol ediniz gerekirse değiştirini...

Page 45: ...pulünün kapağına şekilde gösterildiği gibi bastırıp geriye doğru kaydırınız 5 Arızalı ampulü değiştiriniz 6 Lamba ampulünün kapağını geri takınız ve vidalayınız 7 Buzdolabını tekrar çalıştırınız AEG65 Sorun Olası sebep Çözüm Kurallar standartlar talimatlar Bu cihaz sadece evde kullanım için tasarlanmıştır ve ilgili standartlara uygun olarak üretilmiştir Cihaz güvenliği yasal tüzükleri GSG soğutucu...

Page 46: ......

Page 47: ......

Page 48: ...www electrolux com www aeg electrolux com tr 2223 488 11 00 03032008 Subject to change without notice Önceden uyarıda bulunmaksızın değiştirilebilir ...

Reviews: