background image

103

Customer service centres

8. The guarantee does not apply to defects due to transport which have

occurred outside of our responsibility. Nor will the guarantee cover those
caused by inadequate installation or assembly, lack of maintenance or failure
to respect the assembly instructions or directions for use.

9. Defects that result from repairs or measures carried out by people who are

not qualified or expert or defects that result from the addition of non-
original accessories or spare parts are not covered by the guarantee.

10. Appliances that are easy to transport may be delivered or sent to the

consumer services department. Home repairs are only anticipated for bulky
appliances or built-in appliances.

11. If the appliances are built-in, built-under, fixed or suspended in such a way

that removing and replacing them in the place where they are fitted takes
more than half an hour, the costs that result there from will be charged for.
Connected damage caused by these removal and replacement operations will
be the responsibility of the user.

12. If, during the guarantee period, repairing the same defect repeatedly is not

conclusive, or if the repair costs are considered disproportionate, in
agreement with the consumer, the defective appliance may be replaced with
anotherappliance of the same value. In this event, we reserve the right to ask
for afinancial contribution calculated according to the length of time it has
beenused.

13. A repair under guarantee does not mean that the normal guarantee period

will be extended nor that a new guarantee period begins.

14. We give a twelve month guarantee for repairs, limited to the same defect.

15. Except in the event where liability is legally imposed, this declaration of

guarantee terms excludes any compensation for damage outside the
appliance for which the consumer wishes to assert his rights. In the event of
legally admitted liability, compensation will not exceed the purchase price
paid for the appliance.

These guarantee terms are only valid for appliances purchased and used in
Belgium. For exported appliances, the user must first make sure that they
satisfy the technical conditions (e.g.: voltage, frequency, installation
instructions, type of gas, etc.) for the country concerned and that they can
withstand the local climatic and environmental conditions. For appliances
purchased abroad, the user must first ensure that they meet the
qualifications required in Belgium. Non-essential or requested adjustments
are not covered by the guarantee and are not possible in all cases

Our consumer services department is always at your disposal, even after the
guarantee period has expired.

132972920_GB.qxd  29/05/2007  10.30  Pagina  103

Summary of Contents for LAVAMAT 74850

Page 1: ...LAVAMAT 74850 76850 Notice d utilisation User Manual Lave linge Washing Machine ...

Page 2: ...es performances tout en respectant les aspects environnementaux et d économie d énergie Nous vous conseillons de lire attentivement cette notice d utilisation et de la conserver à proximité pour une utilisation optimale Pensez également à la transmettre au prochain utilisateur Nous vous souhaitons beaucoup de plaisir avec votre appareil A E G Electrolux 2 Les symboles suivants vous guideront tout ...

Page 3: ...its lessiviels 13 Sélection du programme souhaité 14 Sélection de la temperature 14 Sélection de la vitesse d essorage ou de la fonction Arrêt Cuve Pleine et Nuit Silence Plus 14 15 Touche des options de programme 16 Sélection de l option Prélavage 16 Sélection de l option Taches 16 Sélection de l option Sensitive 17 Sélection du rinçage supplémentaire 17 Sélection de l option TEMPS 17 Fenêtre d A...

Page 4: ...res 28 Avant de charge le linge 28 Charges maximales 29 Poids du linge 29 Traitement des taches 30 Choix de la lessive 30 Dosage des produits lessiviels et additifs 31 Degrés de dureté de l eau 31 Produits lessiviels et additifs 31 Assouplissant 32 Symboles internationaux pour l entretien des textiles 33 Entretien et nettoyage 34 Détartrage de l appareil 34 Après chaque lavage 34 La carrosserie 34...

Page 5: ... 43 Installation 44 Débridage 44 Emplacement et mise à niveau 46 Raccordement d eau 46 Dispositif de blocage de l eau 47 Vidange de l eau 47 Branchement électrique 48 Environnement 49 Elimination de l appareil 49 Elimination de l ancien appareil 49 Conseils écologiques 49 Garantie 50 53 Service clientèle 106 5 Sommaire ...

Page 6: ...ne autre personne assurez vous que la notice d utilisation l accompagne Le nouvel utilisateur pourra alors être informé du fonctionnement de celui ci et des avertissements s y rapportant Avant la première installation vérifiez si l appareil n a pas été endommagé pendant le transport Ne procédez pas à l installation d une appareil endommagé Si l appareil présente un endommagement adressez vous à vo...

Page 7: ...ment de l appareil Contactez le service après vente de votre magasin vendeur Exigez des pièces de rechange certifiées Constructeur Installation Cet appareil est lourd Faites attention lors de son déplacement Lors du déballage vérifiez que l appareil n est pas endommagé En cas de doute ne l utilisez pas et contactez le magasin vendeur L appareil doit être débridé avant la première utilisation L éli...

Page 8: ... produit se soit évaporé avant d introduire les articles dans l appareil Le câble d alimentation ne doit jamais être tiré au niveau du câble mais toujours au niveau de la prise N utilisez jamais le lave linge si le câble d alimentation le bandeau de commande le plan de travail ou le socle sont endommagés de manière telle que l intérieur de l appareil est accessible Sécurité des enfants Cet apparei...

Page 9: ...ssent pas pénétrer dans le tambour Pour cela la machine est dotée d un dispositif spécial Pour activer ce dispositif tournez le bouton sans appuyer situé à l intérieur du hublot dans le sens des aiguilles d une montre jusqu à ce que la rainure soit horizontale Si nécessaire utilisez une pièce de monnaie Pour désactiver ce dispositif et permettre la fermeture du hublot tournez le bouton dans le sen...

Page 10: ...programmes avec prélavage Lessive en poudre ou liquide pour le lavage principal Additifs liquides assouplissant amidon Sel détachant pour programmes avec l option TACHES Plaque signalétique Pompe de vidange Trois pieds réglables le pied gauche arrière est automatique Boîte à produits Bandeau de commande Eclairage intérieur Poignée d ouverture de la porte 10 description de l appareil 1 2 3 4 5 6 7 ...

Page 11: ...Touche DÉPART DIFFÉRÉ Sélecteur de programmes Touche TEMP Touche ESSORAGE Touche OPTIONS Touche OK 1 2 3 4 5 6 7 8 9 UIT ARRET 40 60 MIX KATOEN BLANC COULEURS SYNTHETICA SYNTHETIQUES 74850 HYGIENE JEANS FIJNE WAS LINGE DELICATS VISCOSE SPOELEN RINCAGES POMPEN VIDANGE CENTRIFUGEREN ESSORAGE DEKENS COUETTE WOL PLUS LAINE PLUS LINGERIE ZIJDE SOIE 20 MIN 3KG ECO ECONOMIQUE SILENT SYSTEM PLUS OUTDOOR S...

Page 12: ...e manipulation Sécurité enfant Cette option permet de d éviter le départ d un programme par inadvertance ou la modification d un programme en cours Elle reste active même si l appareil n est pas en fonctionnement Il y a deux types de verrouilllages si l option est activée avant d appuyer sur la touche DEPART PAUSE il est impossible de démarrer la machine si l option est activée après avoir appuyé ...

Page 13: ...e des produits lessiviels Votre lave linge a été conçu de manière à réduire vos consommations en eau et produits lessiviels réduisez donc les doses préconisées par les fabricants de lessive 1 Tirez la boîte à produits jusqu à la butée Dosez la lessive en poudre versez là dans le compartiment pour le lavage et si vous souhaitez effectuer le prélavage versez la lessive dans le compartiment Pour les ...

Page 14: ...ge Err s affiche pour indiquer l erreur de sélection Le lave linge n effectuera pas le nouveau programme sélectionné Sélection de la de la température Appuyez sur cette touche par pressions successives pour augmenter ou diminuer la température si vous souhaitez que votre linge soit lavé à une température différente de celle proposée par le lave linge Les températures maximum pour chaque programme ...

Page 15: ...lectionnez Vidange ou Essorage réduisez la vitesse d essorage si nécessaire en appuyant sur la touche correspondante appuyez sur la touche DEPART PAUSE à la fin du programme 0 clignote dans la fenêtre d affichage Le symbole Porte disparaît et le hublot peut être ouvert Nuit Silence Plus en choisissant cette option l eau du dernier rinçage n est pas évacuée pour éviter le froissement du linge Comme...

Page 16: ... option a été programmée Appuyez à nouveau pour désactiver l option sélectionnée Une fois que vous avez terminé de sélectionner les options d attendre 10 secondes pour retourner à l affichage par défaut Les options sélectionnées s affichent Sélection de l option Prélavage Sélectionnez cette option si vous souhaitez que votre linge soit prélavé à 30 C avant le lavage principal Le prélavage se termi...

Page 17: ...aitez activer cette option en modalitée en permanence pour tout cycle de lavage appuyez simultanément sur les touches Temp et Essorage pendant 6 secondes le symbole s allume sur la fenêtre d affichage Cette fonction reste activée en permanence Si vous souhaitez l annuler appuyez de nouveau sur les touches TEMP et ESSORAGE jusqu à ce que le symbole s éteigne Sélection de l option TEMPS Le lave ling...

Page 18: ...toutes les minutes Départ différé Le départ différé sélectionné 20 heures max réglé au moyen de la touche correspondante apparaît pendant environ 3 secondes puis la durée du programme précédemment sélectionné s affiche Le symbole de la phase correspondante s affiche Le décompte s affiche dans la fenêtre d affichage heure par heure puis 90 et minute par minute à partir de 60 min Sélection d option ...

Page 19: ...yant se met à clignoter en rouge Pour faire repartir le programme là où il a été interrompu appuyez de nouveau sur la touche DEPART PAUSE Si vous avez sélectionné un départ différé le lave linge commence son décompte Lorsqu une option incorrecte est sélectionnée le voyant de la touche DEPART PAUSE clignote 3 fois en jaune tandis que le message Err s affiche pendant environ 2 secondes Sélection de ...

Page 20: ...écompte Le programme démarre à l expiration du délai sélectionné Annulation du Départ Différé après avoir appuyé sur la touche DEPART PAUSE Appuyez sur la touche DEPART PAUSE Appuyez sur la touche Départ Différé une fois jusqu à ce que le symbole 0 soit affiché Appuyez de nouveau sur la touche DEPART PAUSE Le Départ Différé ne peut pas être sélectionné avec le programme VIDANGE Affichage de déroul...

Page 21: ...re du hublot ou que le tambour tourne Dans ce cas le hublot ne s ouvre pas S il n est pas possible de l ouvrir mais que cela est absolument nécessaire mettez le lave linge hors tension en tournant le sélecteur sur UIT ARRET Au bout de 3 minutes le hublot pourra être ouvert Attention au niveau et à la température de l eau Pour faire repartir le programme il faudra le lancer de nouveau Fin du progra...

Page 22: ...long SYNTHÉTIQUES 40 30 Froid Synthétiques ou tissus mélangés sous vêtements vêtements de couleur chemises irrétrécissables chemisiers Réduction d essorage Lavage entre 60 C et Froid 3 rinçages Essorage bref REPASSAGE FACILE PLUS 60 50 40 30 Froid Charge max 1 5 kg Synthétiques ou tissus mélangés sous vêtements vêtements de couleur chemises irrétrécissables chemisiers Réduction d essorage Lavage e...

Page 23: ... Lavage entre 40 C et Froid 3 rinçages Essorage bref VIDANGE Pour évacuer l eau du dernier rinçage des programmes effectués avec Arrêt Cuve Pleine et Nuit Silence Plus Vidange LAINE 40 30 Froid Programme spécial pour les vêtements en laine portant l étiquette Pure laine irrétrécissable lavable en machine Réduction d essorage Lavage entre 40 C et Froid 3 rinçages Essorage bref LINGERIE 40 30 Froid ...

Page 24: ...0 tr min 20 MIN 3 Kg 30 Pour textiles peu sales sauf la laine Réduction d essorage Lavage à 30 2 rinçages Essorage bref à 1200 tr min INTENSIF 60 50 40 Charge max 5 kg A utiliser pour le linge en coton ou mixte légèrement sale ou porté une seule fois Réduction d essorage Lavage entre 60 et 40 C 3 rinçages Essorage bref à 1200 tr min ECONOMIQUE 60 Economie Blanc et coton coloré articles légèrement ...

Page 25: ...rogramme Charge Max BLANC COULEURS 7 kg SYNTHÉTIQUES LINGE DÉLICAT et VISCOSE 3 5 kg JEANS 3 5 kg REPASSAGE FACILE PLUS 1 5 kg COUETTE 2 kg LAINE LAVAGE À LA MAIN 2 kg LINGERIE et SOIE 1 kg BLOUSONS 3 kg 20 MIN 3 KG 3 kg INTENSIF 5 kg ECONOMIQUE 7 kg SPORT 3 kg ...

Page 26: ... en jean tels que pantalons chemises ou vestes mais aussi en jersey réalisés avec des matières haute technologie L option Rinçage Plus s active automatiquement La vitesse d essorage maximum est 1200 tr mn Repassage Facile Plus En choisissant ce programme le lavage et l essorage sont effectués en douceur pour éviter le froissement du linge Il vous sera ainsi plus facile de le repasser La machine ef...

Page 27: ...mum de lavage est de 40 C La vitesse d essorage maximum est 1200 tr min 20 MIN 3 Kg Programme spécial à 30 C d une durée de 20 minutes environ idéal pour du linge à rafraîchir par ex une veste de sport portée une seule fois ou légèrement sale ou pour le lavage de linge neuf Intensif Programme de lavage rapide à utiliser pour du linge blanc légèrement sale coton couleurs résistantes et tissus mixte...

Page 28: ...leur peuvent perdre de leur couleur et déteindre sur d autres pièces de linge Ils doivent donc être lavés séparément la première fois Videz des poches intérieures et des poches des pantalons les petits objets métalliques qu elles pourraient contenir clous épingles trombones Boutonnez les taies d oreiller fermez les fermetures à glissière et à pression les crochets Nouez les ceintures et les rubans...

Page 29: ...er Synthétiques tambour à moitié de son volume Articles délicats et lainages tambour au tiers de son volume Utilisez si possible l appareil à pleine capacité plutôt qu avec des charges partielles afin de réaliser des économies d eau et d énergie Pour le linge très sale ou de tissus d éponges réduisez la charge Pour une charge de linge mixte remplissez le tambour en fonction des fibres les plus fra...

Page 30: ... et colle tamponnez à l acétone après avoir étalé le vêtement sur un chiffon propre Rouge à lèvres tamponnez à l acétone comme ci dessus et traitez les taches avec de l alcool dénaturé Eliminez les taches résiduelles des articles blancs avec un agent de blanchiment Vin rouge faites tremper dans de l eau et un produit nettoyant Rincez et traitez avec de l acide acétique ou citrique puis rincez Trai...

Page 31: ... utilisez que des produits lessiviels faiblement moussants vendus dans le commerce spécialement conçus pour l utilisation dans les machines à laver Employez des produits spécifiques pour le lavage de la laine Produits lessiviels et additifs Nous vous déconseillons d utiliser en même temps plusieurs types de lessive vous risqueriez d endommager le linge Les lessives en poudre s utilisent sans restr...

Page 32: ...s le bac avant le départ du programme de lavage Pour le traitement des taches avant le cycle de lavage conformez vous aux doses et aux instructions préconisées par le fabricant du produit Si vous utilisez du produit de lavage pour traiter les taches vous devez démarrer immédiatement le cycle de lavage Assouplissant Versez un produit assouplissant sous forme liquide dans le compartiment de la boîte...

Page 33: ... à la main ne pas laver articles en laine lavables à la ma chine à 40 C articles en coton sans apprêt in froissable certains articles 100 coton avec apprêt infrois sable articles avec ap prêt infroissable ou contenant des fibres synthé tiques 95 60 40 95 60 50 40 40 30 blanchiment au chlore javel permis unique ment à froid et avec une solution diluée blanchiment au chlore javel proscrit tous les s...

Page 34: ...auvaises odeurs à l intérieur de l appareil et pour aérer la cuve Entretien régulier Les lavages à basse température peuvent provoquer l accumulation de résidus à l intérieur du tambour Nous vous conseillons d effectuer un lavage d entretien régulier Pour lancer un lavage d entretien Le tambour doit être vide Sélectionnez le programme de lavage pour coton le plus chaud Utilisez une mesure de lessi...

Page 35: ... La pompe La pompe doit être contrôlée régulièrement et surtout si le lave linge ne vidange pas ou n essore pas le lave linge fait un bruit inhabituel pendant la vidange dû à un blocage de la pompe par des objets tels que épingles de sûreté des pièces de monnaie etc Procédez comme suit 1 Débranchez l appareil 2 Si nécessaire attendez que l eau refroidisse 3 Ouvrez le volet de la pompe 4 Placez un ...

Page 36: ...pompe 11 Fermez le volet Attention Lorsque l appareil fonctionne et selon le programme sélectionné la pompe peut contenir de l eau chaude Ne retirez jamais le couvercle de la pompe pendant un cycle de lavage attendez toujours que le cycle soit terminé et que l appareil soit vide Lors de la remise en place du couvercle refixez le avec soin pour éviter une fuite et empêcher les enfants de le retirer...

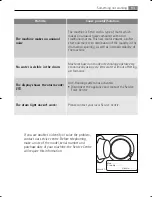
Page 37: ...areil 6 Pour faire fonctionner de nouveau votre appareil assurez vous qu il est installé dans un local où la température est supérieure à 0 C Vidange de secours Si l appareil ne vidange pas procédez de la façon suivante pour évacuer l eau 1 débranchez l appareil 2 fermez le robinet d arrivée d eau 3 si nécessaire attendez que l eau refroidisse 4 ouvrez le volet de la pompe 5 posez un récipient sur...

Page 38: ...ème résolu appuyez sur la touche DEPART PAUSE pour redémarrer le programme Si après toutes les vérifications le problème persiste contactez le service après vente de votre magasin vendeur Anomalie de fonctionnement Cause possible Solution Le lave linge ne démarre pas Le hublot n est pas fermé E40 Fermez correctement le hublot L appareil n est pas correctement branché Branchez l appareil La machine...

Page 39: ... détergent ou une lessive qui n est pas adaptée au lavage en machine trop de mousse Réduisez la quantité de lessive ou utilisez une autre lessive plus adaptée Vérifiez si joints des tuyaux sont étanches Il n est pas toujours facile de voir si de l eau coule le long d un tuyau vérifiez s il est mouillé Vérifiez le raccordement du tuyau d arrivée d eau Le tuyau de vidange est endommagé Remplacez le ...

Page 40: ... bonne installation de l appareil Vous n avez pas réglé les pieds Vérifiez si appareil est de niveau Le linge n est pas correctement réparti dans le tambour Répartissez le linge Il y a peu de linge dans le tambour Chargez correctement de linge Les résultats de lavage ne sont pas satisfaisants Vous avez utilisé trop peu de lessive ou une lessive qui ne convient pas au lavage en machine Augmentez la...

Page 41: ... od No Se r No P0042 BD L essorage démarre tardivement ou le lave linge n essore pas Le dispositif de sécurité anti balourd électronique s est activé parce que le linge n est pas bien réparti dans le tambour Pour mieux répartir le linge le tambour effectue des rotations dans les deux sens Ceci peut se produire à plusieurs reprises jusqu à ce que le balourd disparaisse Ensuite la machine reprend l ...

Page 42: ...gurent sur la plaque signalétique apposée sur le bord intérieur du hublot de l appareil Pression de l eau d alimentation Minimum Maximum 0 05 MPa 0 80 MPa Charge maximum Blanc Couleurs Synthétiques Linge Délicat et Viscose Jeans Couette Laine Lavage à la main et Blousons Sport Repassage facile Plus Lingerie et Soie Intensif 7 0 kg 3 5 kg 3 5 kg 2 0 kg 3 0 kg 3 0 kg 1 5 kg 1 0 kg 5 0 kg Vitesse d e...

Page 43: ...étiquette d énergie d après les normes CEE 92 75 Vidange Essorage Couette 40 75 0 35 Laine 40 58 0 4 Lingerie 40 55 0 35 Soie 30 50 0 25 Blousons 40 60 0 5 Sport 60 70 0 65 20 MIN 3 Kg 30 36 0 18 Intensif 60 48 1 05 Economique 60 45 1 19 Données de consommation Programme Consommation d eau en litres Consommation énergétique en kWh Durée du programme en minutes Blanc Couleurs 95 62 2 1 Pour la duré...

Page 44: ...pareil 1 Après avoir enlevé les protections de transport appuyez avec soin l appareil sur la partie arrière pour retirer le bloc en polystyrène qui constitue le socle de l emballage 2 Redressez l appareil et retirez la fixation du câble d alimentation électriques et du tuyau de vidange de leur support placé à l arrière de l appareil 3 Avec la clé en dotation dévissez et ôtez la vis centrale arrièr...

Page 45: ... ruban adhésif sur le joint du hublot 7 Bouchez l ouverture centrale supérieure et les deux ouvertures en bas à l aide des caches en plastique correspondants placés à l intérieur de l enveloppe contenant la notice d utilisation 8 Branchez le tuyau d alimentation de la façon décrite au paragraphe Raccordement d eau Transporter un appareil non bridé peut endommager des composants internes et générer...

Page 46: ...té Le pied de réglage automatique confère une parfaite stabilité à l appareil même en cas de vitesse d essorage élevée En principe il n a pas besoin d être réglé Raccordement d eau Le tuyau d arrivée d eau livré avec l appareil se trouve dans le tambour N utilisez jamais pour le raccordement un tuyau déjà utilisé précédamment 1 Ouvrez le hublot et sortez le tuyau 2 Branchez le tuyau d alimentation...

Page 47: ...férable de faire couler une certaine quantité d eau avant de mettre en place le tuyau d alimentation De cette façon on évitera que du sable ou de la rouille bouche le filtre placé à I intérieur de l appareil Vidange de l eau L extrémité du tuyau de vidange peut être positionnée de deux manières différentes Sur le bord d un lavabo à l aide d un guide en plastique livré avec l appareil Dans ce cas a...

Page 48: ...multiple risque d incendie Utilisez un socle de prise de courant comportant une borne de mise à la terre qui doit être obligatoirement raccordée conformément à la norme N F C 15100 La ligne d alimentation électrique partant du compteur ne devra pas être inférieure à 4 mm par conducteur Branchez la machine à une prise reliée à la terre Le fabricant décline toute responsabilité en cas de dommage ou ...

Page 49: ...e détails sur le recyclage de ce produit veuillez prendre contact avec les services de votre commune ou le magasin où vous avez effectué l achat Conseils écologiques Pour réaliser des économies d eau et d énergie et ainsi contribuer à la protection de l environnement nous vous recommandons de respecter les conseils suivants Le linge normalement sale ne nécessite pas de prélavage vous réaliserez de...

Page 50: ...mmateur final Ces conditions de garantie ne sont pas d application en cas d utilisation à des fins professionnelles ou de façon équivalente 2 La prestation sous garantie implique que l appareil est remis dans l état qu il avait avant que la défectuosité ne survienne Les composants défectueux sont remplacés ou réparés Les composants remplacés sans frais deviennent notre propriété 3 Afin d éviter de...

Page 51: ...ns sont jugés disproportionnés le remplacement de l appareil défectueux par un autre de même valeur peut être accompli en concertation avec le consommateur Dans ce cas nous nous réservons le droit de réclamer une participation financière calculée au prorata de la période d utilisation écoulée 13 La réparation sous garantie n entraîne pas de prolongation de la périodenormale de garantie ni le dépar...

Page 52: ...44 Téléfax 02 363 04 00 ou 02 363 04 60 E mail consumer services electrolux be Pièces détachées accessoires et produits d entretien pour la Belgique vous pouvez commander des pièces détachées accessoires et consommables online àl adresse http www aeg home be fr L Lu ux xe em mb bo ou ur rg g Grand Duché de Luxembourg ELECTROLUXHOME PRODUCTS Consumer services Rue de Bitbourg 7 L 1273Luxembourg Hamm...

Page 53: ...ur la même période et couvre le remplacement de piè ces détachées et la main d oeuvre dans les mêmes conditions que celles prévues pour votre nouveau pays de résidence pour le type de modèle ou la gamme d ap pareils particuliers La garantie de l appareil est exclusivement reconnue à l acheteur d origine et ne peut être cédée à un autre utilisateur de l appareil L appareil devra être installé et ut...

Page 54: ...integral part of our products To ensure optimal and regular performance of your appliance please read this instruction manual carefully It will enable you to navigate all processes perfectly and most efficiently To refer to this manual any time you need to we recommend you to keep it in a safe place And please pass it to any future owner of the appliance We wish you much joy with your new applianc...

Page 55: ...c softener 65 Select the required programme 66 Select the temperature 66 Select the spin speed Rinse Hold or Night Cycle option 67 Programm option buttons 68 Select the Prewash option 68 Select the Stain option 68 Select the Sensitive option 69 Select the Extra Rinse option 69 Select the Quick option 69 Display 70 Select the Start Pause 71 Select the Delay Start 71 Programme progress display 72 Al...

Page 56: ...es 80 Before loading the laundry 80 Maximum loads 81 Laundry weights 81 Removing stains 82 Detergents and additives 82 Quantity of detergent to be used 82 Degrees of water hardness 83 International wash code symbols 85 Care and cleaning 86 Descaling 86 After each wash 86 External cleaning 86 Detergent dispenser drawer 86 Drain pump 87 Water inlet filter 88 Frost precautions 89 Emergency emptying o...

Page 57: ...g 96 Positioning and levelling 98 Water inlet 98 99 Acqua stop device 99 Water drainage 99 100 Electrical connection 100 Enviroment concerns 101 Packaging materials 101 Old machine 101 Ecological hints 101 Guarantee 102 105 Customer service centres 106 57 Contents ...

Page 58: ...ing the appliance Before first starting up check the machine for any damage incurred during transport Never connect up a damaged machine If parts are damaged contact your supplier If the appliance is delivered in the winter months when there are minus temperatures Store the washing machine at room temperature for 24 hours before using for the first time General safety It is dangerous to alter the ...

Page 59: ...for purposes other than those for which it was designed When unpacking the appliance check that it is not damaged If in doubt do not use it and contact the Service Centre All packing and transit bolts must be removed before use Serious damage can occur to the product and to property if this is not adhered to See relevant section in the user manual After having installed the appliance check that it...

Page 60: ...ull the power supply cable to remove the plug from the socket always take hold of the plug itself Never use the washing machine if the power supply cable the control panel the working surface or the base are damaged so that the inside of the washing machine is accessible Child Safety This appliance is not intended for use by person including children with reduced physical sensory or mental capabil...

Page 61: ... feature To activate this device rotate the button without pressing it inside the door clockwise until the groove is horizontal If necessary use a coin To disable this device and restore the possibility of closing the door rotate the button anti clockwise until the groove is vertical 61 Safety information ...

Page 62: ...e used for main wash Compartment for powder or liquid detergent used for main wash Compartment for liquid additives fabric softener starch Compartment for stain remover used for main wash with STAIN option Rating plate Drain pump Three adjustable feet The rear foot on the left hand side is automatic Detergent dispenser drawer Control panel Drum light Door opening handle 62 Product description 1 2 ...

Page 63: ...n reduction button Options button OK button 1 2 3 4 5 6 7 8 9 UIT ARRET 40 60 MIX KATOEN BLANC COULEURS SYNTHETICA SYNTHETIQUES 74850 HYGIENE JEANS FIJNE WAS LINGE DELICATS VISCOSE SPOELEN RINCAGES POMPEN VIDANGE CENTRIFUGEREN ESSORAGE DEKENS COUETTE WOL PLUS LAINE PLUS LINGERIE ZIJDE SOIE 20 MIN 3KG ECO ECONOMIQUE SILENT SYSTEM PLUS OUTDOOR SPORT KORT INTENSIEF INTENSIF SPORTKLEDING BLOUSONS STRI...

Page 64: ...nts of operating problems By pressing these 2 buttons again the acoustic signal is reactivated Child safety lock This device permits you to leave the appliance unsupervised without having the worry that children might be injured by or cause damage to the appliance This function remains able also when the washer dryer is not working There are two different ways to set this option before pressing th...

Page 65: ...c softener Your new appliance was designed to reduce water energy and detergent consumption 1 Pull out the dispenser drawer until it stops Measure out the amount of detergent required pour it into the main wash compartment and if you wish to carry out the prewash phase pour the detergent into the compartment marked For programmes with the STAIN option pour the stain remover into the compartment ma...

Page 66: ...nother programme when the machine is working the Yellow Start Pause pilot light will flash 3 times and the message Err is displayed on the display to indicate a wrong selection The machine will not perform the new selected programme Select the temperature Press this button repeatedly to increase or decrease the temperature if you want your laundry to be washed at a temperature different from the o...

Page 67: ... programme selector dial to O select the Drain or Spin programme reduce the spin speed if needed by means of the relevant button press the Start Pause button when the programme has finished the display shows a flashing 0 the symbol Door goes off and the door can be opened Night cycle by selecting this option the machine will not drain the water of the last rinse so as not to wrinkle the laundry As...

Page 68: ...been set Depress the same button to deactivate the option After selecting the options wait about 10 seconds untill the display gets back to the default status The selected options appear on the display Select the Prewash option Select this option if you wish your laundry to be prewashed at 30 C before the main wash The Prewash ends with a short spin in programmes for cotton and synthetic fabrics w...

Page 69: ...s If you wish to ativate this option permanently for every washing cycle depress simoultaneously Temp and Essorage for about 6 seconds the symbol illuminates on the display This option remains active permanently If you wish to cancel it depress the same buttons untill the symbol desappears Select the Quick option The washing machine proposes by default the washing cycle for Normally soiled laundry...

Page 70: ...gramme has started the time remaining is updated every minute Delay start The selected delay 20 hours max set by means of the relevant button appears on the display for about 3 seconds then the duration of the previously selected programme is displayed The Delay Start symbol will appear on the display The delay time value decreases by one unit every hour and then when remains 1 hour the time decre...

Page 71: ...Pause button the corresponding red pilot light starts to flash To restart the programme from the point at which it was interrupted press the Start Pause button again If you have chosen a delayed start the machine will begin the countdown If an incorrect option is selected the integrated yellow pilot light of the Start Pause button flashes for 3 times the message Err is displayed for about 2 second...

Page 72: ...countdown The programme will start after the selected delay has expired Cancelling the delayed start set the washing machine to PAUSE by pressing the Start Pause button press the Delay Start button until the symbol 0 is displayed press the Start Pause button again to start the programme The Delay Start option can not be selected with Drain programme Programme progress display The programme progres...

Page 73: ...water level is above the bottom edge of the door In this case the door can not be opened If you cannot open the door but you need to open it you have to switch the machine off by turning the selector dial to O Off After about 3 minutes the door can be opened pay attention to the water level and temperature At the end of the programme The machine stops automatically the Start Pause button pilot lig...

Page 74: ...ite cottons Spin reduction Main wash at 60 C Long spin SYNTHETICS 40 30 cold Synthetic or mixed fabrics underwear coloured garments non shrink shirts blouses Spin reduction Main wash from 60 C to cold 3 rinses Short spin EASY IRON 60 50 40 30 cold Max load 1 5 kg Synthetic or mixed fabrics underwear coloured garments non shrink shirts blouses Spin reduction Main wash from 60 C to cold 4 rinsees Sh...

Page 75: ...Viscose items Spin reduction Main wash from 40 C to cold 3 rinses Short spin DRAIN For emptying out the last rinse water in programmes with the Rinse Hold and Night cycle option Drain WOOL 40 30 cold Garments bearing the Pure new wool non shrink machine washable or Handwash label Spin reduction Main wash from 40 C to cold 3 rinses Short spin LINGERIE 40 30 cold Max load 1 kg Special programme for ...

Page 76: ...wash from 40 C to cold 3 rinses Short spin at 1200 rpm 20 MIN 3 Kg 30 For slightly soiled fabrics except wool Spin reduction Main wash at 30 2 rinses Short spin at 1200 rpm QUICK INTENSIVE 60 50 40 Max load 5 kg To use for cotton or mixed fabrics slightly soiled or worn only once Spin reduction Main was from 60 to 40 C 3 rinses Short spin at 1200 rpm ECONOMY 60 White and coloured cotton economy li...

Page 77: ...f fabric Max Load COTTONS 7 kg SYNTHETICS DELICATES and VISCOSE 3 5 kg JEANS 3 5 kg EASY IRON 1 5 kg BLANKET 2 kg WOOL HANDWASH 2 kg LINGERIE and SILK 1 kg SPORT JACKETS 2 kg 20 MIN 3 KG 3 kg SPORT INTENSIVE 2 5 kg ECONOMIY 7 kg QUICK INTENSIVE 5 kg ...

Page 78: ... in Jeans and also jersey realized with hi tech materials The Extra Rinse option will be activated automatically The maximum spin speed is 1200 rpm Easy iron Selecting this programme the laundry is gently washed and spun to avoid any creasing In this way ironing is easier Furthermore the machine will perform additional rinses Viscose Special programme for fabrics such a viskose cupro lyocell which...

Page 79: ...emperature is 40 C The maximum spin speed is 1200 rpm 20 MIN 3 Kg Special program at 30 C duration approx 20 minutes ideal for laundry to be refreshed e g a sport jacket worn only once or slightly soiled or new garments Quick Intensive Quick washing programme to be used for lightly soiled white fast coloured cottons and mixed fabrics Spin Separate spin for hand washed garments and after programmes...

Page 80: ...pins Button up pillowcases close zip fasteners hooks and poppers Tie any belts or long tapes Remove persistent stains before washing Rub particularly soiled areas with a special detergent or detergent paste Treat curtains with special care Remove hooks or tie them up in a bag or net 80 Preparing the wash cycle 95 or 90 for normally soiled white cottons and linen e g tea cloths towels tablecloths s...

Page 81: ... For heavily soiled laundry reduce the load size Washing a maximum load makes the most efficient use of water and energy For heavily soiled laundry reduce the load size Laundry weights The following weights are indicative 81 Preparing the wash cycle 1200 g bathrobe 100 g napkin 700 g quilt cover 500 g sheet 200 g pillow case 250 g tablecloth 200 g towelling towel 100 g tea cloth 200 g night dress ...

Page 82: ...oint pen and glue moisten with acetone lay the garment on a soft cloth and dab the stain Lipstick moisten with acetone as above then treat stains with methylated spirits Treat any residual marks with bleach Red wine soak in water and detergent rinse and treat with acetic or citric acid then rinse Treat any residual marks with bleach Ink depending on the type of ink moisten the fabric first with ac...

Page 83: ...nt marked before starting the wash programme Follow the product manufacturer s recommendations on quantities to use and do not exceed the MAX mark in the detergent dispenser drawer Quantity of detergent to be used The type and quantity of detergent will depend on the type of fabric load size degree of soiling and hardness of the water used Follow the product manufacturers instructions on quantitie...

Page 84: ...ctions The quantity of detergent can then always be adjusted to degree of hardness I soft 84 Preparing the wash cycle L Le ev ve el l 1 Characteristic soft D De eg gr re ee es s o of f w wa at te er r h ha ar rd dn ne es ss s G Ge er rm ma an n d dH H F Fr re en nc ch h T T H H 0 7 0 15 2 medium 8 14 16 25 3 hard 15 21 26 37 4 very hard 21 37 ...

Page 85: ...x wash temperature 30 C Hand wash Do not wash at all Bleaching Bleach in cold water Do not bleach Ironing Hot iron max 200 C Warm iron max 150 C Lukewarm iron max 110 C Do not iron Dry cleaning Dry cleaning in all solvents Dry cleaning in perchlorethylene petrol pure alcohol R 111 R 113 Dry cleaning in petrol pure alcohol and R 113 Do not dry clean Drying Flat On the line On clothes hanger Tumble ...

Page 86: ...r a wash will also help to preserve the door seal Maintenance wash With the use of low temperature washes it is possible to get a build up of residues inside the drum We recommend that a maintenance wash be performed on a regular basis To run a maintenance wash The drum should be empty of laundry Select the hottest cotton wash programme Use a normal measure of detergent must be a powder with biolo...

Page 87: ... guide rails and push it in Drain pump The pump should be inspected regularly and particularly if the machine does not empty and or spin the machine makes an unusual noise during draining due to objects such as safety pins coins etc blocking the pump Proceed as follows 1 Disconnect the appliance 2 If necessary wait until the water has cooled down 3 Open the pump door 4 Place a container close to t...

Page 88: ...e programme selected there can be hot water in the pump Never remove the pump cover during a wash cycle always wait until the appliance has finished the cycle and is empty When replacing the cover ensure it is securely retightened so as to stop leaks and young children being able to remove it Water inlet filter If you notice that the machine is taking longer to fill check that the filter in the wa...

Page 89: ...iance When you use the machine again make sure that the ambient temperature is above 0 C Emergency emptying out If the water is not discharged proceed as follows to empty out the machine 1 pull out the plug from the power socket 2 close the water tap 3 if necessary wait until the water has cooled down 4 open the the pump door 5 place a bowl on the floor and place the end of the emergency emptying ...

Page 90: ...ooding system has activated Once the problem has been eliminated press the S St ta ar rt t P Pa au us se e button to restart the programme If after all checks the problem persists contact your local Service Centre Problem Possible cause Solution The washing machine does not start The door has not been closed E40 Close firmly the door The plug is not properly inserted in the power socket Insert the...

Page 91: ...t creates too much foam has been used Reduce the detergent quantity or use another one Check whether there are any leaks from one of the inlet hose fittings It is not always easy to see this as the water runs down the hose check to see if it is damp Check the water inlet hose connection The drain hose is damaged Change it with a new one The cap on the emergency emptying hose has not been replaced ...

Page 92: ...ning starts late or the machine does not spin The electronic unbalance detection device has cut in because the laundry is not evenly distributed in the drum The laundry is redistributed by reverse rotation of the drum This may happen several times before the unbalance disappears and normal spinning can resume If after some minutes the laundry is still not evenly distributed in the drum the machine...

Page 93: ...lem contact our service centre Before telephoning make a note of the model serial number and purchase date of your machine the Service Centre will require this information Mod Prod No Ser No M od Pr od No Se r No P0042 BD The machine makes an unusual noise The machine is fitted with a type of motor which makes an unusual noise compared with other traditional motors This new motor ensures a softer ...

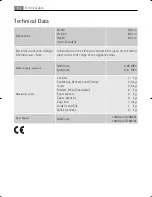
Page 94: ...iven on the rating plate on the inner edge of the appliance door Water supply pressure Minimum Maximum 0 05 MPa 0 80 MPa Maximum Load Cottons Synthetics Delicates and Viscose Jeans Blanket Wool handwash Sport Jackets Sport intensive Easy iron Lingerie and Silk Quick Intensive 7 0 kg 3 5 kg 3 5 kg 2 0 kg 3 0 kg 3 0 kg 1 5 kg 1 0 kg 5 0 kg Spin Speed Maximum 1400 rpm L74850 1600 rpm L76850 ...

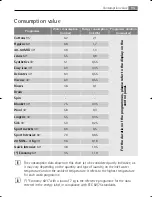
Page 95: ...ance with EEC 92 75 standards Drain Spin Blanket 40 75 0 35 Wool 40 58 0 4 Lingerie 40 55 0 35 Silk 30 50 0 25 Sport Jackets 40 60 0 5 Sport Intensive 60 70 0 65 20 MIN 3 Kg 30 36 0 18 Quick Intensive 60 48 1 05 Economy 60 45 1 19 Consumption value Programme Water consumption in litres Energy consumption in kWh Programme duration in minutes Cottons 95 62 2 1 For the duration of the programmes plea...

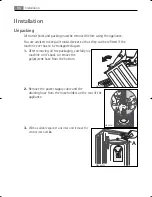
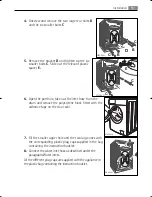
Page 96: ...e machine ever has to be transported again 1 After removing all the packaging carefully lay machine on it s back to remove the polystyrene base from the bottom 2 Remove the power supply cable and the draining hose from the hose holders on the rear of the appliance 3 With a suitable spanner unscrew and remove the central rear bolt A 96 Installation HEC0008 A HEC00022 HEC0001 ...

Page 97: ...rene block fitted with the adhesive tape on the door seal 7 Fill the smaller upper hole and the two large ones with the corresponding plastic plug caps supplied in the bag containing the instruction booklet 8 Connect the water inlet hose as described under the paragraph Water inlet All the different plug caps are supplied with the appliance in the plastic bag containing the instruction booklet 97 ...

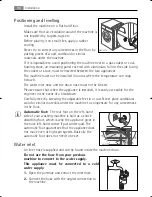
Page 98: ...e is installed it is easily accessible for the engineer in the event of a breakdown Carefully level by screwing the adjustable feet in or out Never place cardboard wood or similar materials under the machine to compensate for any unevenness in the floor Automatic foot The rear foot on the left hand side of your washing machine is built as a shock absorbing foot which is why the appliance gives in ...

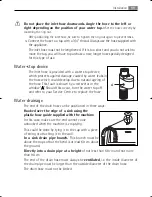
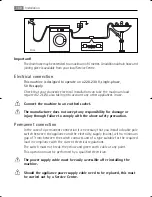
Page 99: ...g of the hose This fault is shown by a red sector in the window A A Should this occur turn the water tap off and refer to your Service Centre to replace the hose Water drainage The end of the drain hose can be positioned in three ways Hooked over the edge of a sink using the plastic hose guide supplied with the machine In this case make sure the end cannot come unhooked when the machine is emptyin...

Page 100: ...ough failure to comply with the above safety precaution Permanent connection In the case of a permanent connection it is necessary that you install a double pole switch between the appliance and the electricity supply mains with a minimum gap of 3 mm between the switch contacts and of a type suitable for the required load in compliance with the current electrical regulations The switch must not br...

Page 101: ...uences for the environment and human health which could otherwise be caused by inappropriate waste handling of this product For more detailed information about recycling of this product please contact your local city office your household waste disposal service or the shop where you purchased the product Ecological hints To save water energy and to help protect the environment we recommend that yo...

Page 102: ...he date theappliance is delivered to the first end user These guarantee terms do not applyin the event of use for professional or equivalent purposes 2 IPerforming the guarantee means that the appliance is returned to thecondition it was in before the defect occurred Defective parts are replaced orrepaired Parts replaced free of charge become our property 3 ISo as to avoid more severe damage the d...

Page 103: ... consumer the defective appliance may be replaced with anotherappliance of the same value In this event we reserve the right to ask for afinancial contribution calculated according to the length of time it has beenused 13 A repair under guarantee does not mean that the normal guarantee period will be extended nor that a new guarantee period begins 14 We give a twelve month guarantee for repairs li...

Page 104: ...eenweg 719 1502 Lembeek Téléphone 02 363 04 44 Téléfax 02 363 04 00 ou 02 363 04 60 E mail consumer services electrolux be L Lu ux xe em mb bo ou ur rg g Grand Duché de Luxembourg ELECTROLUXHOME PRODUCTS Consumer services Rue de Bitbourg 7 L 1273 Luxembourg Hamm Téléphone 00 352 42 431 1 Téléfax 00 352 42 431 360 E mail consumer service luxembourg electrolux lu ...

Page 105: ...ment issued by the seller of the appliance The appliance guarantee is for the same period and to the same extent for labour and parts as exists in your new country of residence for this particular model or range of appliances The appliance guarantee is personal to the original purchaser of the appliance and cannot be transferred to another user The appliance is installed and used in accordance wit...

Page 106: ...2 LV 1012 Riga Lituania 370 5 27 80 609 Verkiu 2 9 09108 Vilnius Lithuania Luxembourg 35 2 42 43 13 01 Rue de Bitbourg 7 L 1273 Hamm Magyarország 36 1 252 1773 H 1142 Budapest XIV Erzsébet királyné útja 87 Nederland 31 17 24 68 300 Vennootsweg 1 2404 CG Alphen aan den Rijn Norge 47 81 5 30 222 Risløkkvn 2 0508 Oslo Österreich 43 18 66 400 Herziggasse 9 1230 Wien Polska 48 22 43 47 300 ul Kolejowa ...

Page 107: ...107 Notes ...

Page 108: ...www electrolux com www aeg electrolux be 132 972 920 00 212007 Sous réserve de modifications Subject to change without notice ...

Reviews: