background image

  Electromagnetic  Compatibility 

True Online 1-3k UPS User Manual


1

1.Electromagnetic Compatibility

* Safety 

IEC/EN 62040-1-1 

* EMI

Conducted Emission.........IEC/EN 62040-2 

Class A 

Radiated Emission............IEC/EN 62040-2 

Class A 

*EMS

ESD..................................IEC/EN 61000-4-2 

Level 4 

RS....................................IEC/EN 61000-4-3 

Level 3 

EFT..................................IEC/EN 61000-4-4 

Level 4 

SURGE............................IEC/EN 61000-4-5 

Level 4 

Low Frequency Signals..............:IEC/EN 61000-2-2 

Warning: 

This is a product for commercial and industrial application in the second 

environment-installation restrictions or additional measures may be needed to 

prevent disturbances. 

NOTICE


This is a product for restricted sales distribution to informed partners. Installation restrictions or 

additional measures may be needed to prevent radio interference. 

Operated the UPS in an indoor enviroment only in an ambient temperature range of 

0-40

°

C(32-104

°

F). Install it in a clean environment, free from moisture, flammable liquids, 

gases and corrosive substance. 

This UPS contains no user-serviceable parts except the internal battery pack. The UPS on/off 

push buttons do not electrically isolate internal parts. Under no circumstance attempt to gain 

access internally, due to the risk of electric shock or burn. 

Do not continue to use the UPS if the panel indications are not in accordance with these 

operating instructions or the UPS performance alters in use. Refer all fault to your dealer. 

Servicing of batteries should be performed or supervised by personnel knowledgeable of 

batteries and the precautions. Keep unauthorized personnel away from the batteries. Proper 

disposal of batteries is required. Refer to your local laws and regulations for disposal 

requirement. 

DO NOT CONNECT equipment that could overload the UPS or demand DC current from the 

UPS, for example: electric drills, vacuum cleaners, laser printers, hair dryer or any appliance 

using half-wave rectification. 

Storing magnetic media on top of the UPS may result in data loss or corruption. 

Turn off and isolate the UPS before cleaning it. Use only a soft cloth, never liquid or aerosol 

cleaners.

Summary of Contents for IST3010

Page 1: ...IST3 Series True on line UPS 1 3kVA User Manual...

Page 2: ...it current Following precautions should be observed before replacing the battery l Wear rubber gloves and boots l Remove rings watches and other metal objects l Use tools with insulated handles l Do n...

Page 3: ...ter 5 3 6 Battery 5 3 7 Dynamic Bypass 5 4 Product Specification and performance 6 4 1 Model Description 6 4 2 Product Specification and Performance 6 5 Installation 6 5 1 Unpacking and Inspection 8 5...

Page 4: ...User Manual III 9 2 Battery Replacement Procedures 16 10 Trouble shooting 17 10 1 Checking UPS status 17 10 2 Adjust the factors caused the problem 17 Annex A Intelligent Slot 21 Annex B EPO 22 Annex...

Page 5: ...osive substance This UPS contains no user serviceable parts except the internal battery pack The UPS on off push buttons do not electrically isolate internal parts Under no circumstance attempt to gai...

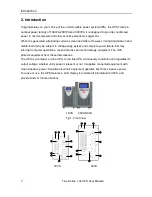
Page 6: ...subject to voltage sags spikes and complete power failure that may interrupt computer operations cause data loss and even damage equipment The UPS protects equipment from these disturbances The UPS is...

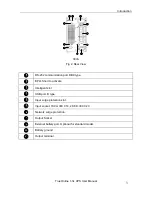
Page 7: ...Fig 2 Rear View RS 232 communication port DB9 type EPO Short to activate Intelligent slot USB port B type Input surge protection slot Input socket 1KVA IEC C14 2K 3K IEC C20 Network surge protection...

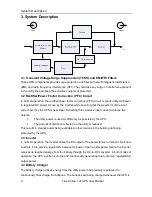
Page 8: ...e input current achieves two objects l The utility power is used as efficiency as possible by the UPS l The amount of distortion reflected on the utility is reduced This results in cleaner power being...

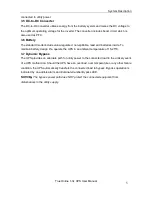
Page 9: ...acid batteries inside To maintain battery design life operate the UPS in an ambient temperature of 15 25 C 3 7 Dynamic Bypass The UPS provides an alternate path for utility power to the connected loa...

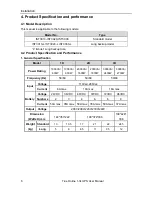
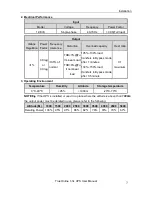
Page 10: ...2000VA 1800W 3000VA 2400W 3000VA 2700W Frequency Hz 50 60 50 60 50 60 Input Voltage 110Vac 288Vac Current 6A max 10A max 16A max Battery Voltage 24VDC 36VDC 48VDC 72VDC 72VDC 96VDC Numbers 2 3 4 6 6 8...

Page 11: ...ere the altitude is above than 1000m the output power must be derated in use please refer to the following Altitude M 1000 1500 2000 2500 3000 3500 4000 4500 5000 Derating Power 100 95 91 86 82 78 74...

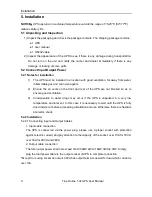
Page 12: ...ts on the front and rear of the UPS are not blocked so as to ensure good ventilation 3 Condensation to water drops may occur if the UPS is unpacked in a very low temperature environment In this case i...

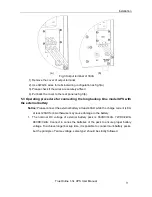
Page 13: ...the long backup time model UPS with the external battery Notice Please connect the external battery at least 40AH while the charge current is 8A at least 20AH for 4A otherwise may cause damage to the...

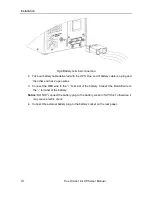
Page 14: ...y cable is a plug and the other end has 2 open wires 3 Connect the RED wire to the terminal of the battery Connect the BLACK wire to the terminal of the battery Notice DO NOT connect the battery plug...

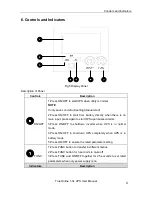
Page 15: ...directly when there is no main input press again to start UPS upon buzzer alarms 3 Press ON OFF to shutdown inverter when UPS is in normal mode 4 Press ON OFF to shutdown UPS completely when UPS is in...

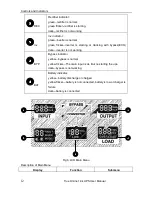
Page 16: ...rter is starting or tracking with bypass ECO dark inverter is not working BYP Bypass indicator yellow bypass is normal yellow flicker The main input is ok But no starting the ups dark bypass is not wo...

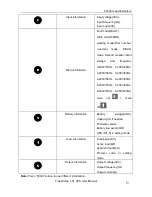
Page 17: ...0V 50Hz 1 200V 60Hz 2 208V 50Hz 3 208V 60Hz 4 220V 50Hz 5 220V 60Hz 6 230V 50Hz 7 230V 60Hz 8 240V 50Hz 9 240V 60Hz mute on mute off Battery information Battery voltage VDC Capacity if needed Firmware...

Page 18: ...el press the ON OFF button once to power on the LCD then press ON OFF button again for 1 seconds when the buzzer alarms 2 A few seconds later the UPS turns into Battery mode and inverter feeds the loa...

Page 19: ...rged once every 4 to 6 months if it has not been used for a long time lIn the regions of hot climates the battery should be charged and discharged every 2 months The standard charging time should be a...

Page 20: ...ore touching the batteries The battery circuit is not isolated from the input potential circuit There may be hazardous voltage between the battery terminals and the ground 8 Even though the input brea...

Page 21: ...battery should not discharge If the UPS is operating in Battery Mode stop and contact your local representative or Channel Support 10 2 Adjust the factors caused the problem When the fault indicator...

Page 22: ...hronous range Bypass frequency is out of synchronous range 30 Warn Transfer times over limit in 1 hour Transfer times between inverter and bypass is over 5 in recent 1 hour UPS works in bypass mode Ch...

Page 23: ...verter overload timeout Load is over the capacity of the UPS and timeout UPS will transfer to bypass mode if bypass is available Remove some loads to under 95 UPS will transfer to inverter automatical...

Page 24: ...ts for batteries NOTICE Please provide the following information when reporting fault UPS 1 The UPS model and serial NO 2 The warn and fault code happened 3 Detail of fault include LED indicates buzze...

Page 25: ...is failure in UPS If not NC Normally Close 2 General alarm Pin2 to pin5 is NO if something is abnormal If not NC 3 GND External power supply GND 4 Remote shutdown UPS shutdowns rectifier and inverter...

Page 26: ...gency condition This function can be activated through a remote contact provided by the user It requires opening NO and 24V at normal operation EPO is activated when shorting NO and 24V Description of...

Page 27: ...conds to enter in setting mode all LEDs flicker 3 Voltage setting press FUNC to change rated voltage Shown as following VAC INPUT VAC OUTPUT CONVERTER BYPASS LOAD Current Rated Voltage 4 Frequency set...

Page 28: ...are shown in LOAD press FUNC to change protocol The ID number of the UPS is displayed as 01 09 default 01 7 Protocol setting press ON OFF to choose mode and enter in protocol setting Codes are shown i...

Page 29: ...rent frequency Current mode Current protocol 9 Press ON OFF to save current setting and exit If want to change press FUNC and repeat the procedures above 10 If you want to exit from setting mode and g...

Reviews: