advidia M-29-FW Quick Manual Download Page 2

Waterproof Requirements 

Please waterproof cables in accordance with the following instructions. User shall assume all 
responsibility for device damage caused by water due to improper waterproof measures. 


NOTE! 


Before you start, connect all the needed cables and cut off the copper wires for the cables that 
you don't use. 


Please use self-adhesive waterproof tape (supplied with some products) to protect the cables. 


Use  waterproof  components  to  protect  the  network  cable.  Waterproof  the  power  cable 
separately if you don’t use it. The video cable does not need waterproof treatment. 


1.


Use insulation tape (not included in the package) to insulate the connection part of each cable. 


2.


Waterproof the cables with self-adhesive waterproof tape. 

(1)


Fully stretch the waterproof tape at both ends. 

(2)


Wrap the connection part and the cable ends tightly with waterproof tape. Make sure the 
tape is fully stretched during the process. 

(3)


Tighten the tape at both ends to prevent water leakage. 


3.


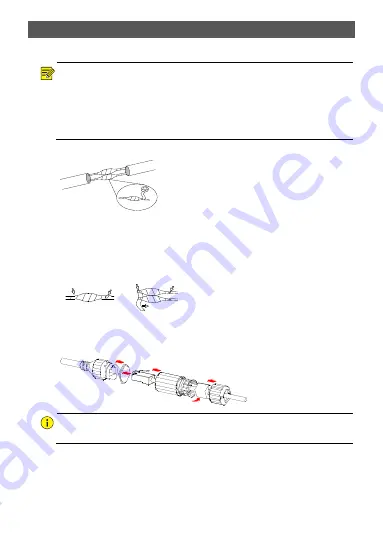
Install the supplied waterproof components to the network cable in sequence. 


CAUTION! 

You need to mount the rubber ring onto the network cable interface first. 


4.


If your camera has a DC cable and you will not use it, insert the plug into the interface. 

Insulation tape

Connection part

Tighten

Waterproof tape

Wrap the unused cables 

together into a bundle

Tighten

Tighten

Tighten


Summary of Contents for M-29-FW

Page 1: ...M 29 FW Network Bullet Cameras Quick Guide V1 00...

Page 2: ...nt 1 Use insulation tape not included in the package to insulate the connection part of each cable 2 Waterproof the cables with self adhesive waterproof tape 1 Fully stretch the waterproof tape at bot...

Page 3: ...1 Set Remarks means optional and supplied with certain models only 1 Including one or more waterproof components such as tape and plug 2 Including one or more accessories such as screws and hex key 3...

Page 4: ...rself We shall not assume any responsibility for problems caused by unauthorized repair or maintenance 2 2 Maintenance If there is grease or a dust stain on the front glass surface clean the glass sur...

Page 5: ...r 3 Mount the plastic rivets of self tapping screws Knock the plastic rivets into the guide holes and ensure that they are tightened up 4 Screw the locknut to loosen the universal joint before attachi...

Page 6: ...en installation is adopted cables are not penetrated into the wall but threaded out from the outlet on one side of the base 5 Stratup After you have installed the device connect one end of the power a...

Page 7: ...on screen instructions to complete the installation and then open the browser again to log in The default password is intended only for your first login To ensure security please change the password...

Page 8: ...ical or typographical errors may exist in this manual Our company cannot be held responsible for any such errors and reserves the right to change the manual without prior notice Users are fully respon...

Page 9: ...sary port mappings Never set the device as the DMZ host or configure a full cone NAT Disable the automatic login and save password features If multiple users have access to your computer it is recomme...

Page 10: ...roper use of the battery such as the following may cause risks of fire explosion or leakage of flammable liquid or gas Replace battery with an incorrect type Dispose of a battery into fire or a hot ov...

Page 11: ...2014 30 EU WEEE Directive 2012 19 EU The product this manual refers to is covered by the Waste Electrical Electronic Equipment WEEE Directive and must be disposed of in a responsible manner Battery Di...

Reviews: