Adventure Kings AKTA-RTTALU 01 User Manual Download Page 5

5

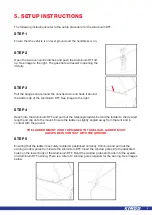
4. INSTALLATION INSTRUCTIONS

STEP 1

The following installation instructions refer to mounting the Aluminium RTT to a vehicle 
roof rack. All mounting fasteners supplied should be used. 

DO NOT

 lift the Aluminium RTT by yourself. Use a team of people or a forklift. 

Un-pack the Aluminium RTT from the box. All components will be stored inside the Aluminium 
RTT. 

STEP 2

Lift the Aluminium RTT onto the vehicle roof rack. Position the Aluminium RTT so that it is centred 

on the roof rack. This will ensure the weight is evenly distributed across the vehicle roof. 

Note: Ensure tent is flush with rear of car to accommodate for ladder during use.
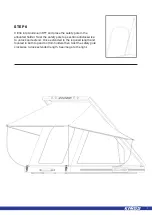
STEP 3

Assemble bolts with mounting track adaptors. See image to the right.

STEP 4

Slide track adaptors with bolts into the desired tracks on the underside of Aluminium RTT by 
lifting up the Aluminium RTT to one side. 

STEP 5

Ensure that the mounting bolts are aligned around the roof rack structural cross bars.

STEP 6

When satisfied with the position of Aluminium RTT slide the 

mounting plates over the bolts and screw on the nyloc nuts. Tighten 
the nyloc nuts and ensure that the bolt thread has fully come through 
the nyloc nut. See image to the right. 

STEP 7

Regularly check the Aluminium RTT bolted connections are secure. Tighten if necessary. 

Summary of Contents for AKTA-RTTALU 01

Page 1: ...Aluminium Rooftop Tent USER MANUAL PLEASE READ AND UNDERSTAND THIS MANUAL COMPLETELY BEFORE USING THIS PRODUCT AKTA RTTALU_01 V1 2...

Page 2: ...2 CONTENTS 1 INTRODUCTION 3 2 SAFETY INFORMATION 3 3 COMPONENTS 4 4 INSTALLATION INSTRUCTIONS 5 5 SETUP INSTRUCTIONS 6 6 WARRANTY CARD 8...

Page 3: ...mended Ensure that the Aluminium RTT is installed correctly as per the below installation instructions All bolted connections should be checked regularly for tightness general condition Ensure that th...

Page 4: ...e included in the Aluminium RTT kit 1 Aluminium RTT x 1 2 Telescopic Ladder x 1 3 Mounting Plates x 6 4 Mounting Fasteners x 12 set of M8 bolt and Nyloc nut 5 Mounting Track Adaptor x 12 6 Window Pole...

Page 5: ...e vehicle roof Note Ensure tent is flush with rear of car to accommodate for ladder during use STEP 3 Assemble bolts with mounting track adaptors See image to the right STEP 4 Slide track adaptors wit...

Page 6: ...uminium RTT and pull out the telescopic ladder Extend the ladder to the desired length and clip onto the mount Ensure the ladder is slightly angled away from the tent and in contact with the ground TH...

Page 7: ...e in the allocated holder Twist the safety pole top section anticlockwise to unlock and extend Once extended to the required length and located in both top and bottom holders then twist the safety pol...

Page 8: ...ilure does not amount to a major failure The benefits provided to you as the consumer by this warranty are in addition to other rights and remedies available to you under the law THE WARRANTY DOES NOT...

Reviews: