Advent AMM10N Installation And Operation Manual Download Page 20

16

AMM10N

MULTI-ZONE OPERATION

Independent sources can be played simultaneously on the 
AMM10N. For example, a video game console can be seen 
on the front screen while DVD video is available to rear 
passengers.

Multi-Zone Limitations

DVD, USB and SD Card cannot be selected 
simultaneously for Front and Rear viewing. 
For example, if DVD is selected for the Rear 
Zone, then the following sources cannot be 
selected for Front Zone viewing: DVD, USB or 
SD Card. If DVD is selected for the Front 
Zone, then the following sources cannot be 
selected for Rear Zone viewing: DVD, USB or 
SD Card.

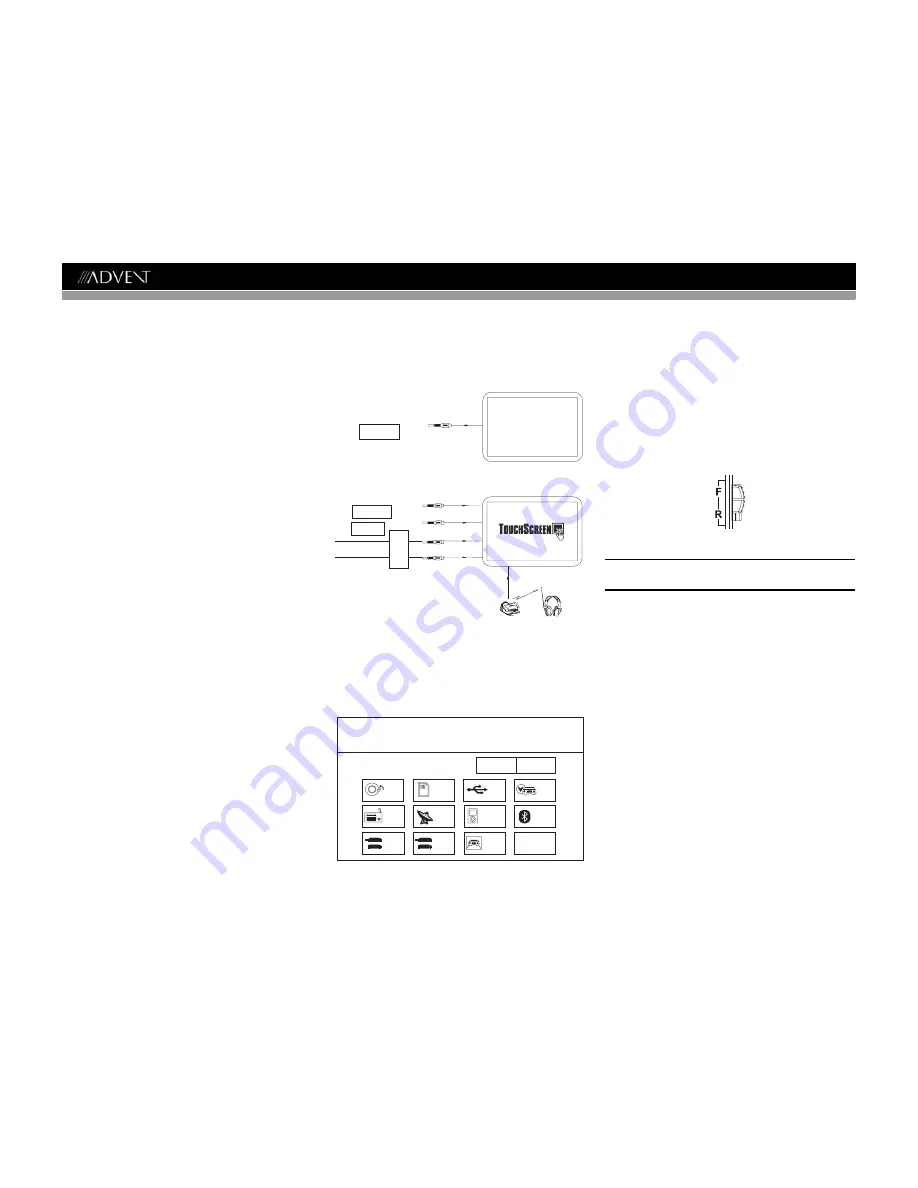
Connecting the Rear Zone Touch 

Screen

You can connect up to two additional monitors (sold 
separately) for rear passengers, one of which can be a Touch 

Screen. You can also connect a wireless headphone system 
to one of your rear monitors, as illustrated below.

Changing the Rear Zone Source

To access the SOURCE MENU, touch the TFT screen in the 
top left corner of the screen. 

This menu allows you to select a source for the front or rear 
zone. Touch FRONT or REAR to choose the zone for which 
you would like to specify the source.

Controlling the Rear Zone Screen(s)

If you have a rear touch screen installed, you can touch the 
screen to control most rear zone functions. 

You can also use the remote control. The AMM10N remote 
controls both the front and rear zones. To switch from front to 
rear zone, move the F/R switch (32) located on the right side 
of the remote controller.

NOTE: You cannot change or control the front zone 
source from the rear zone video screen.

Touch the 

REAR

 button on the left side of the screen to view 

a “Picture in Picture” image of the rear screen.

Turning the Rear Screen Off

Touch the OFF button (on the SOURCE MENU) to suspend 
operation of the rear screen. Any operation assigned 
exclusively to the rear source will be suspended until 
reactivated using either the front or rear zone touch screen or 
the remote control.

YELLOW

BLACK

MZ7TFT Touch Screen

(Sold Separately)

WHITE

RED

Wireless Headphone

(OPTIONAL)

VIDEO OUT 2

MZ-TFT

HEADPHONE MUL

TIZONE

YELLOW

VIDEO OUT 1

Rear Video Screen

(Sold Separately)

SOURCE MENU

DISC

RADIO

SD

iPod

SAT

USB

AUX 1

AUX 2

NAV

CAMERA

OFF

BT

FRONT

REAR

Summary of Contents for AMM10N

Page 1: ...240 DIV Watts Peak Watts en Cr te Vatios el M ximo 60W x 4 AMM10N Installation and Operation Manual video Enter AMM10N Press Audio ANGLE TILT PICTURE Multimedia Receiver AS DISP BAND CLOSE...

Page 2: ......

Page 3: ...Advent AMM10N Mobile Multimedia Receiver for maximum enjoyment Preparation 1 Installation 5 Anti Theft Feature 6 Controls and Indicators 7 Remote Control 9 Using the TFT Monitor 12 Operating Instructi...

Page 4: ...ii AMM10N...

Page 5: ...MediaLink4 Under Dash Interface Allows Portable Media Devices to be Connected MediaLink4 Includes the Following Connectivity USB Supports Hard Drives and Flash Memory Drives LinkDirect 8 pin DIN for i...

Page 6: ...0N is to be installed in a car equipped with an on board drive or navigation computer do not disconnect the battery cable If the cable is disconnected the computer memory may be lost Under these condi...

Page 7: ...ute leave open if not connected MUTE BROWN Car Phone SUB W REAR L REAR R BLUE RED WHITE FRONT L FRONT R RED WHITE WHITE RED Rear Video 1 YELLOW WHITE YELLOW RED Rear View Video Camera External AV Syst...

Page 8: ...nit VIDEO LEFT RIGHT 3 5mm Audio MediaLink Compatible SAT Tuners 1 XMD1000 requires XMC or XMDJEN100 Cable Kit 2 CNP2000UC 3 SC C1 and SIRJEN2 Requires Gen 5 5 or earlier photo or video iPod iPod Touc...

Page 9: ...t be on If unit does not operate recheck all wiring until problem is corrected Once proper operation is achieved turn off the ignition switch and proceed with final mounting of the chassis 1 Connect w...

Page 10: ...screen to enter the SETUP menu 2 Touch RATING to view the RATING sub menu An open lock icon to the right of the Password field indicates that a user password had not yet been entered 3 Touch the keypa...

Page 11: ...s 6 SRC Press to select playing mode When you change the source during navigation the voice prompts will still be heard although the navigation map cannot be seen The selected source audio will be mut...

Page 12: ...disc insertion ejection Press and hold to reset core mechanism position 17 TFT Display 18 REAR Select rear zone source Allows front passengers to listen to the radio while rear passengers listen to a...

Page 13: ...to rear zone move the F R switch 32 located on the right side of the controller 29 3 4 5 9 6 7 26 27 15 16 34 33 19 32 23 24 31 30 8 35 1 2 10 13 28 25 11 12 14 20 18 17 22 21 NOTE Your remote contro...

Page 14: ...playing DVD DivX or Photo Zooms in Navigates the preset station list Navigates list window Navigates the preset station list Navigates list window PRESET 12 Zooms out when playing DVD DivX or Photo Z...

Page 15: ...N EMA or Standby Selects display mode CIN EMA or Standby 1 2 3 4 5 6 7 8 9 0 Numeric Keypad 29 Directly accesses chapter 1 6 selects preset for current band Directly accesses track 1 6 selects preset...

Page 16: ...e TFT screen in Out Press the OPEN button 1 if necessary 2 Locate the extender mechanism behind the screen 3 Firmly grasp both sides of the screen near the bottom 4 Gently pull on either the left or r...

Page 17: ...ould be displayed on the TFT monitor within 1 2 seconds Parking break is disengaged off when the vehicle is started or the accessory ignition is turned on To activate video the following sequence of e...

Page 18: ...ng order RADIO SAT DISC NAV BT iPod SD USB AUX1 AUX2 and CAMERA The playing mode is displayed on the TFT and LCD screens Auxiliary Devices External peripheral devices can be connected to this unit via...

Page 19: ...change the PIP source PIP may also be used to select the NAV or Rear Zone source for transfer to the main TFT screen Touch PIP and then touch the PIP image to select that source for the Front Zone NO...

Page 20: ...ce for the front or rear zone Touch FRONT or REAR to choose the zone for which you would like to specify the source Controlling the Rear Zone Screen s If you have a rear touch screen installed you can...

Page 21: ...and PM 24 Hour Clock displays 24 hour time up to 23 59 RDS Rating Hardware P VOL TS Cal General Language Audio Back Clock Mode 12 Hour Clock Adjust 04 31 AM Video Input AUTO Beep On Speaker DivX Bluet...

Page 22: ...connected Auto Automatically connect when your paired phone is in range Pairing Code The default code is 1234 Touch the keypad icon to open the keypad and enter the pairing code or pass key required f...

Page 23: ...e SETUP button 31 on the remote control or touch the BACK button on the screen Setting Options Function Camera In Normal Mirror Reverse the camera image as if looking through a rear view mirror TFT Au...

Page 24: ...to view the SOURCE MENU Touch RADIO Press the SRC button 6 on the front panel or remote control 8 to switch to the AM FM or RADIO source Select FM AM Band Touch the BAND button 15 on the screen or pre...

Page 25: ...tored in that band Preview Scan PS To scan the AM or FM band for a preview of available stations in your particular area touch the PS button 21 Touch again to stop preview scan Local Radio Station See...

Page 26: ...ode To enter preset mode touch the BAND button on the screen or press the BAND button on the unit 14 or remote control 20 to change between the following bands SAT1 SAT2 or SAT3 indicated in the top l...

Page 27: ...hile in Search Mode to switch between Channel and Category search modes press the CH or CAT buttons on the touch screen Use the scroll bar and arrows on the touch screen to view the next previous page...

Page 28: ...forward Keep pressing and releasing the button to increase the rate from 2X to 4X 6X and 8X Press the joystick enter button 18 on the remote control or touch the play button to resume normal playback...

Page 29: ...choose a language Changing Subtitle Language If you are watching a disc recorded in multiple languages with subtitles press the SUBTITLE button 9 on the remote control to choose the language in which...

Page 30: ...umber of subtitle languages available on the disc maximum of 32 Number of angles provided maximum of 9 Aspect ratios available LB stands for Letter Box and PS stands for Pan Scan In the example on the...

Page 31: ...or on screen or use the button on the joystick to advance to the next track on the disc Press the button 17 on the remote control or on screen or use the button on the joystick to move to the previou...

Page 32: ...m disc capacity use the Disc at once setting MP3 Playing Order When selected for play files and folders Folder Search File Search or Folder Select are accessed in the order they were written by the CD...

Page 33: ...ng large numbers of songs files to a disc for easy music navigation Select the Disc at Once option and close your disc Stopping Playback Touch the button on screen or press the BAND button 20 on the r...

Page 34: ...NU button on screen to return to the previous menu Fast Forward Fast Reverse Press and hold the or buttons on screen or on the remote control 17 19 for 1 second and continue to hold for fast forward o...

Page 35: ...ne from the head unit turn the Bluetooth connectivity off on the mobile phone Phone Book direct searching through the head unit is only available if the mobile phone supports Phone Book Download If th...

Page 36: ...be answered directly or left for voice mail Volume Control To increase or decrease the volume level turn the rotary encoder 5 on the front panel or press the VOL VOL buttons 15 16 on the remote contr...

Page 37: ...The AMM10N allows you to play back audio files from your phone PDA or personal music player using a Bluetooth connection Before using an audio player it may be necessary to enter a PIN code into the u...

Page 38: ...function MUTE wire is grounded Check that the MUTE connection is not grounded and that it s properly insulated Unit resets itself when engine is off Incorrect connection between ACC and positive batte...

Page 39: ...d files Incorrect playback message displayed Message is longer than LCD can display SAT RADIO No Sound Incorrect cable connections Check RCA cables Satellite source not available Incorrect cable conne...

Page 40: ...aged by foreign objects 5 Do not attempt to use a 3 8 cm CD Single disc in this unit either with or without an adaptor as damage to the player and or disc may occur Such damage is not covered by the W...

Page 41: ...Rejection 60dB Frequency Response 50Hz 2 kHz 3dB Monitor Screen Size 7 0 Measured diagonally 16 9 Widescreen 6 06 154 1mm W X 3 42 87mm H Screen Type TFT Liquid Crystal Display LCD active matrix Respo...

Page 42: ...38 AMM10N...

Page 43: ...are and Maintenance section of your Installation and Operation Manual for additional information regarding the proper use of your product Limitations THE EXTENT OF THE COMPANY S LIABILITY UNDER THIS W...

Page 44: ...Audiovox Electronics Corporation Hauppauge NY 11788 Technical Assistance 1 800 645 4994 www audiovox com 2008 Audiovox Ver 042908 Printed in China...

Reviews: