background image

15

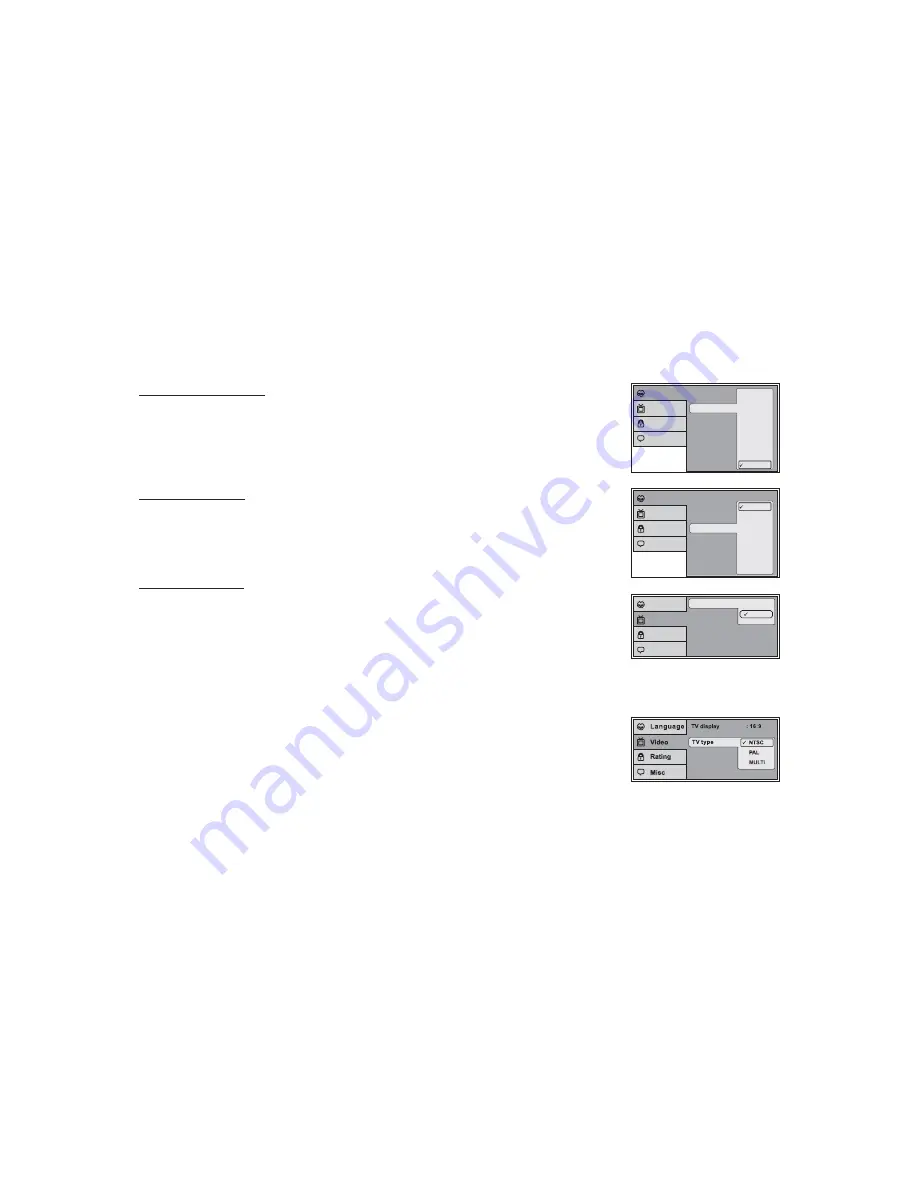
DVD SUBTITLE SETUP

DVD AUDIO SETUP

Select

using

button, then press

button to enter the submenu. Select the subtitle you

desire using

button, then press “ENTER” to confirm the setting. Press

button to return.

Select

using

button, then press

button to enter the submenu. Select the audio language

you desire using

button, then press “ENTER” to confirm the setting. Press

button to return.

The TV DISPLAY setup allows you to set the screen aspect ratio.
4:3
This displays the wide picture with black bands on the upper and lower portions of the screen.
16:9
This displays a wide picture with black bands on the upper and lower portion of the screen. The band
width will vary, depending on the aspect ratio of the disc.

The TV Type setup allows you to select the television standard which corresponds to your TV.
NTSC - Select this type for NTSC TV
PAL - Select this type for PAL TV
MULTI - Select this type for multi-system TV

"SUBTITLE"

"AUDIO"

pq

u

pq

t

pq

u

pq

t

Note: The subtitle selection is only available for discs that are recorded in the above listed languages. If the selected,
language is not available, the player will play and display on the screen the original language contained in the disc.

Note: The audio language selection is only available for discs that are recorded in the listed languages. If the selected,
language is not available, the player will play and display on the screen the original language contained in the disc.

DVD VIDEO SETUP
TV Display

DVD TV Type

Subtitle

Audio

OSD Language

English

French

Spanish

German

Italian

Japanese

Chinese

Thai

Off

Language

Video

Rating

Misc

Subtitle

Audio

OSD Language

English

French

Spanish

German

Italian

Japanese

Chinese

Thai

Language

Video

Rating

Misc

TV type

TV display

4:3

16:9

Language

Video

Rating

Misc

Summary of Contents for 128-8567

Page 1: ...OPERATION MANUAL ADV10 10 1 OVERHEAD LCD MONITOR WITH DVD PLAYER 128 8567C R ...

Page 2: ... or navigation If the LCD panel or video monitor is used for television reception video or DVD play the LCD panel or video monitor must be installed so that these features will only function when the vehicle is in park or when the vehicle s parking brake is applied An LCD panel or video monitor used for television reception video or DVD play that operates when the vehicle is in gear or when the pa...

Page 3: ...omplished using the remote control while seat belts remain fastened Enjoy your ADVENT entertainment system but remember the safety of all passengers remains the number one priority Note Installation options vary see the individual owner s manuals for each component in your system to obtain a full understanding of each component s operation 10 1 TFT Thin Film Transistor Active Matrix LCD Liquid Cry...

Page 4: ...ng of the DVD This control is used for ejecting disc from the disc compartment Turns on the dome lights The dome lights will not turn on in this position Automatically switches on the dome lights in conjunction with the vehicle s interior illumination Provide additional interior illumination Used to turn off the LCD backlight when the LCD is in the closed position Press to release the screen 1 2 3...

Page 5: ...CTION DESCRIPTION SIDE VIEW 1 DVD Disc insertion Slot For loading and removing discs 1 1 2 3 CONTROL FUNCTION DESCRIPTION BACK VIEW 1 Auxiliary Video Input 2 Auxiliary Audio Left Input 3 Auxiliary Audio Right Input ...

Page 6: ... 30 CR2025 REMOTE CONTROL OPERATION Initial Use When purchased the remote control has a battery installed with a Pull Tab to prevent battery discharge Remove the Pull Tab before attempting to use the remote Battery Replacement 1 Remove the battery holder 2 Insert the battery into the battery holder and insert the battery holder into the remote Be sure to observe the correct polarity 3 Align the ba...

Page 7: ...ys on the remote control for monitor functions This button is only active when remote control is in DVD mode Each time of this button is pressed the OSD picture adjustment displays the Adjustment bar for BRIGHTNESS CONTRAST COLOR TINT For NTSC only or RESET Once the desired adjustment bar is displayed use the VOLUME VOLUME button to adjust the setting The display will automatically turn off if no ...

Page 8: ...e desiredTitle Chapter selection Press to search in a backward direction Press repeatedly to change the search speed from 2 4 8 16 times and normal speed Press to activate the play mode while a disc is loaded into the disc compartment Press to return to the previous chapter or track Press to pause playback Allow the user to ENTER the numbers 0 9 for selection of the tracks titles chapters or passw...

Page 9: ...ach time you press the button the language changes Press to display the Setup menu which allows the user to change the DVD player options such as LANGUAGE VIDEO RATING MISC Press to display and select the subtitle language in DVD mode Each time you press the button the subtitle language changes Allows the user to repeat a selected title chapter or track Allow the user to access the disc s menu mod...

Page 10: ...of the original size Forth Q off Picture is returned to original size Press to decrease or increase the level of the picture adjustments after the picture select button PIX is pressed Switches certain function keys on the remote control for DVD function Press this button to mute the audio for wireless FMM IR headphones and wired headphones Pressing the button again restores the audio to the previo...

Page 11: ...the picture quality can be adjusted to the user s references 1 Press the SYSTEM MENU button on the remote and the on screen picture adjustment displays the adjustment for for NTSC only or 2 Use the cursor buttons or to highlight PICTURE CONTROL and press ENTER The PICTURE CONTROL menu will be displayed 3 Use the cursor buttons or to select the desired adjustment and press ENTER 4 Use the cursor bu...

Page 12: ...z CH11 90 1MHz CH12 90 3MHz CH13 90 5MHz CH14 90 7MHz Ch15 90 9MHz CH16 91 1MHz This function allows the user to select the language for the on screen display The user can either select English Spanish French or German for the OSD language 12 ENGLISH SPANISH FRENCH GERMAN SYSTEM MENU OSD LANGUAGE SOURCE DEFAULT DVD SCREEN MODE PICTURE CONTROL FMM FMM ON FMM OFF FMM SELECT SYSTEM MENU OSD LANGUAGE ...

Page 13: ...ault mode of operation Selection of Source default can only be made from within the system menu SCREEN MODE SELECT This allows the user to change the screen format aspect ratio 4 3 16 9 To select the screen aspect ratio format highlight SCREEN MODE and press ENTER button to access the submenu Then press the Cursor button or to select from 4 3 or 16 9 Press ENTER button to confirm the setting p q S...

Page 14: ...en the submenu that contains the different options available Press the ENTER button to set the desired option 3 Use cursor button to position the highlight back on the icon side of the setup page to set the other options Repeat steps 1 2 Press the SETUP button again OSD MENU The OSD MENU setup allows you to select the language for the on screen display The user can either select English French Spa...

Page 15: ... corresponds to your TV NTSC Select this type for NTSC TV PAL Select this type for PAL TV MULTI Select this type for multi system TV SUBTITLE AUDIO pq u pq t pq u pq t Note The subtitle selection is only available for discs that are recorded in the above listed languages If the selected language is not available the player will play and display on the screen the original language contained in the ...

Page 16: ...followed by pressing ENTER Press ENTER button again and key in a new four digit password Select using button then press button to enter the Misc menu Select the option you want to change using button then press ENTER u pq u pq M ISC Note The Default Password is 3308 This password is always effective even after you have selected your own password and changed it To avoid the possibility of others us...

Page 17: ... saver mode ON Screen saver will appear OFF Screen saver will not appear 1 Press the DISPLAY button on the remote control to display the status banner The banner includes title chapter angle audio subtitle and time 2 Press numeric 0 9 buttons to initiate a change of title selection Then press ENTER to implement the selection 3 Press numeric 0 9 buttons to initiate a change of chapter selection The...

Page 18: ...ning the song and press ENTER to begin track playback Use the Next button on the remote control to move to the next song Use the Previous button to move to the previous song Audio data format MP3 WMA Photo data format JPEG Video data format MPEG Selecting Folders and Songs Skipping Songs Selecting a Play Mode Flat Mode p q p q 9 Filter For MP3 JPEG only Audio Photo Video play the entire disc Filte...

Page 19: ...Each song in a folder is t only be played once Play each song in order in the folder for 10 seconds The purpose of the Music Intro function is to provide the user with a sample of each song for 10 seconds thereby making it easy to select and listen to a favorite song To add the selected songs into Browser view make sure disc playback is off Move cursor to Edit mode function and press ENTER After E...

Page 20: ...rk will appear to the left of the selected song Move the cursor to clear program and press ENTER the selected songs will be deleted from the play list 1 12 002 003 004 005 006 Music Playing 001 00 00 01 Clear program Broser view Edit mode Album Region 1 USA Canada Region 2 Japan Europe South Africa Middle East Greenland Region 3 S Korea Taiwan Hong Kong Parts of South East Asia Region 4 Australia ...

Page 21: ...ain musical or sound content only MP3 disc A disc that contains audio files for example a CD R with downloaded MP3 files This system is capable of playing most recordable DVD formats However due to the variety of disc manufacturers and software playback cannot be guaranteed Before you load a disc make sure that it is compatible with the player Insert the disc with the label facing the vehicle s he...

Page 22: ... use 2 Pressing the power button on the unit or the remote control will turn the system on and off When in use the internal backlighting will illuminate the controls 3 After the unit has been turned on and is displaying a picture adjust the viewing angle by pivoting the screen to optimize the picture quality 4 Remember to turn the unit off and pivot the LCD to the locked position when not in use R...

Page 23: ...nnected to a external video source video game system or other audio video devices To access the audio video inputs inputs turn the unit on and press the S source button or the Source button on the remote control until AV1 AUX is displayed on the screen Turn the video source component on with its power button or remote control and it is now ready to play the audio and video signals from the source ...

Page 24: ...on t match the disc can t be played Make sure your DVD is connected properly Make sure all cables are securely inserted into the appropriate jacks If you are using the 2 channel IR headphones make sure you turn on the IR headphone power make sure the correct channel A B is selected Make sure the Modulator is ON and the proper Frequency has been selected Make sure that unit is set to M1 when using ...

Page 25: ...estricts it 2 The disc s software doesn t support the feature e g angles 3 The feature is not available at the moment 4 4 requested a title or chapter number that is out of range No forward or reverse scan Some discs have sections that prohibit rapid scanning or title and chapter skip If you try to skip through the warning information and credits at the beginning of a movie you won t be able to Th...

Page 26: ...ls 1 152 000 Operation Temperature 32 131º F 0 55º C Storage Temperature 4 158º F 20 70º C Backlit life 10 000 Hours Video Display System NTSC PAL Video Output 1 0 Vp p 75 ohms Power Source 12 VDC Dimension L x W x H 11 0 x 9 5 x 1 7 289mm x 243mm x 44mm Specifications are subject to change without notice 26 ...

Page 27: ...ILITYEXCEEDTHE PURCHASE PRICE PAID BYPURCHASER FORTHE PRODUCT This Warranty is in lieu of all other express warranties or liabilities ANY IMPLIED WARRANTIES INCLUDING ANY IMPLIED WARRANTY OF MERCHANTABILITY SHALL BE LIMITED TO THE DURATION OF THIS WRITTEN WARRANTY ANY ACTION FOR BREACH OF ANY WARRANTY HEREUNDER INCLUDING ANY IMPLIED WARRANTY OF MERCHANTABILITY MUST BE BROUGHT WITH IN A PERIOD NOT ...

Page 28: ...128 8567C 20 ADVENT 150 Marcus Blvd Hauppauge NY 11788 11 ...

Reviews: