background image

PCI-1625U User Manual

40

5.1.2 PCI-1625U with OPT8AP

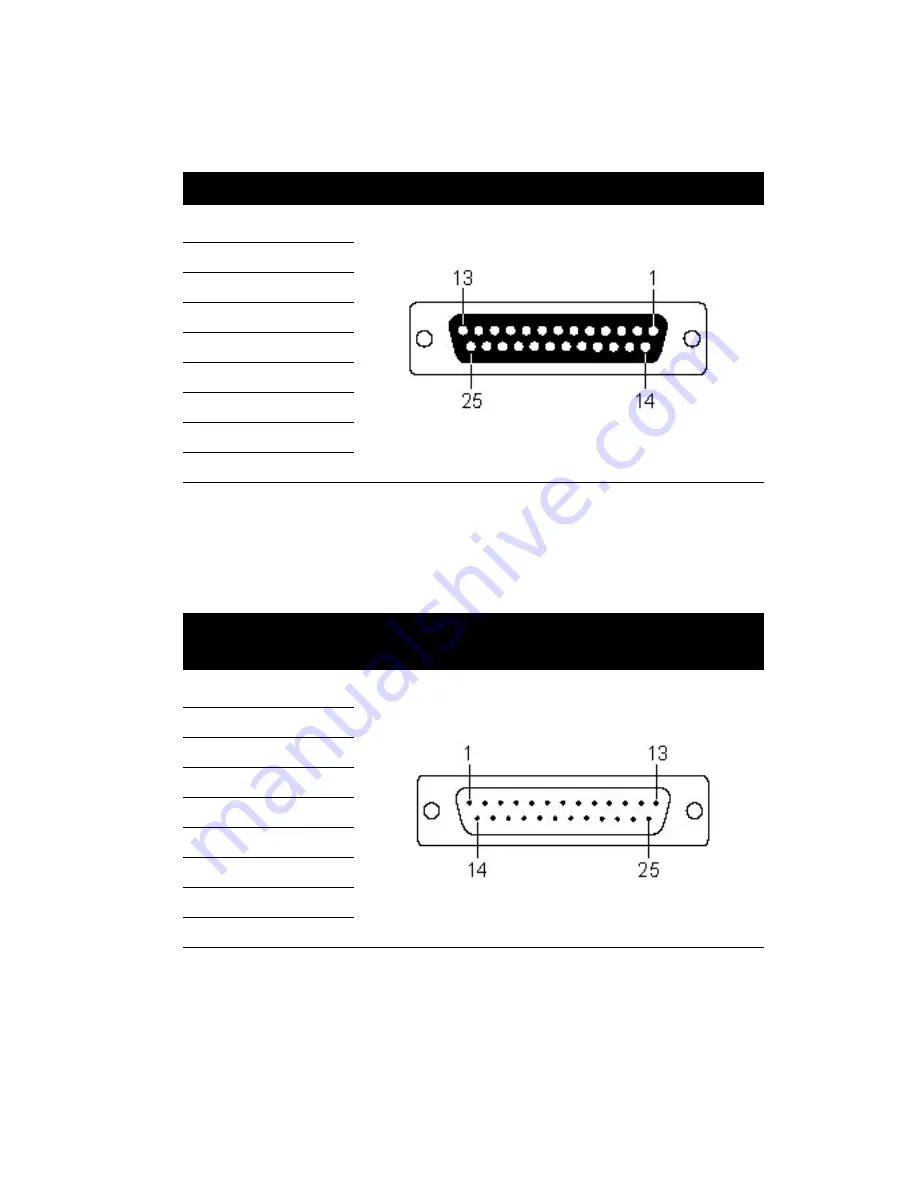
If you choose accessory OPT8AP to connect with PCI-1625U, the female 
DB25 connectors of OPT8AP are as shown below.

5.1.3 PCI-1625U with OPT8BP, OPT8C

If you choose accessory OPT8BP and OPT8C connects with PCI-1625U, 
male DB25 connectors of OPT8BP and OPT8C are as shown below.

Table 5.2: PCI-1625U with OPT8AP Female DB25 Pin Assignment

Pin

Signal

2

RxD

3

TxD

4

CTS

5

RTS

6

DTR 

7

GND

20

DSR

8

DCD

Table 5.3: PCI-1625U with OOPT8BP or OPT8C Male DB25 Pin 
Assignment

Pin

Signal

2

Txd

3

RxD

4

RTS

5

CTS

6

DSR

7

GND

20

DTR

8

DCD

Summary of Contents for PCI-1625U

Page 1: ...PCI 1625U 8 port Intelligent RS 232 Universal PCI Communication Card User Manual...

Page 2: ...any means without the prior written permission of Advantech Co Ltd Information provided in this manual is intended to be accurate and reli able However Advantech Co Ltd assumes no responsibility for...

Page 3: ...lacement materials service time and freight Please consult your dealer for more details If you think you have a defective product follow these steps 1 Collect all the information about the problem enc...

Page 4: ...d used in accordance with the instruction manual may cause harmful interference to radio communications Operation of this equipment in a residential area is likely to cause harmful interference in whi...

Page 5: ...lity and user manual Safety Precaution Static Electricity Follow these simple precautions to protect yourself from harm and the products from damage 1 To avoid electrical shock always disconnect the p...

Page 6: ...PCI 1625U User Manual vi...

Page 7: ...3 1 Menu Bar 25 4 3 2 Tool Bar 26 4 3 3 Com Port Tab 27 4 3 4 Port Status 28 4 3 5 Message Logo 28 4 3 6 Tx Slide Bar 29 4 3 7 Performance Listing Area 29 4 3 8 Status Bar 29 4 4 Using the ICOM Tools...

Page 8: ...with OPT8AP 40 Table 5 2 PCI 1625U with OPT8AP Female DB25 Pin Assignment 40 5 1 3 PCI 1625U with OPT8BP OPT8C 40 Table 5 3 PCI 1625U with OOPT8BP or OPT8C Male DB25 Pin Assignment 40 5 1 4 PCI 1625U...

Page 9: ...2 CHAPTER 1 Introduction This chapter introduces PCI 1625U its accessories and detailed specifications Sections include Description Features Specifications Ordering Information...

Page 10: ...s onboard DSP This improves performance and makes version upgrading easy so there is no hardware redundancy PCI 1625U has a universal PCI connector that is compatible with both newer 3 3 V signaling s...

Page 11: ...402 DSP Memory 1 MB Communication Controller 8 x 16c550c UART Serial Interface 8 port RS 232 Speed bps 50 bps 921 6 kbps Bus Interface PCI bus specification 2 2 compliant IRQ all ports use the same IR...

Page 12: ...le connectors with card and con nection BOX included OPT8BP 8 Port RS 232 Connection Box Male DB25 Connector DTE 1 5 m cable connectos with card and connection BOX included OPT8BSP 8 Port RS 232 Conne...

Page 13: ...2 CHAPTER 2 Hardware Configuration This chapter shows how to get started with your PCI 1625U card Sections include Initial Inspection Card Installation...

Page 14: ...ales representative immediately Also notify the carrier Retain the shipping carton and pack ing material for inspection by the carrier After inspection we will make arrangements to repair or replace t...

Page 15: ...of the Intelligent PCI communica tion card 9 Align the hole in the retaining bracket with the hole on top of the expansion slot 10 Align the gold striped edge connector with the expansion slot socket...

Page 16: ...PCI 1625U User Manual 8...

Page 17: ...iver Setup and Installation This chapter shows how to install ver ify and uninstall the driver Sections include Introduction Driver Setup Verifying Driver Installation Removing PCI ICOM Device Driver...

Page 18: ...tee a smooth and trouble free installation process 3 2 Driver Setup Windows 2000 XP supports COM1 to COM256 up to 256 serial ports The PCI 1625U driver however will assign communication ports auto mat...

Page 19: ...1625U Win dows 2000 XP driver installation 1 Insert the companion CD ROM disc into your CD ROM drive 2 The driver setup program will be launched automatically If the auto play function is not enabled...

Page 20: ...PCI 1625U User Manual 12 4 Click the Continue button and the catalogue select page appears Then click the Installation button for installation 5 Click ICOM Card Drivers for installation...

Page 21: ...13 Chapter3 6 Choose the driver you want to install then click the hyperlink 7 You ll see the following screen Click Next to continue installation...

Page 22: ...PCI 1625U User Manual 14 8 Type user name and company name then click Next 9 Click Next to accept the default installation folder or specify a folder by clicking the Browse button...

Page 23: ...15 Chapter3 10 Confirm the program folder and click Next 11 Click Back to review or change your setting or click Next to begin copying files...

Page 24: ...PCI 1625U User Manual 16 12 Click Finish to complete the installation...

Page 25: ...configuration you want to see On the General tab you can see the loca tion information that means your card is installed in which PCI slot on the board Note If your device has not been properly instal...

Page 26: ...ee On the Properties sheet select the specific tabs to see relevant information On the General tab you can see if the COM port works properly If it does you will see a message under the Device status...

Page 27: ...port is assigned to which port on the PCI slot The tab also shows the card model name and FPGA version In the default communications parameters box you can set up the bits per second data bits parity...

Page 28: ...ce Manager in the hardware tab system properties 2 Click the plus sign on the right of the Ports COM LPT device category to expand it Select the specific Advantech PCI communication port you want to r...

Page 29: ...h PCI 1625U Note You must remove all used ports setting and device setting before you remove the device or there may be a mistake in the port setting when you install another card Note We recommend re...

Page 30: ...sert the ICOM CD and click the driver you want to uninstall 2 Choose the Modify radio button if you want to save another driver or choose the Remove radio button to remove all installed compo nents 3...

Page 31: ...2 CHAPTER 4 ICOM Tools This chapter provides information on installation and usage of ICOM Tools Sections include Introduction Installation User Interface of ICOM Tools...

Page 32: ...COM cards It is included for free on the diskette or on the companion CD ROM with all Advantech Industrial Communication cards 4 2 Installation To begin installation double click the ICOM_Tools exe pr...

Page 33: ...cut keys Port Submenu All Ports Submenu Help Submenu Access Online help Select Select the ports you want to configure Setup Setup the configuration of a specific port Close Close a specific port Run R...

Page 34: ...ou have selected Port Close Closes the port you have selected Port Run Runs the port test on the port you have selected Port Stop Stops the port test on the port you have selected All Ports Setup Sets...

Page 35: ...k In loopback mode a series of special data will be transmitted which are expected to appear on the receiving end Using the loopback mode you can check the integrity of received data and find whether...

Page 36: ...CTS for flow control to run the test you will see the RTS mark appear in black This indicates that the RTS can no longer be toggled on off since it is controlled by driver itself 4 3 5 Message Logo On...

Page 37: ...ssion rate and Last Abnormal Status of each port running a test 4 3 8 Status Bar The Status Bar is where you can glimpse the current information of the port you have selected The Status Bar indicates...

Page 38: ...ls COM Examine Tools to start the port testing util ity 4 4 1 Port Selection Please follow the steps below to make your port selection 1 Launch ICOM Tools You will first see the Program Window such as...

Page 39: ...2 Select Port dialog box Select the port s you want to perform test on from the checkboxes next to each COM port You can either click the checkbox or double click the name s of the port s to select de...

Page 40: ...ecific port or to configure all ports before running your test Just click a Com Port Tab to select the port you want to configure and then click the Port Setup button or use the Port Setup menu comman...

Page 41: ...Run menu command or you want to run all ports at once just click the All Ports Run button or access All Ports Run menu command Once the test is started you can see relevant test information of port p...

Page 42: ...s Stop button or access All Ports Stop menu command You can restart the test by clicking the Run button or accessing the Port Run menu command or if you want to run all ports at once just click the Al...

Page 43: ...stem settings and perfor mance 4 5 1 Status Bar Messages BUSY the port is currently used by another application FAIL the configuration parameters are not accepted by the port N A PORT the port is not...

Page 44: ...been detected on the port Framing Error A timing error i e from start bit to stop bit has been detected on the port Port I O Error An incorrect I O event has been detected on the port Rx Overrun Rece...

Page 45: ...2 CHAPTER 5 Pin Assignments Wiring This chapter shows how the different pins are assigned and how to wire PCI 1625U Sections include Pin Assignments Wiring...

Page 46: ...Chapter 5 Pin Assignments Wiring 5 1 Pin Assignments 5 1 1 PCI 1625U The following diagram shows the pin assignments for the PCI 1625U card s DB 62 connectors for RS 232 Figure 5 1 PCI 1625U RS 232 M...

Page 47: ...TxD1 DTR1 46 47 CTS1 RTS1 6 7 TxD2 DTR2 27 28 29 RxD2 DSR2 DCD2 48 49 50 CTS2 RTS2 GND 8 9 10 RxD3 DSR3 DCD3 30 31 32 TxD3 DTR3 GND 51 52 CTS3 RTS3 11 12 13 RxD4 DSR4 DCD4 33 34 55 TxD4 DTR4 GND 53 5...

Page 48: ...h OPT8BP OPT8C If you choose accessory OPT8BP and OPT8C connects with PCI 1625U male DB25 connectors of OPT8BP and OPT8C are as shown below Table 5 2 PCI 1625U with OPT8AP Female DB25 Pin Assignment P...

Page 49: ...1 5 PCI 1625U with OPT8FP If you choose accessory Opt8FP to connect with PCI 1625U you could access RS 422 device through OPT8FP and female DB25 connectors of OPT8FP are shown as below Table 5 4 PCI...

Page 50: ...l Equipment refers to the device that is leading the communication Examples include PCs terminals and some printers DCE refers to the device being communicated with or con trolled Examples include mod...

Page 51: ...using CTS RTS DSR DTR and DCD signals please short pins 4 and 5 together and please short pins 6 8 and 20 together Table 5 6 Modem Connections DB25 Male Modem DCE Pin Signal Pin Signal 2 TxD 2 RxD 3 R...

Page 52: ...PCI 1625U User Manual 44...

Reviews: