background image

MIC-75G20-10A2 Startup Manual  3

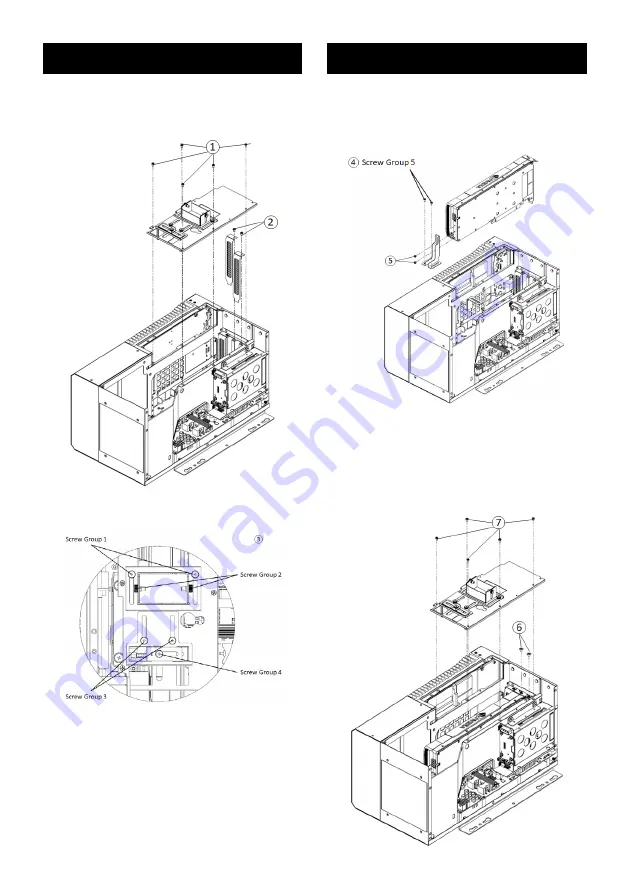
1.  Undo the 5 screws on top of the GPU card bracket 

module.

2.  Remove the adapter bracket to make space for the 

GPU card.

3.  Release screw groups 1, 2, 3, and 4 for further GPU 

card installation.

Memo: If the GPU card has two screw holes on the rear 

side, please follow the assembly instruction. If not, please 

skip steps 4 and 5.
4.  Undo the screws in group 5 to remove the GPU rear 

bracket.

5.  Assemble the GPU rear bracket to the GPU with 2 

screws and reassemble it to the chassis with the group 

5 screws.

Memo: The GPU rear bracket can be adjusted to fit different 

heights of the GPU card by undoing the group 5 screws.

6.  After the GPU card has been installed, secure 2 screws 

to the bracket of the GPU.

7.  Secure the GPU to the adjustable GPU card bracket 

module with 5 screws.

8.  Secure the GPU card by adjusting the GPU card 

bracket module.


GPU Card Bracket Assembly 


GPU Card Bracket Assembly (Cont.)

Summary of Contents for MIC-75G20-10A2

Page 1: ... Startup Manual Environment Operating Temperature 10 60 C 35W CPU w indus trial wide temp RAM SSD Storage Temperature 40 85 C 40 185 F Relative Humidity 95 40 C non condensing Mechanical i Module Dimensions i Module Dimension W x H x D 130 x 192 x 385 mm With MIC 7 series With MIC 7 series W x H x D 207 x 192 x 385 mm Note Width will be increased by 4 mm with MIC 77xx Connectors No Item Function 1...

Page 2: ...system screws and remove the bottom cover 2 Remove the 2 dust covers IMPORTANT 3 Undo the 4 screws on MIC 75G20 Simple Maintenance Process Front View 4 Align MIC 75G20 and MIC 7 and secure 4 screws 5 Assemble the MIC 75G20 cover and secure with 6 screws 6 Reassemble the cover and secure with the screws Simple Maintenance Process Cont ...

Page 3: ...o the screws in group 5 to remove the GPU rear bracket 5 Assemble the GPU rear bracket to the GPU with 2 screws and reassemble it to the chassis with the group 5 screws Memo The GPU rear bracket can be adjusted to fit different heights of the GPU card by undoing the group 5 screws 6 After the GPU card has been installed secure 2 screws to the bracket of the GPU 7 Secure the GPU to the adjustable G...

Page 4: ... to the optimal position to clamp the GPU card 12 Release group 4 screws to adjust the width of bracket B to secure the front and back side of the GPU Card Power Supply Cabling Guide GPU Card Bracket Assembly Cont It is recommended that you replace the fan filter regularly to ensure the stability of system cooling 1 Undo the system cover and remove the old fan filter 2 Replace with the new fan fil...

Page 5: ...nting bracket R 1960094392N013 with 6 screws 1930007259 01 2 Type 2 Secure 1 mounting bracket L 1960005359T00A and 1 mounting bracket R 1960094392N013 with 6 screws 1930007259 01 Mounting Bracket Assembly Power Supply Cabling Guide Cont Width is 207 mm with MIC 77xx installed System Dimensions ...

Reviews: