background image

IPC-610  User's Manual

5

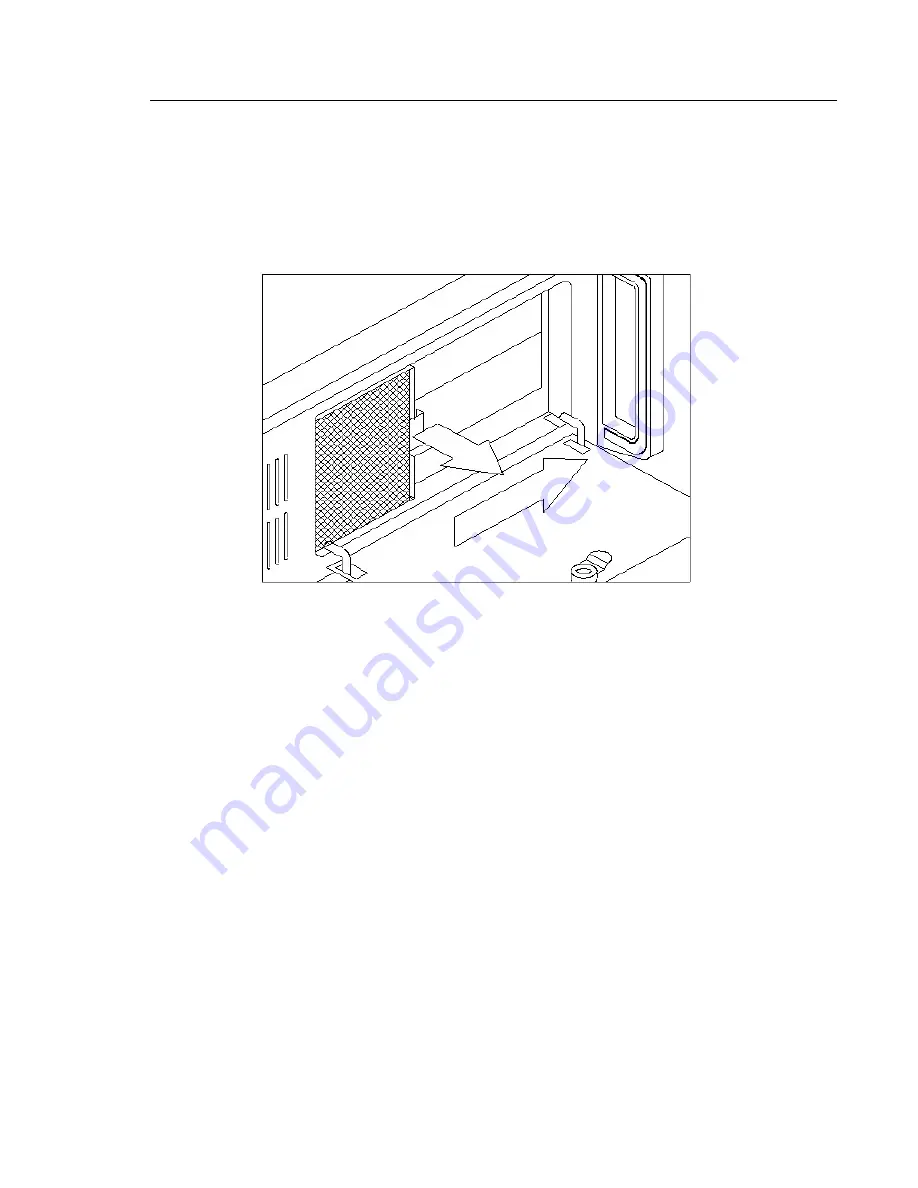
Figure 2-8: Replacing the filter

2.5  Replacing the Filter

The filter is located next to the lockable door. Under continuous use, the filter should be removed about
once a month. To replace the filter, refer to Fig. 2-8 below and do the following:

1. Open the lockable door.

2. Remove the filter out by gently pulling the tab and sliding the filter to the right.

3. Slide a new filter in until it snaps into place.

4. Close and lock the lockable door.

Summary of Contents for IPC-610

Page 1: ...IPC 610 Industrial PC Chassis...

Page 2: ...ided in this manual is intended to be accurate and reliable However Advantech Co Ltd assumes no respon sibility for its use nor for any infringements of the rights of third parties which may result fr...

Page 3: ...e Filter 5 Figure 2 8 Replacing the filter 5 Appendix A Rear Cover and Window 6 A 1 Changing the Rear Cover According to Power Supply Used 6 Figure A 2 IPC 610 with redundant power supply 6 Figure A 1...

Page 4: ...ll cooling fans to exclude dust and dirt A lockable door protects drives and switches from tampering and foreign particles Note There are several special versions of the IPC 610 also available The IPC...

Page 5: ...idity 10 95 40 C non condensing Vibration operating 5 17 Hz 0 1 double amplitude displacement 17 500 Hz 1 5 g acceleration peak to peak Shock operating 10 g acceleration peak 11 ms duration Safety C U...

Page 6: ...ached via a screw WARNING Disconnect all power from the chassis before you install the CPU cards Unplug the power cord from the wall turning off the power switch alone is not sufficient If you are not...

Page 7: ...ded into the hold down clamp These buffers offer the plug in cards two levels of protection against vibration See Fig 2 5 Figure 2 4 Detaching the hold down clamp Figure 2 5 Inserting the rubber buffe...

Page 8: ...nder continuous use the filter should be removed about once a month To replace the filter refer to Fig 2 8 below and do the following 1 Open the lockable door 2 Remove the filter out by gently pulling...

Page 9: ...IPC 610 User s Manual Figure A 2 IPC 610 with redundant power supply Figure A 1 IPC 610 with PS 2 size power supply Appendix A Rear Cover and Window A 1 ChangingtheRearCoverAccordingtoPowerSupplyUsed...

Page 10: ...the backplane you want to install such as the PCA 6114 PCA 6114P4 PCA 6114P4R PCA 6114P7 PCA 6114P10 etc 2 To change the backplane s rear window see Fig A 3 Figure A 3 Rear window of IPC 610 for stan...

Page 11: ...er s Manual Figure A 4 Rear window of IPC 610 for standard AT motherboard A 3 AT Motherboard 1 Make sure that the motherboard supports AT power 2 To change the rear window for standard AT motherboards...

Page 12: ...User s Manual 9 Figure A 5 IPC 610 ATX chassis component layout A 4 ATX Motherboard 1 Make sure that the motherboard supports ATX power 2 To change the rear window for standard ATX motherboards see F...

Page 13: ...10 IPC 610 User s Manual Figure B 1 IPC 610 exploded diagram internal components Appendix B Exploded Diagrams...

Page 14: ...IPC 610 User s Manual 11 Figure B 2 IPC 610 exploded diagram case components...

Page 15: ...12 IPC 610 User s Manual Figure B 3 IPC 610 exploded diagram speaker LED fan...

Page 16: ...noted 11 If the equipment is not used for a long time disconnect it from the mains to prevent damage from transient overvoltage 12 Never pour any liquid into any opening This could cause fire or elect...

Page 17: ...er einen l ngeren Zeitraum nicht benutzt sollten Sie es vom Stromnetz trennen Somit wird im Falle einer berspannung eine Besch digung vermieden 12 Durch die L ftungs ffnungen d rfen niemals Gegenst nd...

Reviews: