background image

ICR-2531

2.6

Reset Functions

Consider creating a router configuration backup before performing the router’s factory
reset.

The

RST

button can be used in three different scenarios:

Reset

: Hold the

RST

button for

less than 4 seconds

; the router will reboot, applying its

customized configuration. The router reset can be initiated by clicking the

Reboot

menu

item in the router web GUI.

Factory Reset

: To restore the default factory configuration of the router, press and hold

the

RST

button for

more than 4 seconds

. After that, the

PWR

LED turns off and on

again. We recommend holding the

RST

button for 1 second after turning on the PWR

LED.

Emergency Factory Reset

: If the router cannot boot up due to the incorrect configu-

ration, turn off the router (disconnect the power supply). Then, push and hold the

RST

button, turn on the router and hold the

RST

button for

at least 10 seconds

. The router

configuration will be set to the default one.

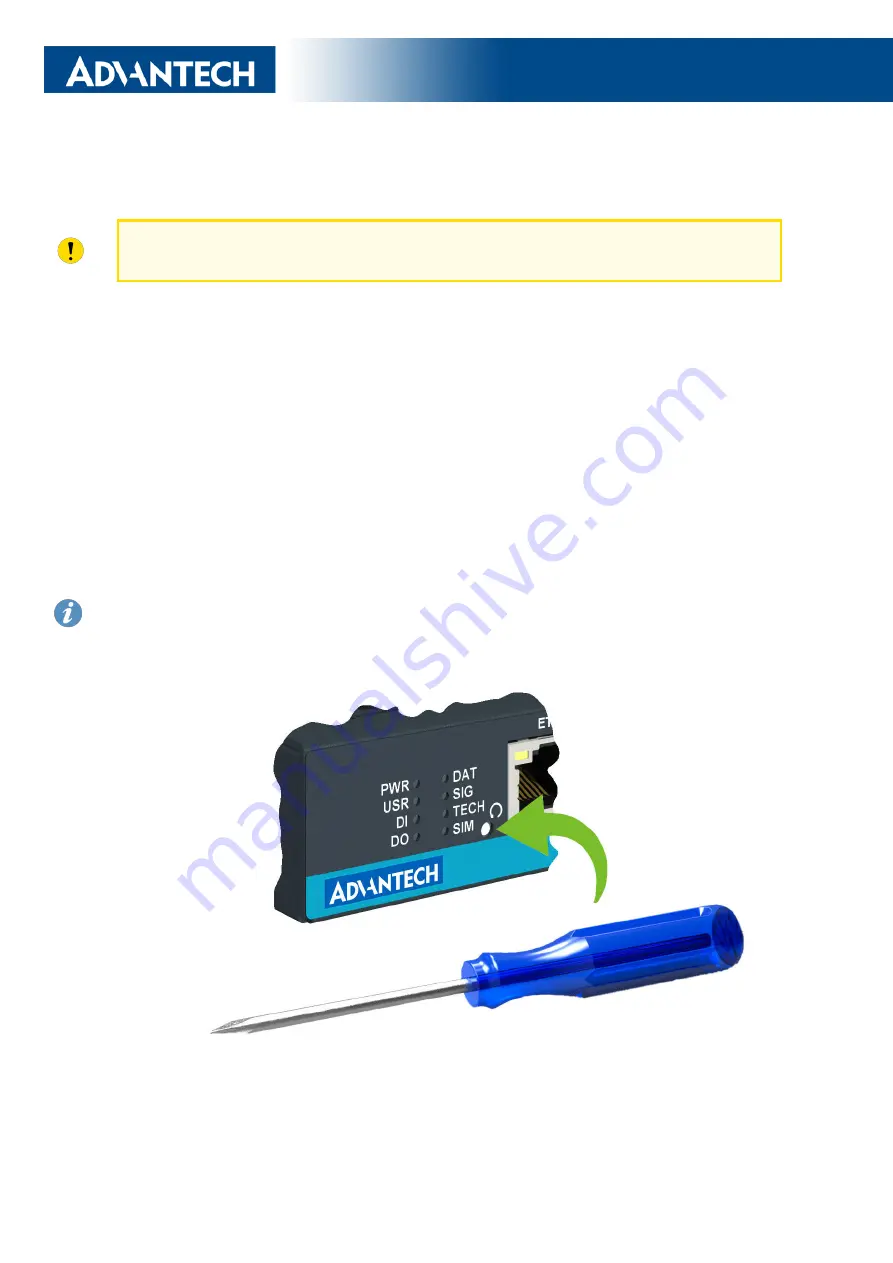
It is necessary to use a narrow screwdriver or any other small tool to press the

RST

button.

Figure 17: Resetting the Router

19

Summary of Contents for ICR-2531

Page 1: ...LTE Industrial Router ICR 2531 USER MANUAL ...

Page 2: ...ect to change without notice and does not represent a commitment on the part of Advantech Advantech Czech s r o shall not be liable for incidental or consequential damages resulting from the furnish ing performance or use of this manual All brand names used in this manual are the registered trademarks of their respective owners The use of trademarks or other designations in this publication is for...

Page 3: ...e router Attention Problems that can arise in specific situations Information notice Useful tips or information of special interest Advantech Czech s r o Sokolska 71 562 04 Usti nad Orlici Czech Republic Document No MAN 0072 EN revision from April 20 2023 Released in the Czech Republic ii ...

Page 4: ...Interfaces 15 2 3 Power Supply 16 2 4 I O Port Interfaces 17 2 5 LED Status Indication 18 2 6 Reset Functions 19 3 First Use 20 3 1 Accessories Connection 20 3 2 Router Configuration 20 4 Technical Specifications 22 4 1 Basic Parameters 22 4 2 Standards and Regulations 23 4 3 Type Tests and Environmental Conditions 24 4 4 Parameters of Cellular Module 25 4 5 Parameters of WiFi 26 4 6 Parameters of...

Page 5: ...ICR 2531 Appendix D Related Documents 34 iv ...

Page 6: ...sions Top Side and Front View with DIN Rail Clip 9 7 Screwed Wall Mounting Clip 11 8 Position of the DIN Rail Clip 12 9 Removing Router from the DIN Rail 12 10 Label Example 13 11 SIM Cards Insertion 14 12 Ethernet Connector Pinout 15 13 Connection of Power Supply 16 14 Position of the Grounding Screw 16 15 I O Connector Pinout 17 16 Functional Scheme of the Binary Interface 17 17 Resetting the Ro...

Page 7: ...ription 15 5 Power Supply Pinout 16 6 I O Ports Pinout 17 7 LED Status Indication 18 8 Basic Parameters 22 9 Standards and Regulations 23 10 Type Tests and Environmental Conditions 24 11 Technical Parameters of Cellular Module 25 12 Technical Parameters of WiFi 26 13 Electrical Characteristics of Binary Input 27 14 System Configuration 27 1 ...

Page 8: ... with a WiFi module but this must be part of the initial configuration it cannot be assembled to the router at some point in the future The router supports VPN tunnel creation using various protocols to ensure safe commu nications The router provides diagnostic functions which include automatic monitoring of the wireless and wired connections automatic restart in case of connection losses and a ha...

Page 9: ...amples The router is primarily intended for these basic situations I Access to the Internet from LAN Figure 1 Access to the Internet from LAN II Backed up access to the Internet from LAN Figure 2 Backed up Access to the Internet 3 ...

Page 10: ...ICR 2531 III Secure networks interconnection or using VPN Figure 3 Using VPN Tunnel 4 ...

Page 11: ...Grounding screw M3 Pay attention to proper grounding see Chapter 2 3 2 PWR IN OUT 6 pin terminal Power supply binary input and binary output interfaces See Chapter 2 3 Chapter 2 4 for more information Chap ter 4 6 for I O parameters 3 WiFi R SMA Connector for the WiFi antenna see Chapter and Chapter 4 5 for WiFi parameters 4 LEDs Status LED indication see Chapter 2 5 5 RST Button to reboot the rou...

Page 12: ...apter 2 1 10 DIN clip DIN rail clip not included as standard accessories see Chapter 1 9 11 Wall clip Wall mounting clip included as standard accessories see Chapter 1 8 Table 1 Hardware Overview of the Router 1 4 Order Codes Order codes overview is shown in the table below Order code Features interfaces ICR 2531 LTE Cat 4 with 3G 2G fallback cellular module 64 MB NOR Flash 3x ETH0 switch 1x ETH1 ...

Page 13: ...in the following table Item Description Figure Q ty 1 Router 1 pcs 2 Wall mounting clip with screws 1 set 3 6 pin terminal block for power sup ply digital input and digital output de ployed on the router 1 pcs 4 Printed Quick Start Guide Leaflet 1 pcs Table 3 Contents of Package 7 ...

Page 14: ... Dimensions For the dimensions of the product see the figures below Note that all sizes are measured in millimeters Variant with Wall Mounting Clip Figure 5 Router Dimensions Top Side and Front View with Wall Mount Clip 8 ...

Page 15: ...ICR 2531 Variant with DIN Rail Clip Figure 6 Router Dimensions Top Side and Front View with DIN Rail Clip 9 ...

Page 16: ...uter attached to a switchboard For whip antennas it is recommended to observe a minimum distance of 6 cm from ca bles and metal surfaces on every side in order to avoid interference When using an external antenna separate from the switchboard it is necessary to fit a lightning conduc tor When mounting a router on sheet steel we recommend using a cable antenna For all cables we recommend to bind th...

Page 17: ... to a wall or another surface using the wall mounting clip There are two wholes on the clip with a diameter of 4 millimeters For detailed information about the mounting dimensions see Figure 5 in Chapter 1 6 When mounting the wall mounting clip tighten the screws with max torque of 0 4 Nm Figure 7 Screwed Wall Mounting Clip 11 ...

Page 18: ...on of the clip is shown in Figure 8 When mounting the DIN rail clip tighten the screws with max torque of 0 4 Nm Figure 8 Position of the DIN Rail Clip To remove the router from the DIN rail it is necessary to lightly push down the router so that the bottom part of the DIN rail clip hitched to the DIN rail get out of this rail and then fold out the bottom part of the router away from the DIN rail ...

Page 19: ...ICR 2531 1 10 Product Label An example of the product label with all the information printed on it is in the figure below Figure 10 Label Example 13 ...

Page 20: ...t Names adjusted The SIM card changing procedure is described below Enter the PIN in the router s web interface if the PIN is required for the SIM Administration Unlock SIM Card Type of SIM card Micro SIM 3FF 15 0 x 12 0 x 0 76 mm Inserting the SIM card Always disconnect the router from the power supply before handling the SIM card Unscrew two screws on the SIM card cover and remove the cover To r...

Page 21: ...escribed in Table 4 Figure 12 Ethernet Connector Pinout Pin Signal mark Description 1 Tx Transmit Data positive pole 2 Tx Transmit Data negative pole 3 Rx Receive Data positive pole 4 5 6 Rx Receive Data negative pole 7 8 Table 4 Ethernet Connector Pinout Description The isolation barrier of the Ethernet ports against the ground is 1500 V 15 ...

Page 22: ...e router is between 9 V and 48 V DC see the connection scheme on Figure 13 Protection against reversed polarity without signaling is built into the router For correct operation it is necessary that the power source is able to supply a peak current of 1 A Unit has to be supplied by a power supply specified as a Limited Power Source LPS or CEC NEC Class 2 source of supply The metal case of the route...

Page 23: ...in Signal mark Description 3 IN The binary input positive pole 4 IN The binary input negative pole 5 OUT The binary output positive pole 6 OUT The binary output negative pole Table 6 I O Ports Pinout The I O user interface is designed for binary input processing and binary output control For detailed electrical parameters see Chapter 4 6 The functional scheme of connection for the binary input and...

Page 24: ...t is active DAT Green Blinking Cellular communication is in progress SIG Green On Blinking Fast blinking Good cellular signal Fair cellular signal Poor cellular signal TECH Green On Blinking Fast blinking The active SIM uses 4G technology The active SIM uses 3G technology The active SIM uses 2G technology SIM Green On Blinking Fast blinking SIM1 is active for the cellular connection SIM2 is active...

Page 25: ...configuration of the router press and hold the RST button for more than 4 seconds After that the PWR LED turns off and on again We recommend holding the RST button for 1 second after turning on the PWR LED Emergency Factory Reset If the router cannot boot up due to the incorrect configu ration turn off the router disconnect the power supply Then push and hold the RST button turn on the router and ...

Page 26: ...192 168 1 1 address in a web browser Please note that usage of the HTTPS protocol for secure communication over the network is required There is just the root user account created on the router by default See the product label on the router for its default password1 Log in to the web interface with the root user and his password If logged in successfully the user will have access to the router web...

Page 27: ...ICR 2531 Figure 18 Router s Web Interface A detailed description of the router settings in the web interface can be found in the configura tion manual 1 of the router 21 ...

Page 28: ...C Battery for RTC CR2032X non replaceable Consumption for non WiFi WiFi version Idle Average Maximum 2 6 W 2 9 W 3 6 W 4 2 W 5 4 W 6 1 W Dimensions of device w o clip 130 95 25 mm 5 19 3 74 0 98 DIN rail clip optional part specification DIN 35 mm EN 60715 Weight Box w o clip 380 g 0 84 lbs Antenna connectors ANT DIV WiFi SMA connectors for LTE 50 Ω R SMA connector for WiFi 50 Ω Interfaces ETH0 ETH...

Page 29: ... 301 511 EN 301 908 1 EN 301 908 2 EN 301 908 13 EMC EN 301 489 1 EN 301 489 17 EN 301 489 52 EN 61000 4 2 EN 61000 4 3 EN 61000 4 4 EN 61000 4 5 EN 61000 4 6 EN 61000 6 2 2019 EN 61000 6 3 2020 EN 55032 Safety IEC 62368 1 AS NZS 62368 1 IEEE 802 3 National CE UKCA compliant Environmental REACH RoHS3 and WEEE compliant Table 9 Standards and Regulations 23 ...

Page 30: ...onducted EN 61000 4 6 DC port ETH I O ports 10 V 0 15 80 MHz 80 AM 1kHz L3 10 V 0 15 80 MHz 80 AM 1kHz L3 10 V 0 15 80 MHz 80 AM 1kHz L3 Radiated emission EN 55032 Enclosure Class B 30 MHz 1 GHz 1 GHz 6 GHz Conducted emission EN 55032 DC power port Ethernet ports Class B 150 kHz 30 MHz Class B 150 kHz 30 MHz Dry heat EN 60068 2 2 Operating Storage Test Bb storage 75 C Test Bd operation 85 C Cold E...

Page 31: ...Hz B7 2600 MHz B3 1800 MHz B1 2100 MHz TDD frequencies B41 2500 MHz B40 2300 MHz B38 2600 MHz Bit rates up to 150 Mbps DL 50 Mbps UL HSPA UMTS parameters Supported frequencies B8 900 MHz B1 2100 MHz Bit rates up to 42 Mbps DL 5 76 Mbps UL EDGE GPRS parameters Supported frequencies B8 900 MHz B3 1800 MHz Bit rates up to 296 kbps DL 236 8 kbps UL Table 11 Technical Parameters of Cellular Module 25 ...

Page 32: ...S Canada and EU 5 25 5 35 GHz FCC UNII middle band for US Canada and EU 5 47 5 725 GHz for EU 5 725 5 825 GHz FCC UNII high band for US Canada Modulation DSSS OFDM DBPSK DQPSK CCK 16 QAM 64 QAM 2 4 GHz Channels 1 2 3 4 5 6 7 8 9 10 11 12 13 5 GHz Channels 36 38 40 42 44 46 48 52 56 60 64 100 104 108 112 116 120 124 128 132 136 140 149 153 157 161 165 Type of Device Access point AP Station STA Mult...

Page 33: ...s 0 0 8 V 0 5 mA On 1 2 V Off Table 13 Electrical Characteristics of Binary Input The maximum binary output load is 100 mA at 9 48 V 4 7 System Configuration The main parametes of the system are listed in Table 14 Parameter Description CPU architecture ARM926EJ S CPU frequency 600 MHz CPU power 4 72 DMIPS MHz Flash memory 64 MB NOR Flash 12 MB for Router Apps 2 MB for customer data RAM size 128 MB...

Page 34: ... the neighbouring cells have a similar signal strength you will need to use a directional antenna For proper operation the signal levels have to be good Try to enable automatic ping from the router which will check the connection when there are no data running and in the case of a failed ping restart the connection This can be done on the Mobile WAN Configuration page in the router in the Check co...

Page 35: ...e with router s IP address You can verify a Firewall by accessing remotely to the router s Web interface The operator may not provide the address of DNS server and without DNS server s address it is impossible to connect to the dyndns org server The following mes sages will be shown in the System Log DynDNS daemon started Error resolving hostname no such file or directory Connect to DynDNS server ...

Page 36: ...ers only You can use SFTP on all routers to transfer files to from the router If having troubles with FTP on v2 routers make sure you have FTP enabled Configuration section Services FTP Then you can connect with any client on port 21 with name and password same as for the Web interface If having troubles with SFTP make sure you have SSH enabled Configuration section Services SSH Then you can conne...

Page 37: ...eu Web www advantech com Customer Support for NAM Advantech B B SmartWorx 707 Dayton Road Ottawa IL 61350 USA Phone 1 800 346 3119 Monday Friday 7 a m to 5 30 p m CST Fax 1 815 433 5109 E mail support advantech bb com Web www advantech bb com Customer Support for Asia Phone 886 2 2792 7818 1299 Monday Friday 9 a m to 5 30 p m UTC 8 Fax 886 2 2794 7327 E mail icg support advantech com tw Web www ad...

Page 38: ... expose the router to extreme ambient conditions Protect the router against dust moisture and high temperature Only routers with appropriate certification and labelling should be used in locations where flammable and explosive materials are present including gas stations chemical plants or locations in which explosives are used We remind users of the duty to observe the restrictions concerning the...

Page 39: ...inimize the environmental impact This product contains high quality materials and components which can be recycled At the end of it s life this pro duct MUST NOT be mixed with other commercial waste for disposal The device contains a battery Re move the battery from the device before disposal The battery in the device needs to be disposed of apart accordingly Check the terms and conditions of your...

Page 40: ... 2531 Appendix D Related Documents 1 Configuration Manual for v2i Platform EP Product related documents and applications can be obtained on Engineering Portal at https icr advantech cz download address 34 ...

Page 41: ...lies with Directive 2014 53 EU We Advantech Czech s r o declare that the radio equipment narrated in this user s manual complies with Radio Equipment Regulations 2017 S I 2017 No 1206 The full text of the EU Declaration of Conformity is available at the following internet address icr advantech cz eudoc ...

Reviews: