background image

FWA-1211 Startup Manual  3

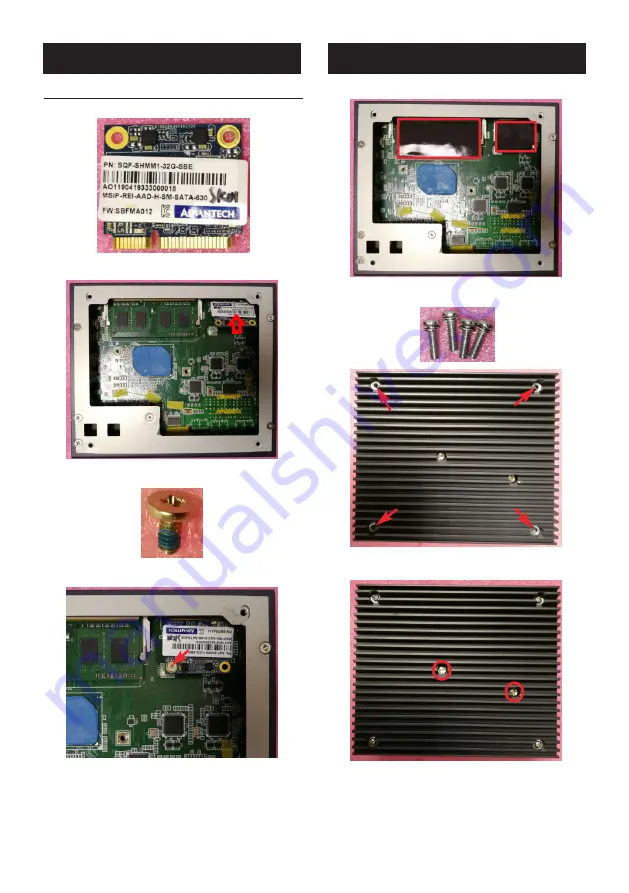
Installing the mSATA

1.  Prepare the mSATA.

2.  Insert the msata storage into the slot as below.

3.  Take the screw from the assembly box.

4.  Fix as below.

5.  Take two thermal pads from the assembly box.

6. 

Replace the heatsink and fix the screws as below.

7. 

Then fix the screws on the heatsink.


Installation (Cont.)


Installation (Cont.)

Summary of Contents for FWA-1211

Page 1: ...slot half size Peripherals USB 12x USB2 0 on front panel 2 x Power LED 1 x HDD LED 1 x Alarm LED 1 x Micro HDMI 1 x Reset 1 x Console 2 x DB9 RS 232 422 485 seriel port SKU option Dimensions W x L x H 88 mm x 127 mm x 150 mm Weight 3 Kg Environment Operating Non operating Temperature 40 C 70 C 40 C 85 C 40 F 158 F 40 F 185 F Altitude Below 5000 m Humidity 5 95 IP Rating IP40 Specifications Packing...

Page 2: ...ication Installation Installing 1 Unfasten the screws red arrows take out and keep for later then loosen the screws circled in red and remove the heatsink Installing the memory 1 Prepare the memory 2 Insert into the slot as below and press the memory until locked ...

Page 3: ...nsert the msata storage into the slot as below 3 Take the screw from the assembly box 4 Fix as below 5 Take two thermal pads from the assembly box 6 Replace the heatsink and fix the screws as below 7 Then fix the screws on the heatsink Installation Cont Installation Cont ...

Page 4: ...ox as below and fix the SSD onto the the bracket Installation Cont Installation Cont 3 Take the SATA power cable from the accessory box then connect to the SSD 4 Connect the SATA cable and the power cable as shown below 5 Route the cable to the side of the mainboard as shown below 6 Put on the heatsink and fix wth the screws as shown below ...

Page 5: ...slot for DDR3L SO DIMM BAT1 Battery holder for coin battery SATA1 SATA IO connector SATA_PWR1 Power connector for SATA HDD used MSATA1 Half size mSATA connecter 8051_JTAG1 Programming 8051 pin header LPC1 LPC bus connecter for TPM module LAN1 LAN2 LAN_ MAGT1 RJ45 LAN connectors USB2_1 USB2 0 connectors USB2_2 USB2 0 connectors COM1 RJ45 console connector HDMI D1 Micro HDMI connector SYS_RST1 Syste...

Page 6: ..._2 00mm 1 2 3 BAT1 W_2V_1 25mm 1 2 Jumpers and Connectors Cont SATA Connector Pin Number Pin Name Function 1 GND Ground 2 TX TX Signal of SATA 3 TX TX Signal of SATA 4 GND Ground 5 RX RX Signal of SATA 6 RX RX Signal of SATA 7 GND Ground SATA Power Connector SATA_PWR1 Pin Number Pin Name Function 1 VCC 5V power 2 GND Ground 3 GND Ground 4 V12 12V power Power Button Signal Pin Header Pin Number Pin...

Page 7: ... 7 9 11 2 4 6 8 10 12 8051_JTAG1 PH_3x1V_2 00mm Characteristic 1 2 3 LPC Connector Pin Number Pin Name Function 1 L_FRAME LPC Frame signal 2 GND Ground 3 LAD0 LPC address pin 0 4 CLK LPC 25Mhz clock 5 LAD1 LPC address pin 1 6 SERIRQ LPC serial IRQ ouput 7 LAD2 LPC address pin 2 8 RESET LPC reset input 9 LAD3 LPC address pin 3 10 VCC3 3 3V power RJ45 Console Port Pin Number Pin Name Function 1 RTS ...

Page 8: ...8 FWA 1211 Startup Manual Figure 1 Location List of Jumper and Connector on Mainboard Jumpers and Connectors Cont ...

Page 9: ...PGND Ground 6 DC_B Power B input DC_IN1 PLUG_6_5 00mm Characteristic 1 2 3 4 5 6 Main Board Connector Pin Number Pin Name Function 1 GND Ground 2 V12_SB 12V standby power 3 GND Ground 4 V12_SB 12V standby power 5 GND Ground 6 V12_SB 12V standby power 7 GND Ground 8 PWRBTN_IN power button input signal 9 V5_SB 5V standby power 10 PA_OK Power good signal of power A 11 0 5V system power 12 PB_OK Power...

Page 10: ...10 FWA 1211 Startup Manual Figure 2 Location List of Jumper and Connector on PWR Board Jumpers and Connectors Cont ...

Page 11: ...elect jumper Clear CMOS Pin Header Jumper Name Pin Default Setting Function J_GPIO1 PSON1 1 1 Jumper short GPIO select 5V level 2 3 Open GPIO select 3 3V level J_GPIO1 PH_3x1V_2 00mm 1 2 3 Jumpers and Connectors Cont Com Port2 Port3 Pin Header Pin Number Pin Name Function 1 GND_COMA GND of COM port 2 NC No connect 3 CONN_COM2_ DTR 422RX DTR of RS 232 RX of RS 422 4 NC No connect 5 CONN_COM2_ TX 42...

Page 12: ...on 1 GPIO0 Signal of GPIO0 2 GPIO4 Signal of GPIO4 3 GPIO1 Signal of GPIO1 4 GPIO5 Signal of GPIO5 5 GPIO2 Signal of GPIO2 6 GPIO6 Signal of GPIO6 7 GPIO3 Signal of GPIO3 8 GPIO7 Signal of GPIO7 9 V_GPIO Power of GPIO 10 GND Ground 8051 _JTAG1 Pin Header Pin Number Pin Name Function 1 RST C2CK Reset 8051 clock for C2 interface 2 C2D data for C2 interface 3 GND Ground GPIO1 PH_5x2V_2 0mm 2 4 6 8 10...

Page 13: ...FWA 1211 Startup Manual 13 Figure 3 Location List of Jumper and Connector on EXT Board Jumpers and Connectors Cont ...

Page 14: ...y replaced Replace only with the same or equivalent type recom mended by the manufacturer discard used batteries according to the manufacturer s instructions 17 RESTRICTED ACCESS AREA The equipment should only be installed in a Restricted Access Area 18 DISCLAIMER This set of instructions is given according to IEC 704 1 Advantech disclaims all responsibility for the ac curacy of any statements con...

Page 15: ...nts de rupture 15 Ne laissez pas cet appareil dans un environnement où la température de stockage peut être inférieure à 40 C ou su périeure à 85 C Cela pourrait endommager l équipement L équipement devrait être dans un environnement contr lé 16 Attention Danger d explosion si la batterie est incorrectement remplacée Remplacez uniquement par le même type ou un type équivalent recommandé par le fab...

Reviews: