background image

33

DS-980/DS-980GL User Manual

Chapter 4

B

IOS Settings

4.2

Entering Setup

4.2.1

Main Setup

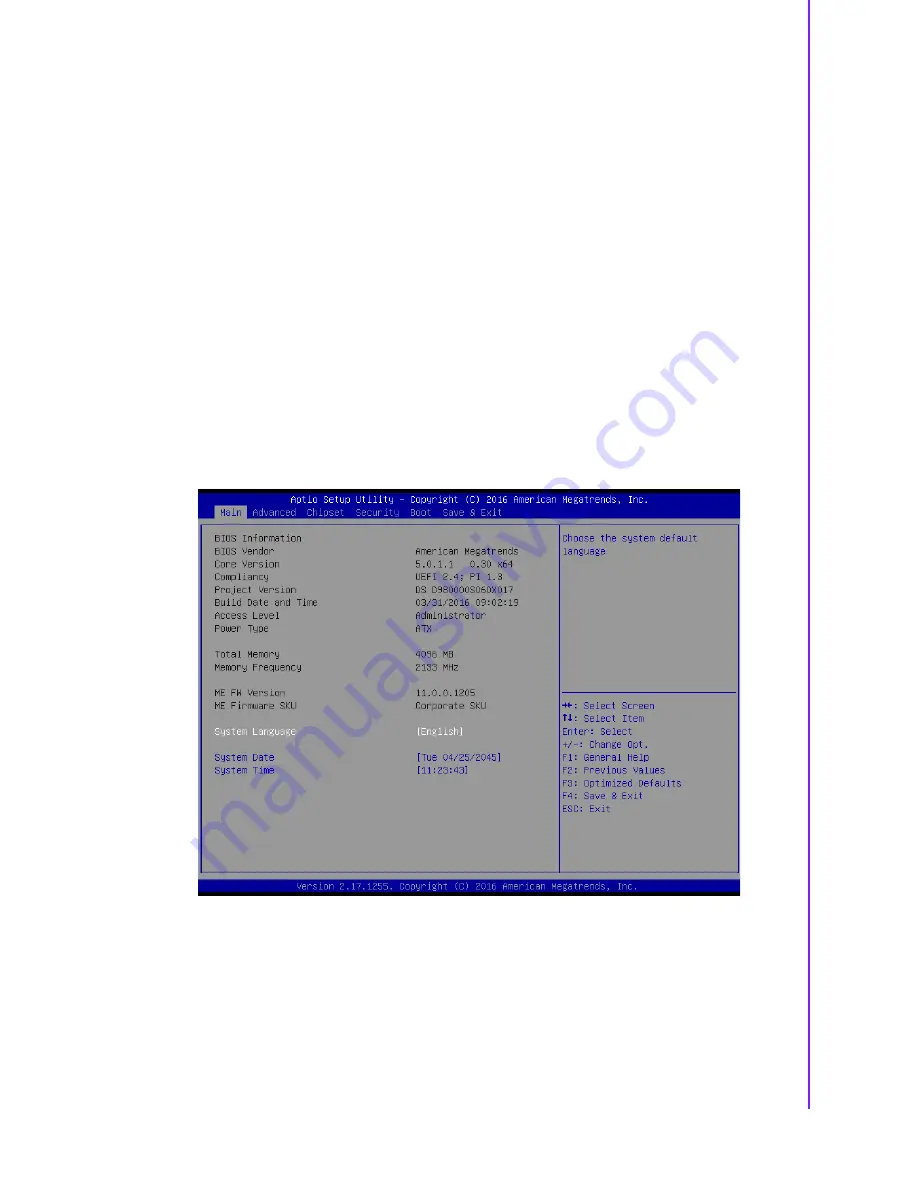
When you first enter the BIOS Setup Utility, you will enter the Main setup screen. You
can always return to the Main setup screen by selecting the Main tab.

The Main BIOS setup screen has two main frames. The left frame displays all the
options that can be configured. Options in blue can be configured, and grayed-out
options cannot be configured instead. The right frame displays the key legend.

The key legend in the top is an area reserved for a text message. When an option is
selected in the left frame, it is highlighted in white. Often a text message will accom-
pany it.

You can use main setup to check BIOS related information and DS-980/DS-980GL
hardware settings, such as project version, build date and time, power type, total
memory, memory frequency, ME FW version, and system date/ time.

In this screen, only system date and time can be adjusted if you wanted. Highlight
System Time or System Date using the <Arrow> keys. Enter new values through the
keyboard. Press the <Tab> key or the <Arrow> keys to move between fields. The
date must be entered in MM/DD/YY format. The time must be entered in HH:MM:SS
format.


Figure 4.1 Main setup

Summary of Contents for DS-980

Page 1: ...User Manual DS 980 DS 980GL Video Wall Signage Player by Expandable PCI Express x16...

Page 2: ...is a trademark of Award Software International Inc IBM PC AT PS 2 and VGA are trademarks of International Business Machines Cor poration Intel and Celeron are trademarks of Intel Corporation Microsoft...

Page 3: ...are used etc Note anything abnormal and list any onscreen messages you get when the problem occurs 2 Call your dealer and describe the problem Please have your manual product and any helpful informati...

Page 4: ...odule including 1 x bracket 4 x damper 4 x screws for installing on a bottom layer 4 x step screws for installing storage on a bracket 1 x SATA cable option 1 x warranty card Warning Warnings indicate...

Page 5: ...tputs Part Number Description 96PSA A84W12W6 1 ADP A D 100 240V 84W 12V C14 LOCKABLE D AEGX N0A4 V5LMS1 GT730 1G PCI E VHDCI HDMI 4 Cable LP G WIFI 3G module by mini PCIe interface Part Number Descrip...

Page 6: ...used for a long time disconnect it from the power source to avoid damage by transient overvoltage 12 Never pour any liquid into an opening This may cause fire or electrical shock 13 Never open the eq...

Page 7: ...ront External I O Connectors 10 2 2 1 Power ON OFF Button 10 Figure 2 5 Power button 10 2 2 2 Ethernet Connector GLAN 10 Figure 2 6 GLAN connector 10 Table 2 1 GLAN Connector Pin Assignments 10 2 2 3...

Page 8: ...Figure 3 12VESA brackets installation 27 3 12 How to Select Suitable Graphic Cards 28 Figure 3 13Maximum board dimension Unit mm 28 Figure 3 14Maximum a graphic card dimension Unit mm 29 Figure 3 15A...

Page 9: ...re 4 28PCH IO configuration 56 Figure 4 29PCI express Configuration 57 Figure 4 30PCI express Gen3 EQ Lanes 58 Figure 4 31Mini PCI Express M 2 1 59 Figure 4 32Mini PCI Express M 2 2 60 Figure 4 33USB...

Page 10: ...DS 980 User Manual x...

Page 11: ...Chapter 1 1 General Introduction This chapter gives background information of DS 980 DS 980GL series...

Page 12: ...Features 1 2 1 General Intel Core i7 6700TE Quad core 2 4 GHz i5 6500TE Quad core 2 3 GHz i3 6100TE Dual core 2 7 GHz Celeron G3900TE Dual core 2 3 GHz rPGA pro cessor LGA 1151 CPU TDP up to 35W Excep...

Page 13: ...Timer 1 255 seconds supported by Advantech SUSI4 0 API I O Interface 3 x HDMI 1 x HDMI2 0 printed by HDMI1 2 x HDMI1 4 printed by HDMI2 HDMI 3 HDMI2 also supports CEC function The maximum resolution u...

Page 14: ...sions Expansion configuration with PCI express x16 slot 250 W x 190 D x 88 H mm Figure 1 1 DS 980 Expansion mechanical dimensions 88 3 46 190 7 48 247 40 9 74 220 90 8 70 4 R 1 7 5 R 5 125 10 4 93 43...

Page 15: ...express x16 slot 3 1kg 1 5 Power Requirements 1 5 1 System Power Expansion configuration with PCI express x16 slot Minimum power input 12V DC in 12 5A for main layer Minimum power input 12V DC in 7A o...

Page 16: ...nsing Storage Temperature 40 C 85 C 104 185 F Vibration Test Operating mode 0 8 Grms IEC 60068 2 64 random 5 500 Hz 1 hr axis Non operating mode 2G IEC60068 2 6 sine 5 500Hz 1 Octave min 1 hr axis Sho...

Page 17: ...Chapter 2 2 External I O introduction This chapter introduces DS 980 DS 980GL series external I O...

Page 18: ...DS 980GL Front and Rear views Figure 2 1 DS 980 Expansion front view Figure 2 2 DS 980 Expansion rear view WiFi LED S PDIF POWER sw HDD LED GLAN2 GLAN1 USB1 USB2 Mic in COM USB3 0_2 USB3 0_1 USB3 0_4...

Page 19: ...ter 2 External I O introduction Figure 2 3 DS 980GL Light front view Figure 2 4 DS 980GL Light rear view WiFi LED S PDIF POWER sw HDD LED GLAN2 GLAN1 USB1 USB2 Mic in COM USB3 0_2 USB3 0_1 USB3 0_4 US...

Page 20: ...Phy only LAN2 Intel I211 with Phy Mac and wake on LAN supported They are fully compliant with IEEE 802 3u 10 100 1000 Base T CSMA CD standards The Ethernet port provides a standard RJ 45 jack connecto...

Page 21: ...turning off the computer Figure 2 7 USB2 0 connector 2 2 4 Mic in Connector Microphone can be connected to the audio jack Pink color and can be Mic in input functions Figure 2 8 Audio connector 2 2 5...

Page 22: ...Connector There are 4x USB3 0 complaint interfaces which are compliant with USB UHCI Rev 3 0 and support Plug and Play It is convenient to enable you to connect or discon nect a device without turnin...

Page 23: ...K res olution at 60Hz but the actual resolutions supported depend on the monitor being used HDMI 1 4 printed HDMI2 also supports CEC Consumer Electronic Control feature designed to allow the user to p...

Page 24: ...Connector DS 980 DS 980GL comes with a DC Jack header that takes 12V DC in external power input at main layer and optional second 12V DC in at bottom layer Figure 2 13 DC input connector at main laye...

Page 25: ...Chapter 3 3 Hardware Installation This chapter introduces DS 980 DS 980GL series Hardware instal lation...

Page 26: ...d disconnect the power cord Transfer the device to a clean flat stable work surface over a noncarpeted floor Caution Advantech strongly recommends that you look for our global service centers to chang...

Page 27: ...processor straight down into the socket and the load plate back so it is resting on the CPU 3 4 Press the socket lever to ensure the load plate tip engages under the socket 3 5 Carefully lock the leve...

Page 28: ...of the plate 2 Push DS 980 DS 980GL top case number 3 back then remove it 3 Install DDR4 SO DIMM memory into the appropriate SO DIMM slots 4 After completed it please push DS 980 DS 980GL top case nu...

Page 29: ...e tray out from the device 2 Please note the 2 5 inch SATA storage direction upside down and assemble on the storage tray with 4 screws number 1 3 Push the completed storage module back to the device...

Page 30: ...1 Gently insert 4 yellow rubbers number 5 into the storage tray 4 2 Install 2 5 inch SATA on this storage tray number 6 by 4 step screws number 7 from the side 5 Make sure to connect SATA cable and S...

Page 31: ...k whether the graphic card bracket size is long or not If not please change to the long size with 2 screws number 7 5 Insert the graphic card into the slot at the bottom case 6 Exactly check all the o...

Page 32: ...DS 980 DS 980GL User Manual 22 Figure 3 6 Fan duct location 1 Figure 3 7 Fan duct location 2...

Page 33: ...remove it 3 Install mini PCIe card on its mini PCIe slot number 3 SIM card on its SIM slot number 6 M 2 WIFI module with 1 screw number 4 on its M 2 2230 slot number 5 4 After completed it please pus...

Page 34: ...lean the antenna holes which you want to use and fix the WIFI cable number 3 on them by rubbers nuts and six angle screws 4 After completed it please push DS 980 DS 980GL top case towards the front si...

Page 35: ...holes to install the mounting brackets number 2 by 4 screws number 1 M3x6L 3 Exactly ensure the mounting brackets are fixed and stable Figure 3 10 Mounting brackets installation Note Please select th...

Page 36: ...and clear floor 2 Both of DS 980 DS 980GL configurations using the outer of screw holes to install the stand rubbers number 2 by 4 screws number 1 3 Upside down the device and exactly make sure the st...

Page 37: ...3x6L 3 Gently place VESA bracket number 3 on the mounting brackets with the right holes which mark DS 9XX printings and tighten 4 screws number 4 M4x 10L with the opposite directions to the monitor Fi...

Page 38: ...eo wall solution with triple displays which depends on what quantities of its outputs a graphic card is Due to the limited space of DS 980 DS 980GL bottom layer there are below criteria to select your...

Page 39: ...Air Inlet Location To efficiently enhance the airflow road inside so please notice air inlet location should be at the slash location following a below picture so that it is able to attach fan duct pr...

Page 40: ...DS 980 DS 980GL User Manual 30...

Page 41: ...Chapter 4 4 BIOS Settings This chapter introduces how to set BIOS configuration data...

Page 42: ...basic navigation of the DS 980 DS 980GL series BIOS setup screens AMI BIOS s ROM has a built in setup program that allows users to modify the basic system configuration This information is stored in...

Page 43: ...op is an area reserved for a text message When an option is selected in the left frame it is highlighted in white Often a text message will accom pany it You can use main setup to check BIOS related i...

Page 44: ...e items in the left frame of the screen such as CPU configuration to go to the sub menu for that item You can dis play an Advanced BIOS Setup option by highlighting it using the Arrow keys All Advance...

Page 45: ...configuration power states like sleep and suspend and functions that may have pre viously been in the BIOS configuration If want to change ACPI sleep state you can select the highest ACPI sleep state...

Page 46: ...Hide Un configure ME without password configuration prompt Configuration options Dis abled Enabled MEBx Debug Message Output Disabled Enabled Disabled MEBx debug mes sage output Configuration options...

Page 47: ...0GL User Manual Chapter 4 BIOS Settings Figure 4 4 AMT Configuration 4 2 2 3 PCH FW Configuration Configuration Management Engine Technology Parameter Display ME Firmware Information Figure 4 5 PCH FW...

Page 48: ...DS 980 DS 980GL User Manual 38 Firmware Update Configuration Enabled Disabled ME FW image Re Flash function Configuration options Disable Enhanced Figure 4 6 ME FW image...

Page 49: ...0 DS 980GL User Manual Chapter 4 BIOS Settings 4 2 2 4 ITE8528E Super IO Configuration System Super IO Chip Parameters Super IO Configuration Super IO Chip ITE8528E Figure 4 7 ITE8528E Super IO Config...

Page 50: ...Port 1 Configuration Set Parameters of Serial Port 1 Serial Port Enabled Enabled Disabled Serial Port Configuration options Disabled Enabled Device Setting IO 3F8h IRQ 4 Change Setting Auto Select an...

Page 51: ...itor hardware status PC health status Display system health status Figure 4 8 ITE8528E HW monitor WatchDog Timer Disabled Enabled Disabled WatchDog Timer When Enabled you can change WatchDog Timer Mod...

Page 52: ...system to wake from S5 using RTC alarm Figure 4 10 S5 RTC wake setting Wake system from S5 Disabled Enabled Disabled Wake system from S5 Configu ration options Disabled Enabled and set up Wake up by...

Page 53: ...1 Console Redirection Disabled Enabled Disabled COM1 Console Redirection Configuration options Disabled Enabled Serial Port for Out of Band Management Disabled Microsoft Windows Emer gency Management...

Page 54: ...Emulation ANSI Extended ASCII Char set VT100 ASCII char set VT100 Extends VT100 to support color functional keys etc VT UTF8 Uses UTF8 encoding to map Unicode chars onto 1 or more bytes Figure 4 13 CO...

Page 55: ...ay redirection of Legacy OS and Legacy OPROM Mes sages Figure 4 14 Legacy console redirection setting Microsoft Windows Emergency Management Services EMS allows for remote man agement of a Windows Ser...

Page 56: ...Technology Not Suppoerted Intel VT x Technology Supported Intel SMX Technology Supported 64 bit Supported EIST Technology Supported CPU C3 state Supported CPU C6 state Supported CPU C7 state Supported...

Page 57: ...isabled Enabled Hardware Prefetcher Enabled To turn on off the Mid Level Cache L2 steamer Prefetcher Configuration options Disabled Enabled Adjacent Cache Line Prefetch Enabled To turn on off prefetch...

Page 58: ...DS 980 DS 980GL User Manual 48 4 2 2 9 Intel TXT information Display Intel TXT Parameters Figure 4 18 Intel TXT information...

Page 59: ...Settings 4 2 2 10 SATA configuration SATA Mode AHCI Support IDE AHCI or RAID mode Configuration options Disabled IDE AHCI RAID Serial ATA Port 1 Enabled Disabled SATA Device Configuration options Dis...

Page 60: ...0GL User Manual 50 4 2 2 11 Network Stack Configuration Enabled Disabled UEFI Network Stack Configuration options Disabled Enabled Figure 4 20 Network Stack Configuration Disabled Figure 4 21 Network...

Page 61: ...51 DS 980 DS 980GL User Manual Chapter 4 BIOS Settings 4 2 2 12 CSM configuration Disabled Enabled CSM support Configuration options Disabled Enabled Figure 4 22 CSM Configuration...

Page 62: ...ion Disabled AUTO Disabled USB Configuration Configuration options Enabled Dis abled AUTO Enabled Legacy USB support AUTO disables legacy support if no USB devices are connected Disabled option will o...

Page 63: ...53 DS 980 DS 980GL User Manual Chapter 4 BIOS Settings 4 2 3 Chipset Display System Agent SA Parameters Figure 4 24 Chipset...

Page 64: ...Agent VT d Enabled Set VT d Enabled Disabled Configuration options Dis abled Enabled Graphics Configuration PEG Port Configuration and GT Power Management Control setting options Display Memory Config...

Page 65: ...4 BIOS Settings Graphic Configuration if enabled it will not scan for external Gfx Card on PEG and PCH PCIE Ports Figure 4 26 Graphic Configuration PEG Port Configuration Enabled Disabled the Root Po...

Page 66: ...DS 980 DS 980GL User Manual 56 4 2 4 1 PCH IO configuration Display PCH Parameters Check to enabled render standby support Figure 4 28 PCH IO configuration...

Page 67: ...s clock gat ing for each root port Configuration options Disabled Eanbled DMI Link ASPM Control Enabled Enabled Disabled the control of active state power management on SA side of the DMI link Configu...

Page 68: ...control the PCI Express Root Port Mini PCI Express Enabled Enabled Disabled to control Mini PCI Express Configuration options Disabled Enabled Auto ASPM Support Auto L1 Substates L1 1 L1 2 Gen3 Eq Ph...

Page 69: ...led Extra Bus Reserved 0 Reserved Memory 10 Prefetchable Memory 10 Reserved I O 4 PCIE Cp 2 PCIE Cm 6 PCIE LTR Enabled PCIE LTR Lock Disabled PCH PCIe CLKREQ Configuration PCIE16 CLKREQ Mapping Overri...

Page 70: ...re 4 32 Mini PCI Express M 2 2 Precondition work on USB host controller and root ports for faster enumeration USB Precondition Disabled XHCI Disable Compliance Mode FALSE USB Port Disable Override Dis...

Page 71: ...4 BIOS Settings Control Detection of HD Audio device Auto Disabled HDA will be unconditionally disabled Enabled HDA will be unconditionally enabled Auto HDA will be enabled if present disabled otherw...

Page 72: ...DS 980 DS 980GL User Manual 62 4 2 5 Security Administrator Password Set up Administrator password User Password set up User password Figure 4 35 Security...

Page 73: ...e keyboard NumLock State Configuration options On Off Quick Boot Disabled Configuration options Disabled Enabled Boot Option Priorities Select the system boot order Fast Boot Disabled Enabled Disabled...

Page 74: ...the changes Discard Changes and Reset Reset the system without saving the changes Save Changes Save changes done with any of the setup option Discard Changes Discard changes done with any of the setu...

Page 75: ...65 DS 980 DS 980GL User Manual Chapter 4 BIOS Settings...

Page 76: ...tions are subject to change without notice No part of this publication may be reproduced in any form or by any means electronic photocopying recording or otherwise without prior written permis sion of...

Reviews: