background image

ElectraCOOL

 LA550 Chiller 


For Information Call 


 1 800-250-2920          

electracool.com


One Tara Boulevard


   Nashua, NH  03062  USA


international Inquiries (603) 888-2467                               

rev 7/03


1.0 Introduction 


The 

ElectraCOOL

 LA550 Chiller is a thermoelectric temperature control system 

designed to meet RTCA DO-160D requirements for use in aircraft.  The chiller 

circulates 1.2 gpm of constant temperature coolant for controlling laser package 

temperatures and other temperature sensitive systems.  It does not use Freon 

or any other replacement gas.  From conception, this chiller has been designed 

for long life and ease of use.  The internal thermoelectric modules have lifetimes 

greater than 200,000 hours.
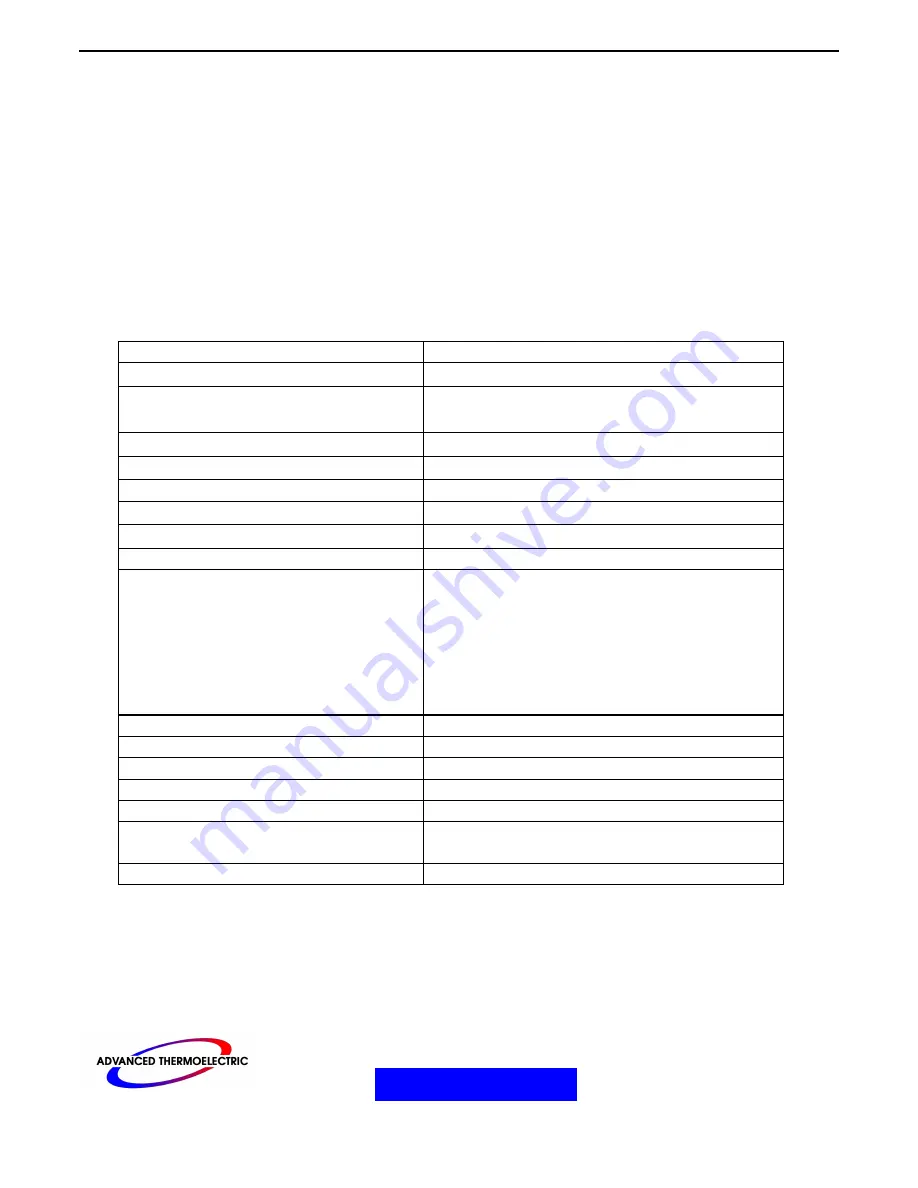


2.0 Specifications 


Process Fluid Type: 

Water, Ethylene Glycol 50/50 

Ambient Air Operating Range: 

5

°

C to 40

°

Cooling Capacity @25

°

C with 

25

°

C Ambient Air : 

600W 

Control Accuracy: 

±

0.5

°

Storage Temperature Range 

-20

°

C to 60

°

Humidity 

95% minimum non condensing 

Set-point Range: 

-10

°

C to +50

°

Temperature probe: 

100

 Platinum RTD, 3 Wire 

Process Pump Capacity : 

1.2 gpm @ 35 psi 

Process Fluid Connections: 

3/8” DESO Quick Disconnect, 

Minimal Spillage on 90

°

 elbow for 

space constraint 

Parker FS-371-6FP inlet (Female) 

Parker FS-372-6FP outlet (Male) 

Include mating connectors (3/8”NPT 

Female ends) 

Input Power : 

27.5 VDC Nominal @ 1000W 

Input Voltage Range: 

22 to 30.3VDC 

Abnormal Input Voltage 

20.5 to 32.5 VDC for 5 min 

System Proof Pressure : 

100 psi 

Process Fluid Reservoir: 

1 Liters 

Dimensions: 

19” rack mount , 14” high, 16.5” 

deep 

Weight : 

65 lbs 


Summary of Contents for ElectraCOOL L-A 550

Page 1: ...ormation Call 1 800 250 2920 electracool com One Tara Boulevard Nashua NH 03062 USA international Inquiries 603 888 2467 rev 7 03 ElectraCOOL L A 550 550 Watt Rack Mountable Thermoelectric Chiller User Manual ...

Page 2: ...ions 4 4 0 Start Up 4 4 1 System Check 4 4 2 Coolant Fill 5 4 3 Start up 5 5 0 Operation 8 5 1 Simple Operation 8 5 2 Advanced Operation 9 5 3 Alarms 13 5 4 Auto tuning 13 5 5 Manual Tuning 13 6 0 System Alarms Troubleshooting 14 7 0 Repair and Maintenance 15 7 1 Coolant Draining Procedure 16 7 2 Fuse Replacement 16 7 3 Filter Replacement Procedure 16 7 4 Pump Replacement Procedure 17 7 5 Fan Repl...

Page 3: ...fill cap as this could result in contact with the coolant inside Caution Risk of electric shock Disconnect main DC power prior to servicing This includes changing a fuse or opening the cover for any reason Even though the input DC voltage is under 42 VDC the high current levels used are a potentially serious hazard CAUTION Never store or operate the ElectraCOOL LA 550 Chiller at ambient temperatur...

Page 4: ...etimes greater than 200 000 hours 2 0 Specifications Process Fluid Type Water Ethylene Glycol 50 50 Ambient Air Operating Range 5 C to 40 C Cooling Capacity 25 C with 25 C Ambient Air 600W Control Accuracy 0 5 C Storage Temperature Range 20 C to 60 C Humidity 95 minimum non condensing Set point Range 10 C to 50 C Temperature probe 100Ω Platinum RTD 3 Wire Process Pump Capacity 1 2 gpm 35 psi Proce...

Page 5: ...mbing Installation See Figure 1 The accessories for the chiller include DESO quick disconnects with right angle adapters Mating DESO fittings with 3 8 FNPT ports Drain valve with plug Coolant fill port and plug Install the male DESO quick disconnect onto the Coolant Outlet using the 3 8 Swagelok right angle adapter included Turn nut until finger tight position fitting in orientation needed then ti...

Page 6: ...s Pin A Laser Interlock Pin B Laser Interlock common Pin C Laser Interlock Shield Pin D Spare Pin E Spare Pin F Chassis Shield Pin G Remote RTD Shield Pin H Remote RTD Pin I Remote RTD Pin J Remote RTD Ground The laser interlock is a normally closed dry contact that opens in the event of a fault in the chiller The Remote RTD can replace the internal RTD used by the temperature controller for contr...

Page 7: ...iller on 11 Press the start button to set the chiller to an idle mode 12 Perform a closed loop tuning and enter the new PID parameters 3 4 Air Considerations The main air inlet is located on the front panel and the outlet on the rear panel Normal airflow is approximately 320 cfm Restricting airflow into or out of the chiller will impair performance At least 6 inches of clearance is required on eac...

Page 8: ...ll automatically start 8 Let pump run for 3 sec then press the START button to stop the pump off note Flow fail may occur if the pump runs for 5 sec and no flow is detected this requires a power cycle to clear 9 If TANK LEVEL LOW alarm appears alternating with main display every sec then turn off chiller and repeat steps 2 through 9 until the TANK LEVEL LOW indication no longer appears This should...

Page 9: ...ElectraCOOL LA550 Chiller For Information Call 1 800 250 2920 electracool com One Tara Boulevard Nashua NH 03062 USA international Inquiries 603 888 2467 rev 7 03 6 Figure 1 ...

Page 10: ...ElectraCOOL LA550 Chiller For Information Call 1 800 250 2920 electracool com One Tara Boulevard Nashua NH 03062 USA international Inquiries 603 888 2467 rev 7 03 7 Figure 2 Figure 3 ...

Page 11: ...nd holding the ENTER key for 3 seconds changes the LCD display menu START Pressing the START key turns on temperature control START Pressing the START key while the chiller is operating turns off temperature control 5 1 Simple Operation The ElectraCOOL LA 550 Chiller comes with preset operating parameters that will work well for most applications If temperature control at a new temperature is desi...

Page 12: ...re is off The Temperature Input Menu allows input of set point temperatures soak times number of cycles if cycling between two temperatures and an alarm temperature The Parameter Input Menu allows input of the temperature units the time units for soak times the PID parameters and the auto tune function The PID parameters have been preset at the factory for most applications If however temperature ...

Page 13: ...ew SETTEMP 2 AUTOTUNE SETTEMP 1 SETTIME 2 P1 HEAT OF CYCLES I1 HEAT ALARM TEMP D1 HEAT P2 COOL I2 COOL D2 COOL MAX PWM Press ENTER key once to scroll between menu items Press and hold ENTER key for 3 seconds to scroll between menus Note If the user enters the temperature input or the parameter input menus and does not press a key for 30 seconds the display will revert back to the Status menu Statu...

Page 14: ...with of cycles set to zero will change the set point temperature upon pressing the START key Temperature Input Menu The temperature input menu allows input of operating temperatures soak times number of cycles desired and an optional alarm temperature Note If of cycles is set to zero only TEMP 1 and ALARM TEMP will be used SETTEMP1 Set point of first control temperature If OF CYCLES is set to zero...

Page 15: ...Default Value 4 4 I1 HEAT Integral term for heating 0 999 seconds Factory Default Value 22 D2 HEAT Derivative term for heating 0 999 seconds Factory Default Value 2 P2 COOL Proportional band for cooling 0 99 9 C or F Factory Default Value 2 4 I2 COOL Integral term for cooling 0 999 seconds Factory Default Value 22 D2 COOL Derivative term for cooling 0 999 seconds Factory Default Value 2 MAX PWM Ma...

Page 16: ...key to change off to on 5 Press and hold the Enter key until the parameter input menu returns to the Status Display 6 Press the Start key once The left most display character will show the letter A until the auto tune is complete The ElectraCOOL LA 550 Chiller will then begin controlling at the set point temperature 5 5 Manual Tuning Changing the PID parameters is normally not recommended unless a...

Page 17: ...check all outside plumbing lines for leaks Once all leaks are sealed follow the procedure in section 4 2 and add more coolant until the alarm disappears Warning Always disconnect the DC power cord before opening the ElectraCOOL LA 550 Chiller cover as electrical shock hazards exist inside RTD Open The temperature sensor has failed or its connector has come loose Shorted Turn off the ElectraCOOL LA...

Page 18: ...place the temperature controller as per the procedure in section 7 8 Temperature If no other alarms are present poor temperature control indicates Control Poor the heat load is too great for the chiller the TE cooling heating engine is not receiving power or has failed or the PID constants have been corrupted First check the PID constant values shown section 5 2 match the factory defaults If not c...

Page 19: ...s turned off and chiller main power is unplugged 2 Remove chiller from the rack 3 Remove the 9 screws holding the top cover and remove the cover 4 Remove the perforated electronics enclosure cover 5 Remove fuse with a fuse puller 6 Replace fuse 7 Reinstall the perforated cover 8 Close top cover and fasten with the 9 screws removed in step 3 use Loctite 242 9 Reinstall chiller and check operation 7...

Page 20: ...pump access hole 10 Install new pump assembly though the pump access hole 11 Remake both Swagelok fittings hand tight only 12 Install the four mounting screws with Loctite 242 13 Tighten the Swagelok fittings with a wrench note use a backing wrench on the threaded end of the fitting going into the pump and follow Swagelok recommended retightening guidelines 14 Reinstall Pump electrical connector 1...

Page 21: ...hell and reconnect 10 Use proper wrenches to loosen and remove the old flow switch at the 3 8 Swagelok fittings taking note of the flow direction continued 11 Install the new flow switch and tighten the Swagelok fittings following the Swagelok retightening instructions see attachment in section 9 12 Reinstall the filter and strap 13 Fill system using fill procedure and check for leaks 7 8 Temperat...

Page 22: ...ight side bracket the one with wire grommets and the fuse From the outside of the chassis and the bottom of the electronics box 7 Open the pump access panel 8 Loosen but do not remove the four 8 32 socket head cap screws do not remove the 5 pan head Philips holding the board to the heat sink holding the power supply assembly and using allen wrench and socket wrench to hold the nut below the electr...

Page 23: ...Inquiries 603 888 2467 rev 7 03 20 Figure 7 8 0 Spare Parts List Description ADVANCED THERMOELECTRIC Part Number Fuse 20 22522 1 Pump 36 22418 1 Fan 28 22425 5 RTD 24 22521 1 Flow Switch 24 22430 1 Temperature Controller 26 22200 3 TE Power Supply 18 22419 1 Level Switch 24 22421 1 DC DC Converter 20 22517 1 Input Module 20 22518 1 ...

Page 24: ...ElectraCOOL LA550 Chiller For Information Call 1 800 250 2920 electracool com One Tara Boulevard Nashua NH 03062 USA international Inquiries 603 888 2467 rev 7 03 21 Appendix 1 Schematics ...

Page 25: ...tracool com One Tara Boulevard Nashua NH 03062 USA international Inquiries 603 888 2467 rev 7 03 22 Appendix 2 Schematics This page intentionally left blank for online manual Pease contact us to receive this diagram or to request a copy of our nondisclosure agreement ...

Page 26: ...nformation Call 1 800 250 2920 electracool com One Tara Boulevard Nashua NH 03062 USA international Inquiries 603 888 2467 rev 7 03 23 For the complete guide to using this connection system visit http www johnguest com plumb_pg1 shtm ...

Page 27: ...o ADVANCED THERMOELECTRIC before the end of the warranty period will be repaired or replaced at no cost see below for reporting requirements The warranty period begins on the date the product was initially shipped from ADVANCED THERMOELECTRIC The length our warranties is product specific and depends on the type and planned usage of the product but will be specified in the quotation upon which a pu...

Page 28: ...o void the CE Mark Switchback 6600 CE model power supply Any actions prohibited in the Caution section of the product manual Returned Goods Procedure and Reporting Requirements Before a failed product is returned to the factory a Returned Materials Authorization RMA number must be obtained from Customer Service at 1 800 250 2920 in the US and Canada or at the fax phone numbers below for internatio...

Reviews: