


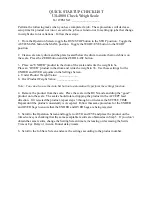


QUICK STARTUP CHECKLIST
US-4000 Check Weigh Scale
For ITEM NO: __________________
Perform the following tasks when you have completed a job. These procedures will decrease
setup time for product not run or saved in the job save function or for setting up jobs that change
in weight due to lot variations. Follow these steps:
1. From the Operation Screen, toggle the RUN/STOP button to the STOP position. Toggle the
AUTO/MANL button the MANL position. Toggle the WGHT/EYE button to the WGHT
position.
2. Clean scale rotary drum and the plate located below the drum to ensure that no debris is on
the scale. Press the ZERO button and the ZERO LAST button.
3. Place an “UNDER” product in the drum of the scale and write the weight in 3a.
Place an “OVER” product in the drum and write the weight in 3b. Use these settings for the
UNDER and OVER setpoints on the Settings Screen.
a. Under Product Weight Value: _____________
b. Over Product Weight Value: ______________
Note: You can also use the Auto Set button to automatically perform the settings function.
4. Remove the product from the scale. Place the scale in the RUN mode and drop the “good”
product onto the scale. The scale should rotate, dropping the product in the ACCEPT feed
direction. If it rejected the product, repeat steps 3 through 4 or increase the SETTLE TIME.
Repeat until the product consistently is Accepted. Follow this same procedure for the UNDER
and OVER bags to ensure that the UNDER and OVER bags are being rejected.
5. Scroll to the Operation Screen and toggle to AUTO and EYE and place the product on the
infeed conveyor checking that the same acceptable results are obtained as in Step 5. If you don’t
obtain the same results, change the Setting Screen timers, increasing or decreasing the Settle
Time or Eye Delay or Accum. Funnel delay timers.
6. Scroll to the Job Save Screen and save the settings according to the product number.
Summary of Contents for US-4000
Page 2: ...This page intentionally left blank ...
Page 6: ...This page intentionally left blank ...
Page 8: ...Chapter 5 Maintenance Trouble Shooting 5 1 Troubleshooting Checklist Chapter 6 Parts Drawings ...
Page 12: ...This page intentionally left blank ...
Page 15: ......
Page 16: ...This page intentionally left blank ...
Page 20: ...FIG 3 1 FIG 3 2 FIG 3 3 FIG 3 4 FIG 3 4A FIG 3 5 ...
Page 21: ...FIG 3 6 FIG 3 7 FIG 3 8 FIG 3 9 FIG 3 10 FIG 3 11 ...
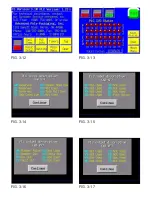
Page 27: ...FIG 3 12 FIG 3 13 FIG 3 14 FIG 3 15 FIG 3 16 FIG 3 17 ...
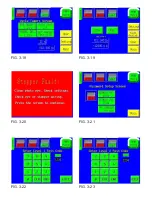
Page 28: ...FIG 3 18 FIG 3 19 FIG 3 20 FIG 3 21 FIG 3 22 FIG 3 23 ...
Page 30: ...This page intentionally left blank ...
Page 33: ......
Page 34: ......
Page 35: ......
Page 36: ......
Page 37: ...Chapter 5 Trouble shooting Troubleshooting Checklist ...
Page 39: ...Chapter 6 Replacement Parts Components Lists with Drawings ...
Page 41: ......
Page 43: ......
Page 45: ......
Page 47: ......
Page 49: ......
Page 51: ......
Page 53: ......
Page 54: ......


