background image

Smart IP Strobe (IPSTROBE) 


Advanced Network Devices • 3820 Ventura Dr. Arlington Hts. 

IL 60004 

Support: 

[email protected]


  847-463-223

7 •


www.anetdsupport.com


3


v2.2 

INSTALLATION 

The strobe assembly can mount to a 4” 

square junction box as follows: 

1.


Run Cat5 cable to the junction box, 
and terminate the end, leaving 
abo

ut 12” of slack 

inside the box. 

2.


Set the heads of the junction box 
screws to protrude with 

~1/8” of 

space under each head.  

3.


Open the strobe assembly by 
removing the two screws at either 
side of the top of the box.   

4.


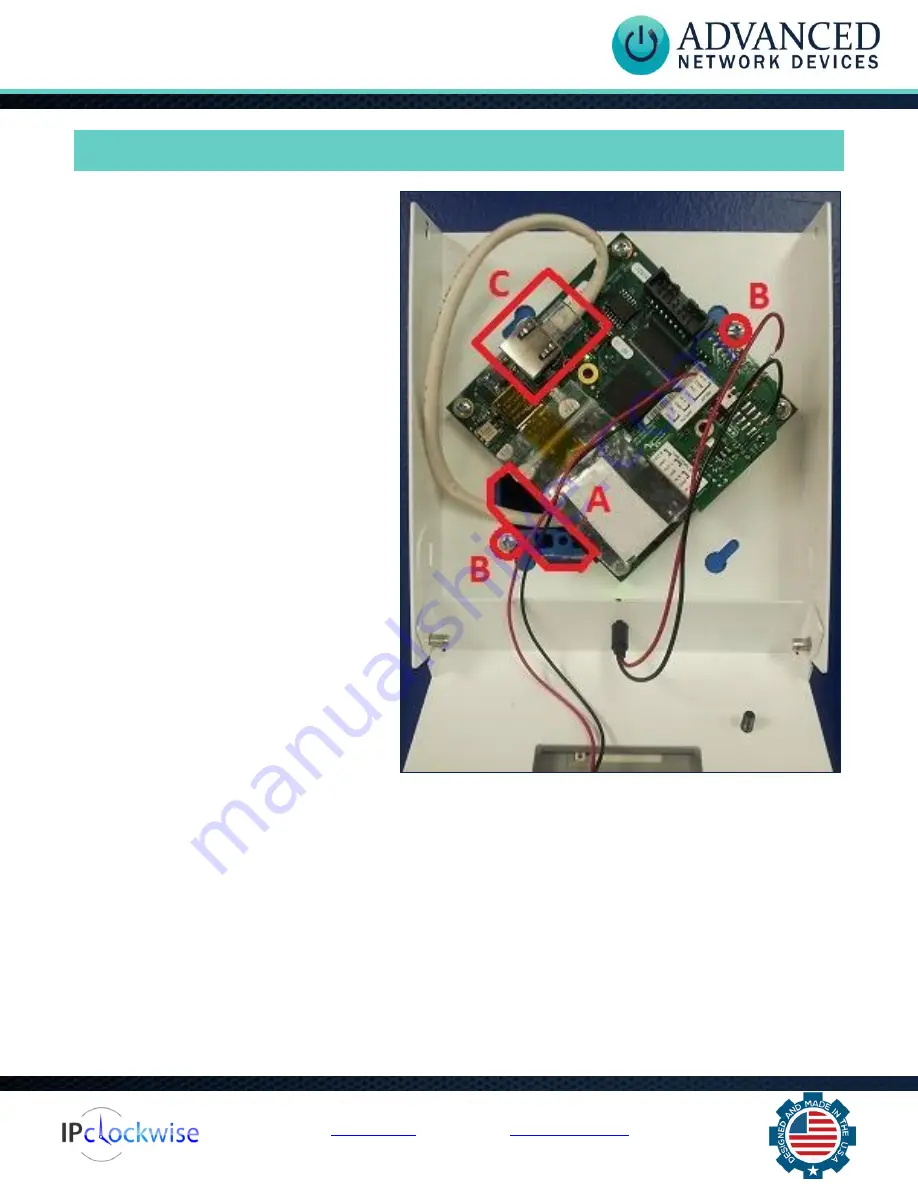
Feed the Cat5 cable through the 
large 6-sided hole in the strobe box 
at the bottom left (s

ee “A” in photo)

5.


Attach the strobe box to the junction 
box by placing two of the diagonal 
slotted holes over the protruding 
screws (se

e “B” in photo)

. Tighten 

the screws to firmly attach the 
strobe box to the junction box. 

6.


Plug the Cat5 cable into the main 
circuit board in the location marked 

“Ethernet Cable” (see “C” in photo)

Make sure the Cat5 connector snaps into the metal connector receptacle on the circuit board, 
such that it won't disconnect when gently pulled. 

7.


Stuff extra Cat5 cable back into the junction box cavity to minimize the amount of cable within 
the strobe assembly.  

8.


Fold up the front of the chassis and fasten in place using the two previously removed screws that 
came with the strobe assembly. 


Summary of Contents for Smart IP Strobe

Page 1: ...Version 2 2 8 24 2018 2018 ADVANCED NETWORK DEVICES 3820 NORTH VENTURA DR ARLINGTON HEIGHTS IL 60004 U S A ALL RIGHTS RESERVED Smart IP Strobe IPSTROBE Installation ...

Page 2: ...anted in accordance with the terms of the Warranty Statement accompanying each product However actual performance of each product is dependent upon factors such as system configuration customer data and operator control Since implementation by customers of each product may vary the suitability of specific product configurations and applications must be determined by the customer and is not warrant...

Page 3: ... sided hole in the strobe box at the bottom left see A in photo 5 Attach the strobe box to the junction box by placing two of the diagonal slotted holes over the protruding screws see B in photo Tighten the screws to firmly attach the strobe box to the junction box 6 Plug the Cat5 cable into the main circuit board in the location marked Ethernet Cable see C in photo Make sure the Cat5 connector sn...

Page 4: ...tion file reference the corresponding settings in the Gen 2 Configuration document on the AND Customer Portal http www anetd com portal Audio Broadcasts such as Paging or Intercom This method requires IPClockWise or other third party software that supports paging to an AND device In the Device Settings Priorities set GPIO 0 to Yes in the Message and Audio Priorities section for the priority ranges...

Page 5: ...r with which to register Set the SIP Mode to Phone In the SIP GPIO Output Control Settings section set Activate GPIO 0 When Ringing to Yes When a SIP phone or ring group calls the strobe s extension the strobe will activate When the ringing stops the strobe will turn off If using a configuration file SIPConfig gpio0_when_ringing 1 Line In Audio In Device Settings Audio under the Line In Audio Sett...

Page 6: ...s Peripherals set GPIO 0 Output Transitions Send SNMP Trap to Yes On Device Settings Network add the IP address and community name for a trap manager The device will now send an SNMP trap to the configured manager when the strobe goes on or off If using a configuration file with nameTBD and 10 10 3 4 provided only as example GPIO snmp_trap_for_output_gpio0 1 SNMP write_community nameTBD read_commu...

Reviews: