background image

Creating Training Plans

17

Click step 5

Create Plan

on the

!

Home

screen’s

Get Started

bar. Then pick Operator Assessment on the Create Plan screen and click 

OK

.

IMPORTANT NOTE:

Separate training plans must be created for each pipette that will be used for operator assessment.

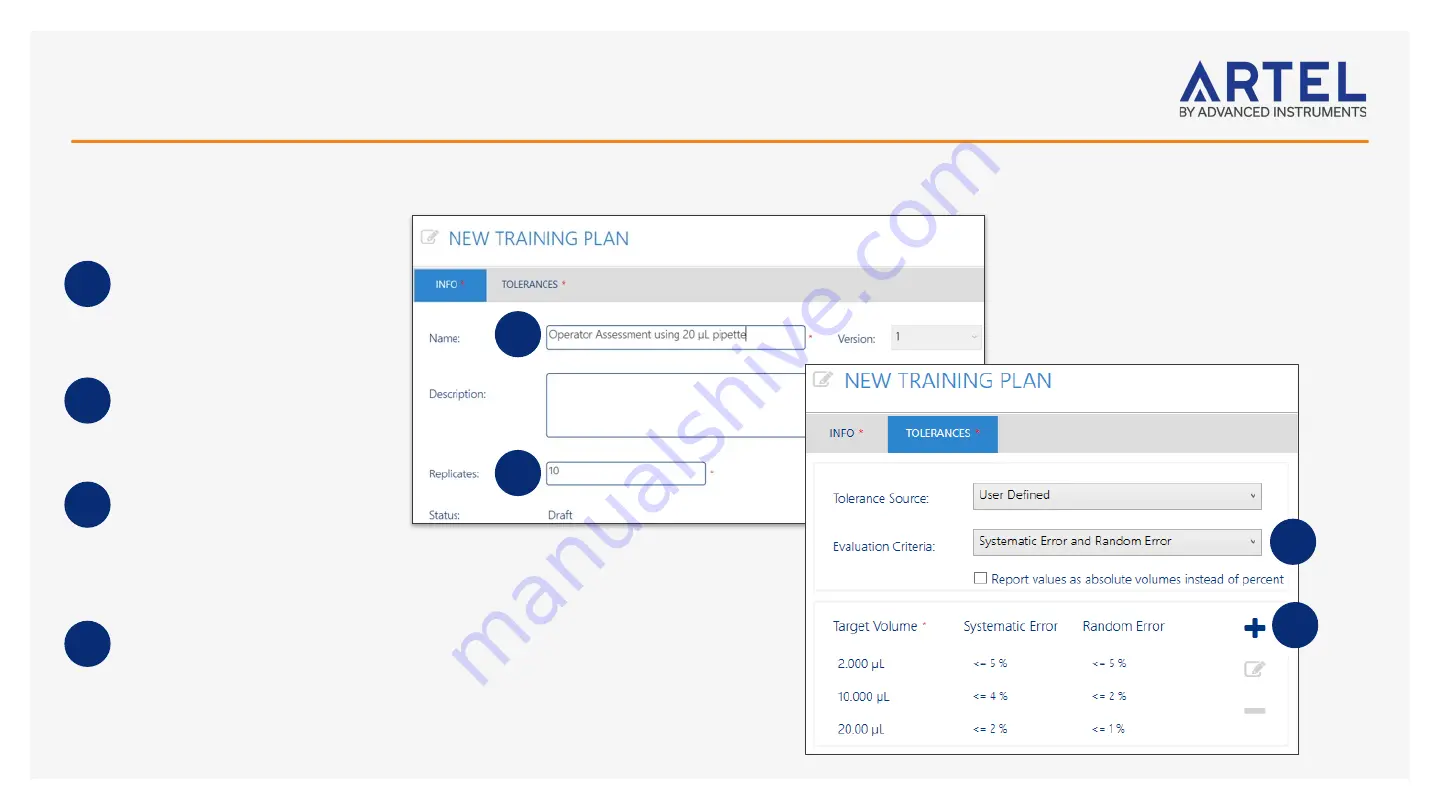
Name

Artel recommends that the name 

of the training plan reference 

the (nominal) target volume of 

the pipette that will be used in 

the assessment.

Replicates

Enter the number of replicates, the 

number of data points to be taken 

for each Target Volume of 

the operator assessment.

Evaluation Criteria

Click on the Tolerances tab to 

choose inaccuracy, imprecision, or 

the combined inaccuracy and 

imprecision. These can be recorded 

as absolute or relative values.

Add a target volume

ArtelWare directs the 

operator assessment in the same 

order as the Target Volumes entered 

here.

1

2

3

4

1

2

3

4

Summary of Contents for ARTEL PCS

Page 1: ...Pipette Calibration System Quick Start Guide For...

Page 2: ...10 Creating Calibration Plans 11 Creating Schedules 12 Calibrating Pipettes with PCS 13 Performing Unscheduled Volume Measurements 14 Uploading External Calibration Records 15 Creating Training Plans...

Page 3: ...le locks into place On first connection to the computer Microsoft Windows will begin installing drivers for the integrated barcode scanner and the PCS instrument This process may take a few moments 3...

Page 4: ...d Follow the placement instruction printed on the new EEPROM card Carefully insert new EEPROM card by gently but fully pressing card into slot Place cover back on instrument tighten quarter turn faste...

Page 5: ...ress YES to enter Link to Computer mode This completes the link and the PCS instrument indicates that it is ready for use with ArtelWare To leave Link to Computer mode at any time press RESET but note...

Page 6: ...to ensure all QualAssure solutions and vials belong to the same Lot Code PCS Calibrator Kit Components of the PCS Calibrator Kit should not be exposed to light For PCS instruments keep the vials in t...

Page 7: ...m the scan window Touch Bar Touch anywhere on this bar to close the PCS lid after dispensing QualAssure solutions replacing vials or as instructed on screen by ArtelWare Status Light Bar The light bar...

Page 8: ...propriate PCS type from the Add Instrument screen and then click OK On the New Instrument screen confirm the Instrument Type provide a unique Instrument ID and then select a Location and an Owner from...

Page 9: ...ires a Passing instrument calibration before performing pipette calibrations or operator trainings Artel recommends creating an Instrument Calibration schedule for every 30 days Note The first time ca...

Page 10: ...hen click OK Ensure that the Manufacturer and Model are correct because they cannot be changed once a calibration has been completed New models can be added to the Pipette Catalog by clicking on Pipet...

Page 11: ...Click on the Tolerances tab to continue setting up the Plan Tolerance Source Choose Manufacturer Specification ISO Specification or User Defined Evaluation Criteria The statistical errors can be repor...

Page 12: ...Items Click Add to select the Pipettes Operators or Instruments along with any associated Plans which need to follow this schedule See the Filtering Lists page of this guide for more about Filters Ho...

Page 13: ...ipettes due for calibration Calibrate Pipette to see a choice of Calibration Types or Scan Barcode on the Shortcuts bar if the pipette has a barcode Select the connected PCS instrument or choose to ma...

Page 14: ...Shortcuts bar click Calibrate Pipette Choose PCS Volume Quick Check for the Calibration Type Enter the expected target volume in L the number of replicates to dispense and select to display errors as...

Page 15: ...ette Calibration for the Calibration Type and then select an appropriate Calibration Reason before clicking Start Calibration Enter the Calibration Date and the Calibration Result Click Browse to sele...

Page 16: ...ernal calibration and any related approvals View the original uploaded document by clicking on the View attached calibration record shortcut in the upper right corner of the calibration report Origina...

Page 17: ...n reference the nominal target volume of the pipette that will be used in the assessment Replicates Enter the number of replicates the number of data points to be taken for each Target Volume of the o...

Page 18: ...dule reference the nominal target volume of the pipette that will be used in the assessment Type Select operator training Scheduled Operators Select the operators and training plan that should follow...

Page 19: ...select any operator for training Select the connected PCS instrument the pipette to be used for the training and have the operator provide their login credentials to begin Follow the on screen instruc...

Page 20: ...an assessment is due Otherwise training can be initiated from the Calibration menu by selecting Scheduled Training or Ad Hoc Training Select the connected PCS instrument and the pipette to be used fo...

Page 21: ...call or email Artel technical support for list of supported balances Click step 3 Add Instrument on the Home screen s Get Started bar or from the Configuration menu select Instruments and then click...

Page 22: ...ype Enter a Repeat interval Click to add the pipette calibration plan and a start date Click OK to add the Pipette and then Save Activate Deactivate a pipette PIPETTES find and select the pipette in t...

Page 23: ...ators visit artel co and see the Resources page at https www artel co resource library 15A7337A artel co Advanced Instruments 25 Bradley Drive Westbrook Maine 04092 USA ordering orders artel co techni...

Reviews: