ADT KS-535 Instruction Manual Download Page 10

Page 9

CONNECTIONS

SELECTING YOUR KARAOKE MACHINE AS YOUR SOURCE/INPUT

Selecting your 

Karaoke Machine

 as a source / input on your TV is very similar to connecting a VCR/DVD or Satellite 

system. 

We’ve listed below the most common ways of selecting the source from your TV or VCR / DVD player: 

1.

In the set up menu of the TV or VCR / DVD player there may be an option for “Input Select” where you can choose 
between “Cable/Ant., Video 1, Video 2, etc” as the input source. 

2.

Look for a TV channel between the highest and lowest on your TV or VCR / DVD player (i.e AUX, EXT, LINE 1 or
LINE IN) 

3.

Your remote control for either your TV or VCR / DVD player may have source input selections as well as detailed 
as the following: “Video, Video 1, Game, AUX, EXT or LINE-IN.” Choosing one of those sources in most cases
should display the lyrics from your 

Karaoke Machine

 as well. 

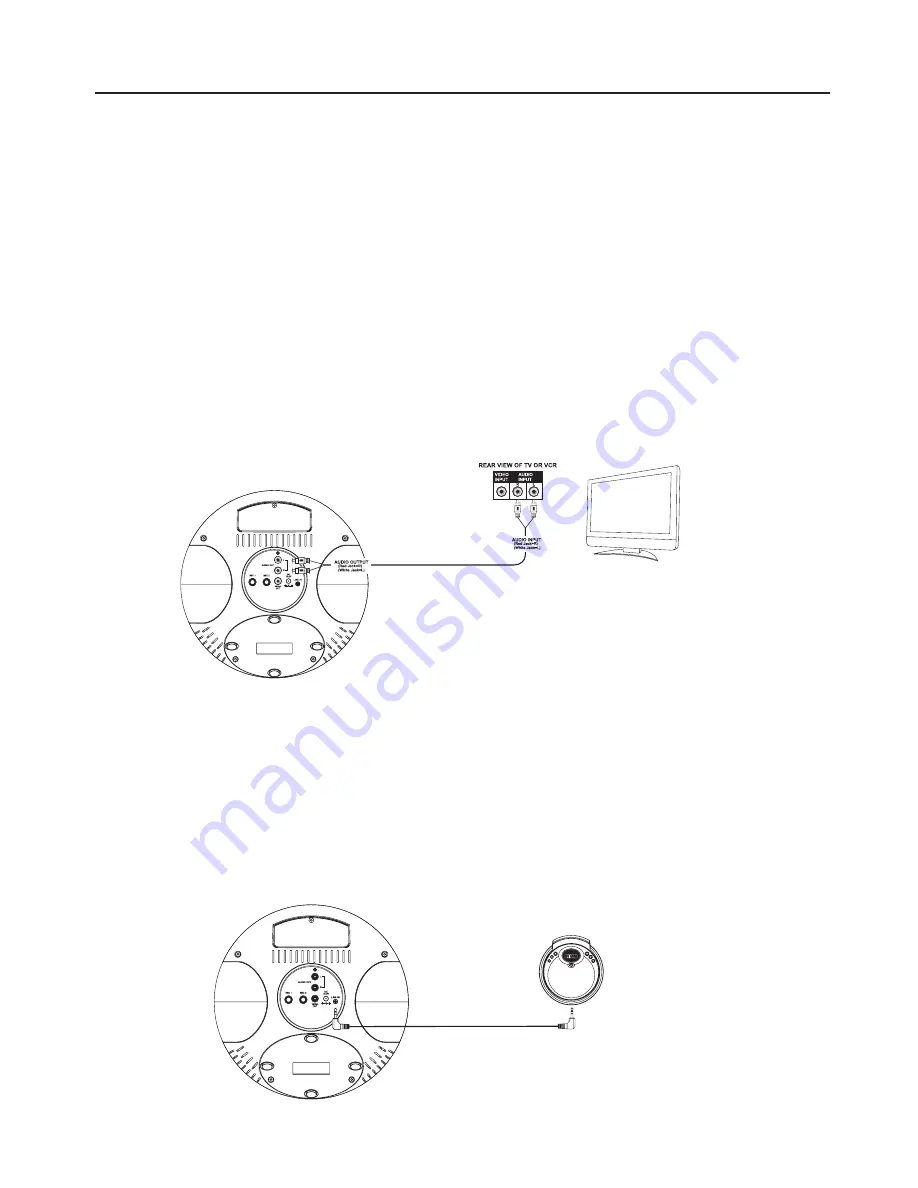
CONNECTION (Audio Out) 

Please follow the steps below to connect the unit to your display CD+G or TV screen or home stereo system. 

1.

Locate the multi-colored RCA cables. 

2.

Connect audio cables (White and Red) to the 

Audio Out

 of the back of your 

Karaoke Machine

.

3.

Connect the other end of the audio cables to the Audio/Auxiliary input on your TV or VCR or home stereo system. 

SET UP YOU LINE IN PORT 

This will allow you to broadcast the external unit’s sound through your 

Karaoke Machine

 speakers.

CONNECTION (Line In) 

1.  Plug a 3.5mm audio cable (not included) into your MP3 or MP4 player and connect the other end (3.5mm jack) 
 into 

the 

LINE IN

 port at the back of your

 Karaoke Machine

.

2.  Make sure both units are turned on.

3.  Press play on your MP3 or MP4 player. 

4.  This will allow you to broadcast the external unit’s sound through your unit’s speakers. 

Summary of Contents for KS-535

Page 1: ...KS 535 Instruction Manual Please read before using this unit CD Graphics Karaoke Player with TFT Screen...

Page 2: ...s unit off when not in use or move it away from the affected radio tuner This class B digital apparatus complies with Canadian ICES 003 Cel appareil numerique de la classe B est comforma a la norme NM...

Page 3: ...Do not place this product on an unstable cart stand tripod bracket or table The product may fall causing serious injury to a child or adult and serious damage to the product Use only with a cart stand...

Page 4: ...power lines or circuits as contact with them might be fatal 18 Overloading Do not overload wall outlets extension cords or integral convenience receptacles as this can result in a risk of fire or ele...

Page 5: ...such as vases shall be placed on apparatus L appareil ne doit pas tre expos aux coulements ou aux claboussures et aucun objet ne contenant de liquide tel qu un vase ne doit tre plac sur l objet Main...

Page 6: ...CREEN ON OFF Button 12 USB Socket 13 KEY PAGE Button 14 SKIP Button 15 SKIP Button 16 PLAY PAUSE Button 17 Auto Voice Control 18 BALANCE Control 19 MASTER VOLUME Control BACK PANEL 21 AUX OUT Socket R...

Page 7: ...MODE REPEAT ONE REPEAT ALL REPEAT FOLDER NO REPEAT PROGRAM MODE C PROGRAM MODE PLAYING NO PROGRAM MODE PLAY PLAY PAUSE STOP INDICATOR PLAYING MODE PAUSE MODE STOP MODE PLAYING TRACK NUMBER AND TOTAL...

Page 8: ...f the music and press the KEY button to similarly lower the key For the most natural sounding effect it s best to only raise or lower the key of the music by pressing the KEY or KEY buttons a maximum...

Page 9: ...OUR TV OR VCR DVD PLAYER Your Karaoke machine is designed to connect to your TV the same way you would connect most video cameras VCR DVD players or video games consoles We have provided RCA cables to...

Page 10: ...osing one of those sources in most cases should display the lyrics from your Karaoke Machine as well CONNECTION Audio Out Please follow the steps below to connect the unit to your display CD G or TV s...

Page 11: ...isc out holding it carefully by the edges Discs should be returned to their cases after use to protect them from dust and scratches To prevent warping the disc do not expose it to direct sunlight high...

Page 12: ...y only Normal play will continue when you release the SKIP button Press SKIP or SKIP to go to the previous or next track or MP3 file NOTES Adjust MASTER VOLUME control on your unit TV or audio system...

Page 13: ...REP 1 indicator will appear on TFT display it can keep repeat the current track To repeat the Directory press PROG REP button twice the REP D indicator will appear on TFT display To repeat all tracks...

Page 14: ...o both the karaoke system and the TV PA system CD Player does not work normally Disc is inserted upside down Disc is dirty Disc is scratched Disc is warped A non standard disc is inserted Moisture has...

Page 15: ...EO IN Refer to page 8 under Connecting to your TV or VRC DVD player Using your TV remote to select VIDEO input or select the proper VIDEO input on the TV itself Refer to page 8 under Connect ing to yo...

Page 16: ...ing system 100 Hz 20 kHz 50 dB 20 STEPS RANDOM ACCESS PROGRAMMING 8 TIMES OVER SAMPLING Microphone 73 dB 600 OHMS IMPEDANCE WITH 6 3mm DYNAMIC MICROPHONE Power Power adapter Input AC 120V 60Hz Output...

Reviews: