background image

28

Placement:

 Clicking one of the squares specifies where the imageable area or first tile of your 

artwork should be placed to adjust the artwork on the film or printed page. 

Origin X and Y:

 Specifies the origin point along the horizontal (X) and vertical (Y) axes.

Tiling:

 If the artwork is larger than the selected page size, it can be tiled to print onto 

multiple pages. Tile Full Pages divides the artboard into as many whole pages as will fit. No 
partial pages are displayed or printed. Tile Imageable Areas divides the artboard into as 
many sections as necessary to print all the artwork. To view the page tiling boundaries on 
the artboard, see the preview. For more details, choose View > Show Page Tiling.

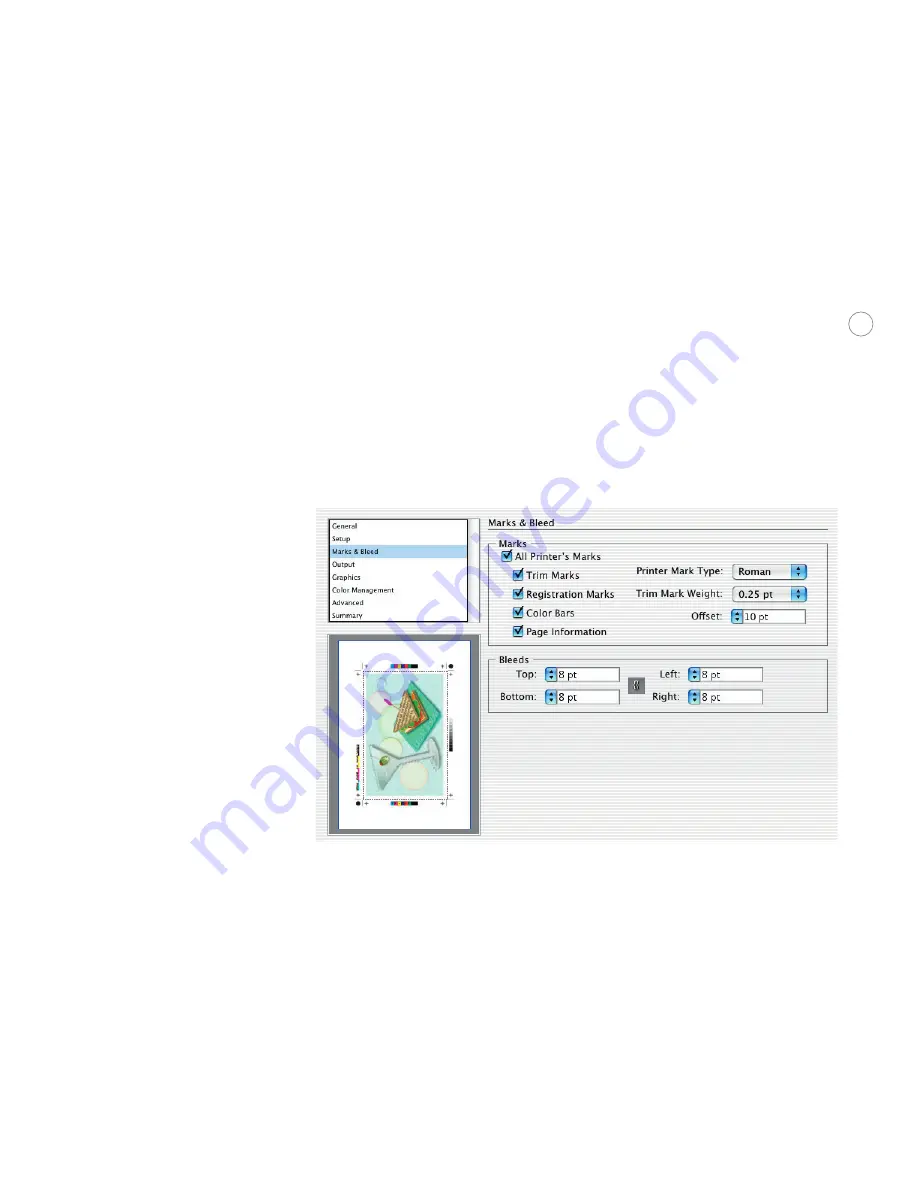
Marks & Bleed

Marks:

 Print whatever combination of trim, registration, color bar, and page information 

marks you want by selecting each individual choice. You can also specify the weight of trim 
marks, the offset distance from the artwork, and the type of printer’s marks.

Select individual printer’s marks and bleed settings from the Marks & Bleed tab of the Print dialog, and see the 

results in the preview. 

Offset:

 Specifies the distance between the trim marks and the artwork. To avoid drawing 

printer’s marks on a bleed, be sure to enter an Offset value greater than the Bleed value.

Bleeds:

 Specifying the extent of the bleed moves the trim marks farther from or closer to the 

image. The trim marks still define the same size printing bounding box, however. You can 
enter values from 0 to 72 points for each edge. Click the link icon to make them all the same 
as the Top value. By default, Illustrator applies a bleed of 0 points to roman printer marks 
and 18 points to Japanese printer marks (which have a double line to show any difference 
between the original origin point and any offset.)

Summary of Contents for 26001360 - Illustrator CS - PC

Page 1: ...T E C H N I C A L R E F E R E N C E Adobe Illustrator CS Printing Guide for Service Providers...

Page 2: ...ator with other applications in the Adobe Creative Suite 9 Placing Illustrator art in QuarkXPress 11 Preparing Illustrator files for print 13 New Adobe Text Engine 13 Trapping 14 Gradients mesh object...

Page 3: ...l not only bypass several tasks to save an EPS le and incorporate it into another application but you retain a live document that can be edited up until the time it is printed Device speci c settings...

Page 4: ...om the print prepress service provider s point of view The need for Page Setup and Separations Setup dialog boxes has been eliminated and all print functionality has been consolidated into the new com...

Page 5: ...nterface been streamlined but you get increased control over individual print settings as well providing the complete output experience needed to print directly from Illustrator Printer s marks trim r...

Page 6: ...tions directly from the Print dialog for individual inks Access this dialog from File Print Output tab The Frequency Angle and Dot Shape values can be edited directly When printing layers with Illustr...

Page 7: ...your own to ensure consistency and save time New text composition engine Adobe Illustrator CS has an entirely new text composition engine which includes advanced support of OpenType fonts the standard...

Page 8: ...ossible Both applications now share the same text composition engine which signi cantly improves text editability Multiple spot channels can be imported and 16 bit color data can be converted to 8 bit...

Page 9: ...t option You also have the option to Preserve Text Appearance which retains the appearance of the text both on screen and in print and will not cause text to re ow For details see New Adobe Text Engin...

Page 10: ...nsparency Using Illustrator CS to create color separations means spot colors are maintained rather than converted to process colors unless speci ed otherwise in the print settings Even in linked duoto...

Page 11: ...and modi ca tion dates You can also access this dialog by double clicking on the link name To see image resolution and color space use the Linked Images panel of the Document Info palette Using Illust...

Page 12: ...dit its individual components Linked PDF les When placing PDF les into Illustrator CS including Photoshop multi tone les you can leave them linked rather than embedded and they will print as intended...

Page 13: ...a Knockout option either Shallow or Deep are merged with the underly ing layers Layer sets that use the Dissolve blending mode are merged into a single layer Hidden layers that require merging are dis...

Page 14: ...placed Since the exact resolution and capabilities of the end printing device are not necessarily known during the design process you should use the highest resolution possible in the PDF attening set...

Page 15: ...n to either update the text then or wait until later By default Illustrator appends the word Converted to the lename when you update the text If you don t want Illustrator to append the lename you can...

Page 16: ...Or you can use Illustrator to create traps Illustrator has two main ways of creating traps You can use the Trap command as part of the Path nder and let Illustrator determine the need for trapping or...

Page 17: ...raps to equivalent process colors An object of the lighter of the spot colors is created and overprinted Select Reverse Traps to trap darker colors into lighter colors This option does not work with r...

Page 18: ...important for print output of raster and transparency effects Use a line screen low enough for the resolution of the device to retain 256 levels of gray If the resolution is 1270 a maximum screen fre...

Page 19: ...a speci c object in the document and look at the following palettes Transparency palette To see or change the opacity and blending mode of the currently selected object s group s or layer s use the T...

Page 20: ...jects that are not involved in transparency even when they are overprinted Overprint preview It is always a good idea to check the results of settings before progressing with print output To see an in...

Page 21: ...at the time of printing rather than earlier in the process Transparency f lattener presets To streamline the attening process and ensure consistent results in similar conditions Illustrator CS include...

Page 22: ...ions When overlapping transparent objects are attened each discrete shape that results from the overlapping objects is called an atomic region When complex areas get rasterized during the attening pro...

Page 23: ...ncy Flattener Preset Options If you change them you can save them into a new preset or rede ne a preset with the Flattener palette yout menu You can zoom in to magnify the preview by clicking in the p...

Page 24: ...clicking the triangle to the left of the layer or group name Note If a layer is off not visible it will not be printed or included in the exported artwork Choose Window Layers to list and control all...

Page 25: ...racters item which you can double click to list the character attributes For more information see Working with appearance attributes in the User Guide Note If you have done trapping by overprinting yo...

Page 26: ...how overprinting colors will print Flattener Preview palette displays the results of overprinting and attening in les being color separated that may contain transparency The preview in the Print dial...

Page 27: ...incorpo rates their functionality into a uni ed Print dialog box similar to that in InDesign Once you ve determined the best combinations of settings for the output devices in your shop save them as...

Page 28: ...e given device and output conditions The print settings are identical to those on the Print dialog 5 Check the Summary on the last tab to make sure everything is correct 6 Click OK The new preset name...

Page 29: ...6 layers are converted to PDF layers which can then be selectively turned on and off for viewing and printing in Acrobat 6 Professional This is very useful when creating different versions of content...

Page 30: ...ation marks you want by selecting each individual choice You can also specify the weight of trim marks the offset distance from the artwork and the type of printer s marks Select individual printer s...

Page 31: ...t dialog Turn individual inks on or off by clicking the printer icon next to each ink It is no longer necessary to load an EPSF Rider le to the printer Instead set the frequency screen angle and dot s...

Page 32: ...this option often creates smaller le sizes for short documents or those without much text you may run into problems if the le is edited later When sending les to print select Complete PostScript The P...

Page 33: ...matching as your content moves across applications during the production process If you are using color management you will have already turned it on in this document by selecting Color Settings from...

Page 34: ...rint Fill or Overprint Stroke settings you have set in the Attributes palette are not used Flattener presets Lists the three prede ned and locked attener presets for Low Medium and High Resolution out...

Page 35: ...ency including overprints and you require high resolution output it s a good idea to preview the effects of attening before saving the le by going to Window Flattener Preview For details see the secti...

Page 36: ...t for each kind of output you want to receive This lets you decide how to deal with font embedding compres sion levels marks and bleeds overprinting and transparency attening when necessary To make yo...

Reviews: