background image

26

Product overview

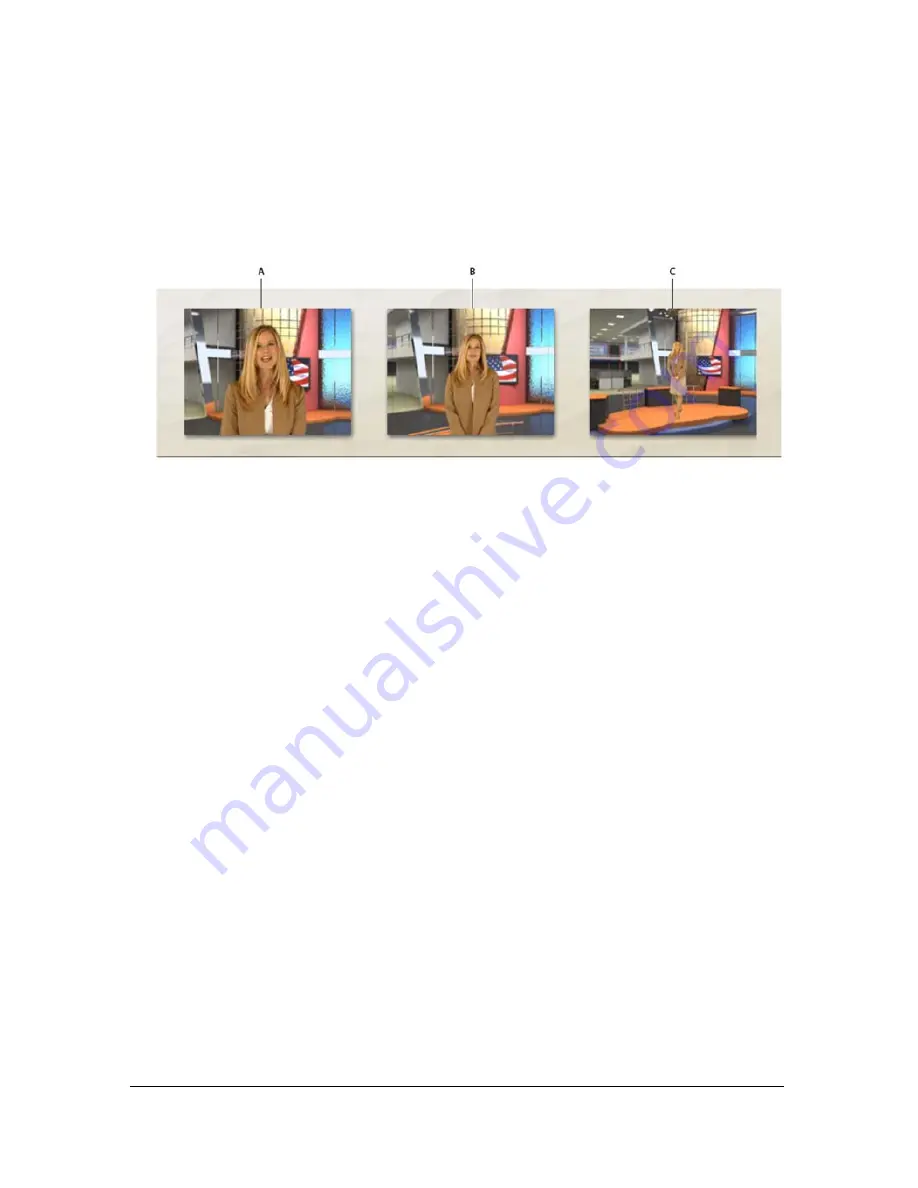
This is followed by the type of framing enclosed with parentheses: Tight, Medium, Wide, 
or Sitting. VirtualTrak effects are designated as “Trak”. For these, you should preview the 
tracking shot to determine its final framing. Virtual set names that have nothing in 
parentheses display the input clip (Source A) in an inset. In this case, any framing will 
work.

A) Tight: Designed for the subject to be framed from the chest up.  B) Medium: Designed for 
the subject to be framed from the waist up.  C) Wide: Designed for the subject to be standing, 
visible from head to foot, and possibly scaled down.

For instructions on assembling a set using your own graphics, see 

“Creating elements for a set 

or individual layers” on page 68

.

For more information, see the following sections:

“Input area and Input Preview Monitor” on page 28

“Creating and assigning sources and virtual sets” on page 57

Summary of Contents for 25510629 - After Effects CS3 Professional

Page 1: ...USER GUIDE ADOBE ULTRA CS3...

Page 2: ...cts Creative Suite and Ultra are either registered trademarks or trademarks of Adobe Systems Incorporated in the United States and or other countries Windows and Windows Vista are either registered tr...

Page 3: ...presenters 11 Tutorials and source files 11 Using Adobe Video Workshop 12 Extras 12 Adobe Design Center 12 Adobe Developer Center 12 Customer support 13 Downloads 13 Adobe Labs 13 User communities 14...

Page 4: ...es 51 Background and Input Clip thumbnails 51 Overlay thumbnail 52 Output Preview Monitor 52 Grid controls on the Scene Input and Pan Zoom tabs 52 Items on the Virtual Sets Backgrounds Output Clips Se...

Page 5: ...composited scene 71 Advanced compositing tasks 72 Customizing a virtual set 73 Editing virtual set images 74 Moving virtual sets to an alternate location 75 Copying a single virtual set 75 Setting th...

Page 6: ...and Out Points in a video clip 104 Looping the clip 105 Specifying when a video clip begins playing in the session 105 Setting a pause point for a VirtualTrak effect 107 Adjusting the volume of a vide...

Page 7: ...7 Technical support web pages 124 Run the DirectX Diagnostic Tool 124 StatusLog txt file 125 Symptoms and solutions 125 Index 127...

Page 8: ...8...

Page 9: ...your computer 2 Insert the installation disc into your DVD drive and follow the on screen instructions Choosing PAL or NTSC video format When you run the program for the first time you select either...

Page 10: ...ll the content from in product Help plus updates and links to additional instructional content available on the web For some products you can also add comments to the topics in LiveDocs Help Find Live...

Page 11: ...tive Suite 3 product Many videos show you how to use Adobe applications together When you start the Adobe Video Workshop you choose the products you want to learn about and the subjects you want to vi...

Page 12: ...orials The video files referred to in the tutorials are located in the folders in the Browse tab in Ultra Adobe Design Center Adobe Design Center offers articles inspiration and instruction from indus...

Page 13: ...arty developers helping you to automate tasks customize workflows create specialized professional effects and more Adobe Labs Adobe Labs gives you the opportunity to experience and evaluate new and em...

Page 14: ...ng Ultra offers an extraordinary one click keying feature for faster keying Advanced controls such as spill suppression color restoration and edge softening can also be applied to fine tune composites...

Page 15: ...is provides an additional 33 of vertical resolution when using a video format with a 4 3 frame aspect ratio and an additional 78 of vertical resolution when using a video format with a 16 9 frame aspe...

Page 16: ...s for compatibility with non linear editing systems that use film alpha interpret an alpha channel value of 0 as complete opacity Output files can be uncompressed AVI DV or QuickTime AVI and QuickTime...

Page 17: ...for each layer plane Note that some layers in virtual sets may be locked so you can t change them It is best to set up the scale and position of the input clip and other layers at the beginning of the...

Page 18: ...put Clip thumbnail 5 Drag the slider under the Output Preview Monitor to the time of 1 seconds 00 00 01 00 or enter this timecode in the timecode text box A video frame showing two hands appears on th...

Page 19: ...lder that you are exporting to is set to My Documents Adobe Ultra CS3 My Output Clips 11 Optional Change the name of the file in the File Name field 12 Click Save Output Ultra renders the movie 13 To...

Page 20: ...20 Quick start session...

Page 21: ...in collections known as master sets that have a variety of camera angles for the same virtual 3D environment Available in packages known as Master Sets Libraries most master sets have at least one set...

Page 22: ...s with a predefined scale position and orientation Some virtual sets also have foreground elements such as doors desks and podiums To customize the colors or otherwise manipulate the layers of a virtu...

Page 23: ...eb page www adobe com support ultra Input Clip or Live Preview This is the main video source shot against a greenscreen or bluescreen which you key and composite with the other layers It sits behind t...

Page 24: ...assign a source to the active layer For more information see Assigning source content to a layer on page 63 To determine which folder a source came from click the Browse button to open a dialog box t...

Page 25: ...o of the session as set on the Output tab However Ultra lets you mix them if that suits your purposes You will find 16 9 sets in the Basic folder on the Virtual Sets tab The name of a virtual set prov...

Page 26: ...is case any framing will work A Tight Designed for the subject to be framed from the chest up B Medium Designed for the subject to be framed from the waist up C Wide Designed for the subject to be sta...

Page 27: ...eview Monitor and several controls that you can use to assign sources select the active layer preview the source content and select tools for setting the key and panning and zooming For more informati...

Page 28: ...the right are for choosing and showing which layer is the active layer The Input Preview Monitor displays the source that s assigned to the active layer The buttons below the Input Preview Monitor are...

Page 29: ...to each layer Clicking a thumbnail for a layer makes it the active layer If there are multiple insets or overlay layers you can select among them by using the list above the thumbnail You can assign...

Page 30: ...e layer E Source for active layer F Select new source for active layer Current time If the source assigned to the active layer is a video clip then this field displays the current time in the video cl...

Page 31: ...m For more information see Magnifying and repositioning the view in the monitors on page 33 Output Preview Monitor and previewing the output The Output Preview Monitor displays a preview of the sessio...

Page 32: ...ut Preview Monitor then the image is scaled down to fit in the monitor Use the standard set of transport controls below the Output Preview Monitor to navigate and play the session You can also drag th...

Page 33: ...s the perspective of the layer plane in all three axes See Changing the orientation of a layer plane on page 93 Size in Scene Scene Controls the scale of the layer plane independent of the Z setting i...

Page 34: ...a grid control For more information about individual controls see the following sections Setting the size position and orientation of a layer plane on page 91 Moving and scaling an input within the la...

Page 35: ...essing unit GPU for some keying functions which reduces the load on the CPU and substantially accelerates previewing and exporting a keyed session For more information see Keying methods on page 76 Se...

Page 36: ...sparency Controls the overall transparency of the source video This control increases the range of transparency of the reference key color background starting at the center reference color and moving...

Page 37: ...area Start Level Controls the starting range of the desaturation curve in the input clip The effect of this setting on the Color Curve graph corresponds to that of the Start Threshold setting on the...

Page 38: ...atte setting Sharpen Matte works well with the Soften Matte setting to make the edges of the subject stronger and sharper Sharpen Range Adjusts the direction of sharpening This control works with the...

Page 39: ...rols the degree of separation of light and dark shades in the currently active source Saturation Controls the intensity of color in the current active source Hue Controls the balance of colors used in...

Page 40: ...en Adjusts the size of the input clip while retaining its baseline position in the scene The default size is 1 0 Set Sets the end point of the pause prebuilt into the virtual set using the current fra...

Page 41: ...Pan Zoom Points Lists all of the points in order and displays the time for each point Selecting a point jumps to the associated frame displays the programmed region of the image and displays the x y...

Page 42: ...untrimmed Offset Into Scene Defines the time in the session when the current clip starts playing This is typically required with VirtualTrak scenes where the input clip or an inset is not visible imme...

Page 43: ...all the way to the left For more information see Adjusting the volume of a video clip on page 107 Input Offset area This set of controls changes the size and position of the source on the layer plane...

Page 44: ...edges and painted masks blending these mattes with unmatted regions so that no harsh edges are evident Shadows tab The Shadows tab provides controls for adding a virtual reflection and up to three vi...

Page 45: ...check box When enabled displays the current shadow in front of the subject Baseline Aligns the bottom of the current shadow with the feet of the subject Length Controls the length of the shadow Angle...

Page 46: ...r the transparency information Invert Alpha This option is available if you select 32 bit Keyed Source When enabled Ultra reverses how it encodes the alpha channel data This is for compatibility with...

Page 47: ...d and encoded Libraries The five tabs on the right that contain the folder icons are for accessing Ultra sessions various files that you use in the sessions and the movies that you produce with Ultra...

Page 48: ...owse tab Assigning a folder as a library s home 1 Click the desired library tab 2 Navigate to the desired folder using the address bar 3 Right click a blank spot in the library A context sensitive men...

Page 49: ...al view Alt O or the checkerboard alpha view Alt A This option is used only if the input clip is the active layer it s keyed and the keyer is enabled For more information see Input area and Input Prev...

Page 50: ...rimarily for checking the quality of the lighting and camera settings prior to shooting content to be keyed in Ultra For more information see Live Preview on page 57 Device Lists the compatible live v...

Page 51: ...About Adobe Ultra Shows information about the currently installed version and your computer system Right click context menus This section describes the menu options that are available when you right...

Page 52: ...s If an option is dimmed it is not available for the current grid Reset All Resets all items to the defaults Reset Scale Resets the scale to the defaults Reset Position Resets the position to the defa...

Page 53: ...mmed or not present it is not available for the current item Paste Pastes the file from the clipboard Create New Folder Creates a child folder in the current folder Set Current Folder As Home For Make...

Page 54: ...54 Product overview...

Page 55: ...of session type sets the frame aspect ratio on the Output tab The session s frame aspect ratio also affects the Input Preview Monitor and Output Preview Monitor as well as the grid controls on the Sc...

Page 56: ...k or create a new session that uses some of the same input assignments or settings as an existing session To make a copy of a session choose File Save Session As and save the session with a new name o...

Page 57: ...then set the key as you normally would and check for problems such as hotspots wrinkles shadows and color spill from the background onto the subject This helps you to evaluate whether the current ligh...

Page 58: ...any camera movements then the only way that you can key it in Ultra is with the single key point method which works entirely by color without a model For more information see Single Key Point Method O...

Page 59: ...image that s too large preserves quality and scaling up an image that s too small degrades the image Virtual sets from the Master Sets Libraries are designed to work best with input clips of a particu...

Page 60: ...drop color for typical Ultra usage In some cases however green isn t the best backdrop color and other colors will work For example if your subject must wear green clothing you may get better results...

Page 61: ...ry square inch of colored background reflects light of the background s color In wide shots with the subject standing on a color screen the floor also becomes a source of bounced light To minimize spi...

Page 62: ...t project their voice as they would when performing to a far away camera If the subject will be inserted into a large virtual environment with a distant camera they may want to be more expressive with...

Page 63: ...oose the desired layer Source B C and so on or Overlay 1 2 and so on by using the list above the layer thumbnail After the layer is selected any of the following actions assign a source to it These me...

Page 64: ...Unassigning content from a layer If for any reason you want to remove a source from a layer which leaves the layer blank right click the layer thumbnail and choose Unload Source or Remove Current Over...

Page 65: ...first If you choose the wrong field order for a clip you ll see a comb like edge around the subject and stuttering with movement in the image 1 Assign the video clip to the desired layer and select i...

Page 66: ...verlay layer exists in each session To add an overlay right click the thumbnail for an existing overlay that has a source assigned and choose Add New Overlay This option is unavailable if the current...

Page 67: ...er you apply all of the camera moves Supported input formats Ultra supports HD and HDV video QuickTime video files and an expanded list of graphic formats The following table provides a partial list o...

Page 68: ...designs Some of these virtual sets have foreground elements and multiple insets each with a letter designating which source it is The Basic sets that are installed with Ultra let you achieve comparab...

Page 69: ...s Backgrounds without transparent regions are simple to create You can assign any image of a supported file type as a background As a rule you want the frame aspect ratio for the background to be the...

Page 70: ...following example the foreground is a desk For photographs you can either copy the overlay from the background and paste it back in as a separate layer or add an object from another image If you re dr...

Page 71: ...ge Use the Mask Painter to make that region of the input clip transparent For more information see Cropping and spot masking the source clip on page 83 Reposition the subject a few pixels to the left...

Page 72: ...background in another segment Moving all or part of an image from the foreground to the background or vice versa can help you to get the subject on the correct side of a wall doorway or pillar This ca...

Page 73: ...he overlay into the background for another session you will have to move the object to the same relative position Otherwise the object will appear to move when you cut from one session to the next If...

Page 74: ...can check the full path in the Look In field of the dialog box that appears when you click the Browse button The files that you just identified are stored in the Elements folder in the Master Set fold...

Page 75: ...e Moving a Master Set or the complete Virtual Set Library is the same as moving any folder using Windows Explorer or your preferred file management utility Copying a single virtual set Copying a singl...

Page 76: ...deo that is less than perfect Ultra provides three methods of setting the key The method that you should use depends on several factors The following procedure should help you determine the method to...

Page 77: ...ntrols on the Colors tab to improve the quality You may not recognize this problem until you ve tried unsuccessfully to get a good key After you become familiar with what you can accomplish with the k...

Page 78: ...the preview slider to a reference frame Then click the Set Key button You don t have to select Enable first because the Set Key button automatically enables the keyer The background should disappear...

Page 79: ...stent in color with no pronounced shadows or uneven shading For more information see Set Key on page 78 If this is not the case for the current session see Setting the key on page 76 to determine whic...

Page 80: ...Keeping the shadow in an input clip on page 82 If neither of these conditions apply for the current session then see Setting the key on page 76 to determine which of the other two methods to use to se...

Page 81: ...background which is well saturated The key point in the shadow causes the shadow to be keyed out If you want to preserve the shadow do not set any key points there 3 Click the Apply Points button on...

Page 82: ...a key point within the shadow as shown in the following example For more information see Multiple Key Points Method Color Spread on page 80 To change how pronounced the shadow is adjust the Shadows s...

Page 83: ...d region To blur these lines so that they are less obvious adjust the Edge Softness slider at the bottom of the Input Cropping control set N O TE If you re not satisfied with the real shadow try a dig...

Page 84: ...ut Preview Monitor gives you finer control Removing a spot mask If you cut a regional mask that s too large you can trim it back with the Mask Eraser tool Activate the Mask Eraser tool and drag in the...

Page 85: ...rkflows This section suggests a sequence of steps to fine tune a key The order of the steps is important because various settings on the Keyer tab interact with one another Proceeding in a different o...

Page 86: ...sections to set the key If you re satisfied with the key then you don t need to proceed with the following steps This procedure assumes that the color screen is green but these steps are the same for...

Page 87: ...se the Shadows setting 7 If the input clip was captured from an analog source and contains a troublesome green or blue edge around the subject that you cannot eliminate by using the Color Control step...

Page 88: ...Saving and applying Keyer settings You can save a profile of all of the settings on the Keyer tab and apply it to other sessions You can also use this feature within a given session to preserve a part...

Page 89: ...ine the size position and orientation of the layer plane or the space within which the layer s input appears Unlike a plane in broad geometrical terms that extends to infinity in both dimensions a lay...

Page 90: ...ene Controls the scale of layer plane independent of the Z setting in the Position In Scene controls You can scale the layer plane of the input clip in sets that lock the other Scene controls See Resc...

Page 91: ...iar with how repositioning a layer with the Position In Scene controls on the Scene tab differs from moving a layer with the Input Offset controls on the Input tab see Positioning layers and performin...

Page 92: ...For more information about moving and scaling these layers see Positioning insets in custom virtual sets on page 94 To move the layer right and left along the x axis drag the Position grid sideways o...

Page 93: ...ked In fact when working with the virtual sets that you create you may find this slider preferable to the grid control because it works from the ground up Adobe recommends that you position the bottom...

Page 94: ...f the basic set has multiple insets then Source B is selected by default 3 Assign the desired source to the inset 4 Reduce the scale to roughly the size of the transparent region in the background thr...

Page 95: ...camera moves on page 88 A Black box represents the borders of the layer plane Content outside this box is cropped B Y axis Vertical position Drag up and down C Angle Ctrl drag vertically D Scale Shif...

Page 96: ...In Scene controls that you usually use for this purpose These controls are particularly valuable in this regard if the input clip is a few pixels off so that the subject appears from the middle of spa...

Page 97: ...play it in the portrait orientation To rotate an image so that it is displayed in the portrait orientation rather than landscape select Plus 90 Portrait below the grid control This turns the layer 90...

Page 98: ...clip to a 16 9 virtual set with a background that has at least 1280x720 resolution 3 Enable the Plus 90 mode This rotates the input clip 90 If Scale To Fit is enabled which it is by default for the i...

Page 99: ...nction of the distance between the two points divided by the time between them To make the moves smoother and more natural the rate accelerates at the beginning and decelerates at the end Adobe uses a...

Page 100: ...cene tab No other layers extend beyond edges of the background However if you use the Scene tab to enlarge the scale of the background or another layer or if other layers are distributed beyond the ba...

Page 101: ...cannot zoom out any farther than 1 1 0 000 The right click menu for the grid control provides options for resetting values individually or collectively Adding and setting a pan and zoom point 1 Reset...

Page 102: ...but rather requires a discrete step either clicking the Set to Preview Time button or typing a framecount in the Time field and pressing Enter NO TE If the first last or both pan and zoom points are...

Page 103: ...ition 3 The difference between Time B and Time C is how long the position remains unchanged Panning and zoom with different aspect ratios If the frame aspect ratio for the session is 16 9 and the fram...

Page 104: ...to the layer If you intend to return to the original trimmed clip and want to reapply the same trim points make sure that you note the timecodes before switching sources The In and Out points do not...

Page 105: ...at least until the Virtual Trak effect brings that plane before having the input clip begin playing and you may prefer to delay its start until the effect ends N O TE To return the In Point setting t...

Page 106: ...nput clip disable the keyer so that you can see the plane appear 3 Click the Set button for the Offset Into Scene setting on the Input tab This applies the current framecount from the Output Preview M...

Page 107: ...In the Input Preview Monitor drag the preview slider to the point where you want the virtual camera move to start or resume 3 Click the Set button in the Pause Point Setting control area on the Scene...

Page 108: ...subtle appropriate ambient sound effects such as street noise or wind in the trees You cannot change the audio in Ultra You can use an application such as Adobe Audition or Soundbooth Correcting color...

Page 109: ...tonal variations between the highlights middle tones and shadows of the image Contrast is the difference in visual properties that makes an object or its representation in an image distinguishable fr...

Page 110: ...ellow if you increase the gamma If you select the green or blue channel then the pixel is not affected at all Adjusting Gamma is similar to using the midpoint slider of the Levels control in Adobe Pho...

Page 111: ...using the Apply Points keying method then choosing virtual shadows also frees you to use the more advanced and effective Set Key method For more information see Multiple Key Points Method Color Spread...

Page 112: ...The following diagram shows the result of all of the controls Although the process looks complex when you take it step by step the process is simple enough that you can probably learn how to position...

Page 113: ...es the baseline 2 Use the Flip Vertically option to specify if the shadow appears behind the subject or in front of it With classic three point lighting the shadow from the back light shows in front o...

Page 114: ...line in the following diagram Changing this setting is similar to moving the virtual light stand on an arc the cyan line in the following diagram A Angle slider bar Left setting B Angle slider bar Rig...

Page 115: ...r farther and adjusting its height the orange line in the following diagram A Spread TI P When deciding how many shadows to use and where they should fall try to mimic the position of lights for the s...

Page 116: ...her You generally achieve the best results by changing them in the following order N O TE Subtlety is crucial when adding virtual shadows When done well they should be such an integral part of the sce...

Page 117: ...ransparency The shadow or reflection becomes more transparent with distance from the subject To be more precise this slider controls how far up the shadow the gradient is applied Beyond a point which...

Page 118: ...round If the Falloff slider is set to either extreme 0 000 or 1 000 then the Edge Softness control has no impact A Blur slider bar Sharp setting B Blur slider bar Fuzzy setting Blur The Blur slider co...

Page 119: ...for a light touch In the following example the background of the image on the left is in crisp focus The background of the image on the right has the Defocus set to 0 07 which is just enough to make...

Page 120: ...video and still image files To output to a QuickTime file you must have QuickTime installed on your computer Frame Sequence This option lets you export a separate still image for each frame in the se...

Page 121: ...ng on whether you are working in NTSC mode or in PAL mode 7 Select a field order that s compatible with the editing application If you re not sure which field should be first see the NLE s documentati...

Page 122: ...ession that is only one minute in length produces well over 1 000 images you may want to create a folder for each frame sequence that you export You can do this through the dialog box that appears whe...

Page 123: ...problem immediately it can improve the ability of Adobe technicians to isolate the problem and identify a solution Updating device drivers The hardware devices attached to a computer such as the mouse...

Page 124: ...sic system configuration information choose Help About Adobe Ultra If you are using email or the User Forum to get help copy and paste this information except for the copyright information into your m...

Page 125: ...Settings Application Data Adobe Adobe Ultra CS3 Windows Vista C Users user name AppData Local Adobe Adobe Ultra CS3 Symptoms and solutions Symptom Solution When I click the Set Key button the subject...

Page 126: ...126 Troubleshooting and getting help...

Page 127: ...37 color screens 60 color settings saving 110 color correcting 108 Colors tab 38 correcting color 108 cropping 83 84 customer support 124 D defocusing a source 119 Design Center 12 directing for virtu...

Page 128: ...ng input in 95 orientation in scene 91 position in scene 91 size 91 thumbnails 28 29 libraries 47 Live Preview 57 LiveDocs 10 log file 125 looping 105 M magnifying 33 masking 83 84 master sets 24 Matt...

Page 129: ...ormats 67 trimming 104 spill reducing 61 spot masking 83 StatusLog txt 125 still images saving 122 support 124 system requirements 9 T tabs 35 technical support 124 thumbnails layer 28 29 timecode fie...

Page 130: ...130...

Reviews: