background image

Avante • Los Angeles, Ca USA • Mexico • Kerkrade, The Netherlands 

13 

C O N N E C T I O N S   &   C O N T R O L S


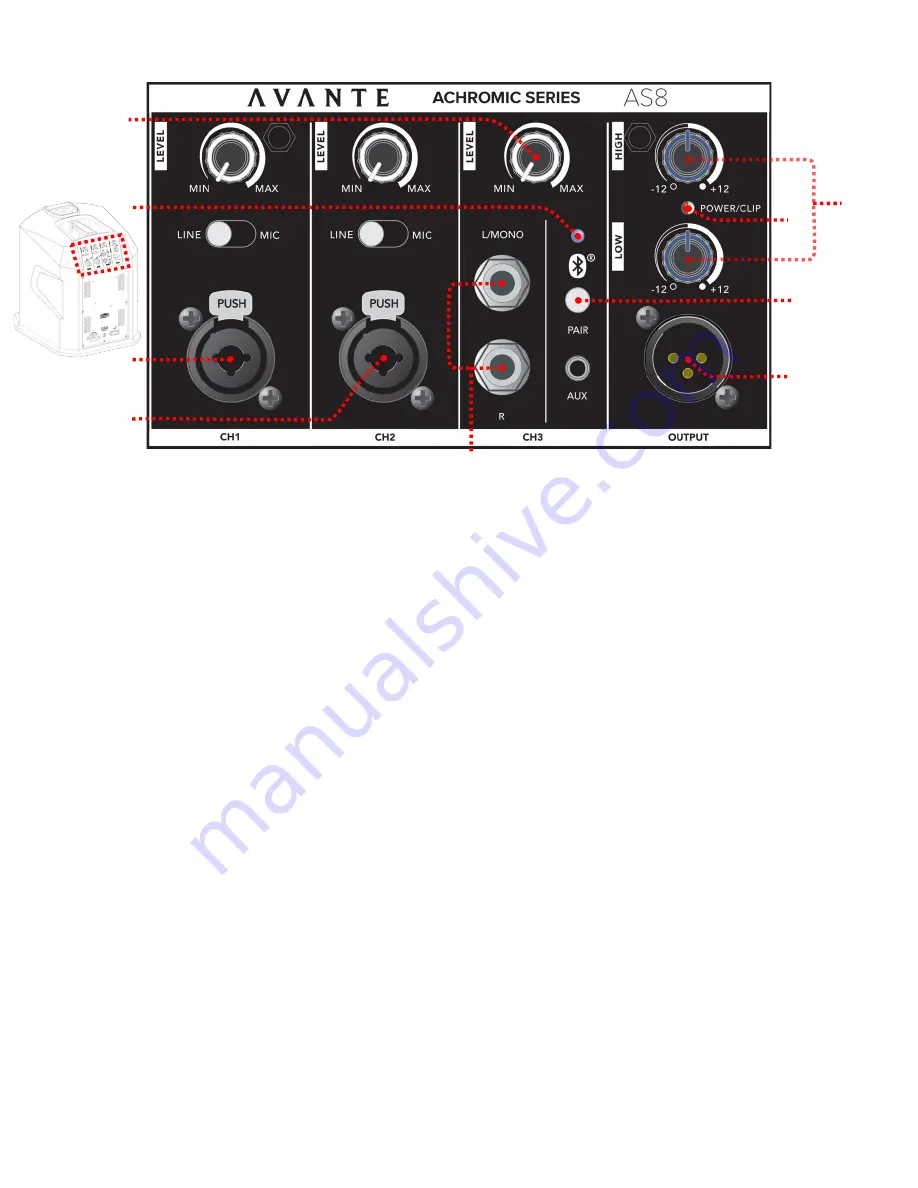
1.


CHANNEL 1

: This input accepts balanced XLR plugs, and balanced/unbalanced TRS (tip/ring/sleeve) 1/4” plugs. Set 

the LINE/MIC switch to match the type of device you’ve connected to prevent distortion. When using an unbalanced 

1/4” instrument jack, start with the button in LINE setting. Then, if the gain is too low, turn the volume down, select 

MIC, and slowly raise the volume. 

2.


CHANNEL 2

: This input accepts balanced XLR plugs, and balanced/unbalanced TRS (tip/ring/sleeve) 1/4” plugs. Set 

the GTR/MIC switch to match the type of device you’ve connected to prevent distortion. When using an unbalanced 

1/4" instrument jack, start with the button in GTR setting. Then, if the gain is too low, turn the volume down, select 

MIC, and slowly raise the volume. 

3.


CHANNEL 3 LEVEL KNOB

: This knob sets the volume for Channel 3. 

4.


CHANNEL 3 AUX JACKS

: The small 1/8” jack is for connecting a portable audio device like a phone, a computer, 

MP3, or CD player. The L (left) and R (right) jacks can be used for -10dB line level devices like keyboards or drum 

machines. For best results, do not use the 1/8” and L/R jacks simultaneously. 

5.


CHANNEL 3 BT

: Bluetooth® (BT). 

6.


CHANNEL 3 BLUETOOTH® CONTROLS

: To use a Bluetooth-enabled device like your phone or computer as the 

source for Input 3, you must first “pair” it with your AS8. 

-


Power on your AS8 and enable Bluetooth on your source device (phone, computer, or other mobile device). 

-


From your source device, display its list of discovered Bluetooth devices and look for “AVANTE AS8” there. If you 

don’t see it, try scrolling the list to make sure it’s not hidden off-screen. If it’s not listed, push and release the 

PAIR/play/pause button on your AS8. 

-


Once you do see “AVANTE AS8” on the list, select it, and your source device and your AS8 will pair, while the 

AS8 plays a chime and lights the Bluetooth LED blue. 

-


Play audio from your Bluetooth source device, and you’ll now hear it via INPUT 3 of your AS8 as the Bluetooth 

LED slowly flashes. 

-


Pressing the PAIR/play/pause button will now remotely control the play/pause action of your device, with the 

Bluetooth LED flashing during play, and solid while paused. 

-


To “disconnect” your Bluetooth device Input 3, press and hold the PAIR/play/pause button. The LED will turn off 

and you will hear a chime. 

-


When  you  power  on  your  AS8,  it  will  look  for  any  previously  paired  device,  and  pair  with  it  automatically  if 

available. 

7.


LOW AND HIGH EQ KNOBS

: The LOW knob will p/- 12dB of boost or cut below 100Hz. Turn LOW up to 

add bass or warmth to the speaker. Turn LOW down to remove rumble and noise when the program material does 

not contain low frequencies, or when using the speaker as a floor monitor. The HIGH knob will p/-12dB of 

boost, or cut above 10kHz. Turn HIGH up to add clarity and definition to vocals, acoustic instruments, or backing 

tracks. Turn HIGH down to reduce hiss or feedback. 

8.


POWER/CLIP LED

: The green LED on the AS8 indicates that AC power cord is connected to an electrical outlet, and 

the Power Switch is turned on. If you see the red LED while audio is playing into the speaker, this indicates that the 

speaker is being overdriven, and the limiter is engaged. If the CLIP LED is constantly lit, first reduce the Gain on the 

Input channels. 

9.


LINE OUT 0.0dB

: The LINE OUT provides a 0.0dB level signal and is used to link multiple AS8 units together using 

the same audio signal. Connect the LINE OUT of the first AS8 to a Line Input of the next AS8 in the signal path. 


Summary of Contents for Avante AS8

Page 1: ......

Page 2: ...rference that may cause undesired operation FCC RADIO FREQUENCY INTERFERENCE WARNINGS INSTRUCTIONS This product has been tested and found to comply with the limits as per Part 15 of the FCC Rules Thes...

Page 3: ...3 CONTENTS General Information 4 Limited Warranty USA Only 5 Safety Guidelines 6 Maintenance Guidelines 8 Overview 9 Setup 11 Connections Controls 12 Installation 15 Frequency Charts 16 Troubleshooti...

Page 4: ...answer any question should you encounter problems during your set up or initial operation and for any service related issues You may also visit us on the web at www avanteaudio com for any comments or...

Page 5: ...by reason of defects in material or workmanship The sole responsibility of ADJ Products LLC under this warranty shall be limited to the repair of the product or replacement thereof including parts at...

Page 6: ...must not be exposed to water liquid dripping or splashing DO NOT attempt installation and or operation without knowledge how to do so Consult a professional sound equipment installer for proper and s...

Page 7: ...r source before performing any servicing or cleaning procedure CAUTION To avoid physical damage read the installation instructions carefully before installation CAUTION Listening to speakers at high v...

Page 8: ...to rain or water conditions C Does not appear to operate normally or exhibits a marked change in performance D Has fallen and or been subjected to extreme handling 4 Check each speaker for loose scre...

Page 9: ...USA Mexico Kerkrade The Netherlands 9 OVERVIEW INCLUDED ITEMS 1X Active subwoofer with built in mixer 8 driver 1X Speaker Column speaker array with 6x 2 75 drivers 1X Riser Support Column 1X IEC Powe...

Page 10: ...Avante Los Angeles Ca USA Mexico Kerkrade The Netherlands 10 OVERVIEW 34 3 870mm 31 5 800mm 3 8 96mm 3 8 96mm 13 330mm 13 4 340mm 16 3 413mm 13 8 350mm 16 9 430mm RISER SUPPORT COLUMN SPEAKER COLUMN...

Page 11: ...ocation and ensure that the speaker is stable Make sure the POWER switch is OFF Make certain INPUT GAIN 1 INPUT GAIN 2 and MASTER VOLUME are down Set EQUILIZER knobs to center 12 o clock Insert the Ri...

Page 12: ...f the AS8s Power ON the AS8 Slowly turn INPUT 1 CH1 GAIN INPUT 2 CH2 GAIN and INPUT 3 CH3 GAIN to the desired levels POWER CLIP LED AND PROPER LEVELS This LED on the AS8 should normally be green when...

Page 13: ...f it s not listed push and release the PAIR play pause button on your AS8 Once you do see AVANTE AS8 on the list select it and your source device and your AS8 will pair while the AS8 plays a chime and...

Page 14: ...L S 10 IEC POWER INPUT The IEC AC cable plug inserts into this jack 11 FUSE The power must be turned off and device disconnected from mains before replacing the fuse Only use a fuse with the same rat...

Page 15: ...EXCEED THE MAX POWER OUTPUT ON THIS SPEAKER CHECK SILK SCREEN ON SPEAKER FOR MAX AMPS WARNING The safety and suitability of any lifting equipment installation location platform anchoring rigging moun...

Page 16: ...Avante Los Angeles Ca USA Mexico Kerkrade The Netherlands 16 FREQUENCY CHART...

Page 17: ...ly paired is your source device still active not asleep or out of battery power and audio with its output level control set appropriately Distortion Noise in the Audio Signal Low Output Level You will...

Page 18: ...e 55 200Hz Max output SPL 116dB at max amp output Impedance 4 Ohm Driver 8 subwoofer 1 5 vc 28Oz Cabinet PP plastic Grill 1 0mm steel Satellite Passive full range speaker Frequency response 180 20kHz...

Page 19: ...Avante Los Angeles Ca USA Mexico Kerkrade The Netherlands 19 Intentionally Blank...

Page 20: ......

Reviews: