3
Set the DIP switches on the 4208U as instructed below (see
Figure 1):
1. Select fast/slow response for loops A and B using DIP
Switch 1: Fast = OFF (10msec) Slow = ON (400msec).
2. Select mode of operation (serial number or zone
assignment mode) using DIP Switch 6: Serial Number
mode = ON Zone Assignment mode = OFF.
3. Select the group setting using DIP Switches 2, 3, 4, and
5. See Table 1 for zone assignments or Table 2 for
serial number assignments. If using more than one
4208U, be sure to set each one to a different group
setting.
4. DIP Switch 7: Not used, set to OFF.
5. Select the 4208U Tamper Protection setting using DIP
Switch 8: Tamper Disabled = ON Tamper Enabled =
OFF. Tamper will report for every active zone on the
4208U module.
PROGRAMMING
When setting the 4208U to a group of zone numbers, each
zone must be programmed as follows:
•
On 4140XMP and earlier controls, these zones must be
programmed as Left Loop Polling Loop Zones.
•
On VISTA-40 and later controls, these zones must be
programmed in the #93 Menu Mode Zone Programming
as INPUT TYPE “7” -- DIP Switch type polling device
(DP).
When setting the 4208U to a group of serial numbers, each
zone must be programmed as INPUT TYPE “6” --SL (Serial
Number Polling Loop Device). Loops can be learned in any
order and assigned to any legitimate zone number.
When prompted to learn the serial number for a particular
zone, you may either enter it manually through the keypad
or through V-Link, or “learn” it by momentarily faulting
(shorting) the terminals of that zone as required by the
control. If entering a serial number manually through the
keypad, enter it and press “*” to advance to the next
prompt, which will ask you for the loop number. Entering a
“1” for each serial number entered.
If learning or entering a serial number, “Duplicate of Zone
XX”
Duplicate of Zone XX” is displayed; another device with that
same serial number is already in the system. In that case,
use a different serial number group setting on the 4208U.
If learning a serial number by faulting
its associated loop, make sure that
other polling loop devices are not
activated, as they may interfere with
the device being learned.
VERIFICATION OF PROGRAMMING
To verify proper programming, the following test should be
performed:
1. Be sure to enable expansion zone tamper protection at
the control (program field *24 = 0).
2. Set DIP Switch 8 to OFF (tamper enabled).
3. Replace the 4208U cover and clear the keypad of any
faulted zones.
4. Remove the 4208U’s cover and verify (on the keypad)
that only the zones you designated for this 4208U are
indicating a check (or trouble) condition.
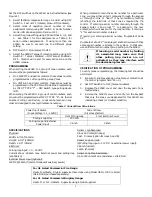
Table 3. Current Draw Calculations
Power Input Source
(Input Voltage: 11 – 14VDC)
Current Draw
(All zones shorted)
From Polling Loop
From External Power
Polling Loop Only
27.3 mA
Polling Loop and External
Power Input
0.6
mA 28
mA
SPECIFICATIONS
Physical:
Width: 6-7/16”(163mm)
Height: 4-1/4” (108mm)
Depth: 1-1/4” (32mm)
Electrical:
Polling loop input: 7.3 – 14 VDC
Current draw: 28.6mA max. External power and polling loop
(see Table 3)
External Power Input (optional):
12VDC @ 28mA (from control panel’s auxiliary power)
Sensor Loop Response:
Slow: 400 msec (all loops)
Fast: 10 msec (option for loops A and B)
Sensor Loop Current:
(@ Polling loop input = 11 VDC, no external power input):
0.52mA (normal)
1.3mA (shorted)
Sensor Loop Max. Resistance:
Up to 300 ohms of wire resi 10k EOLR.
For UL Listed Commercial Fire Usage:
Use N.O. contacts. Style B supervise these loops using Model # EOL 100 fire listed
10k EOLRs (purchased separately).
For UL Listed Commercial Burglary Usage:
Use N.O. or N.C. contacts. Supervise using EOLRs supplied.


