background image

How to Configure Raid 
 
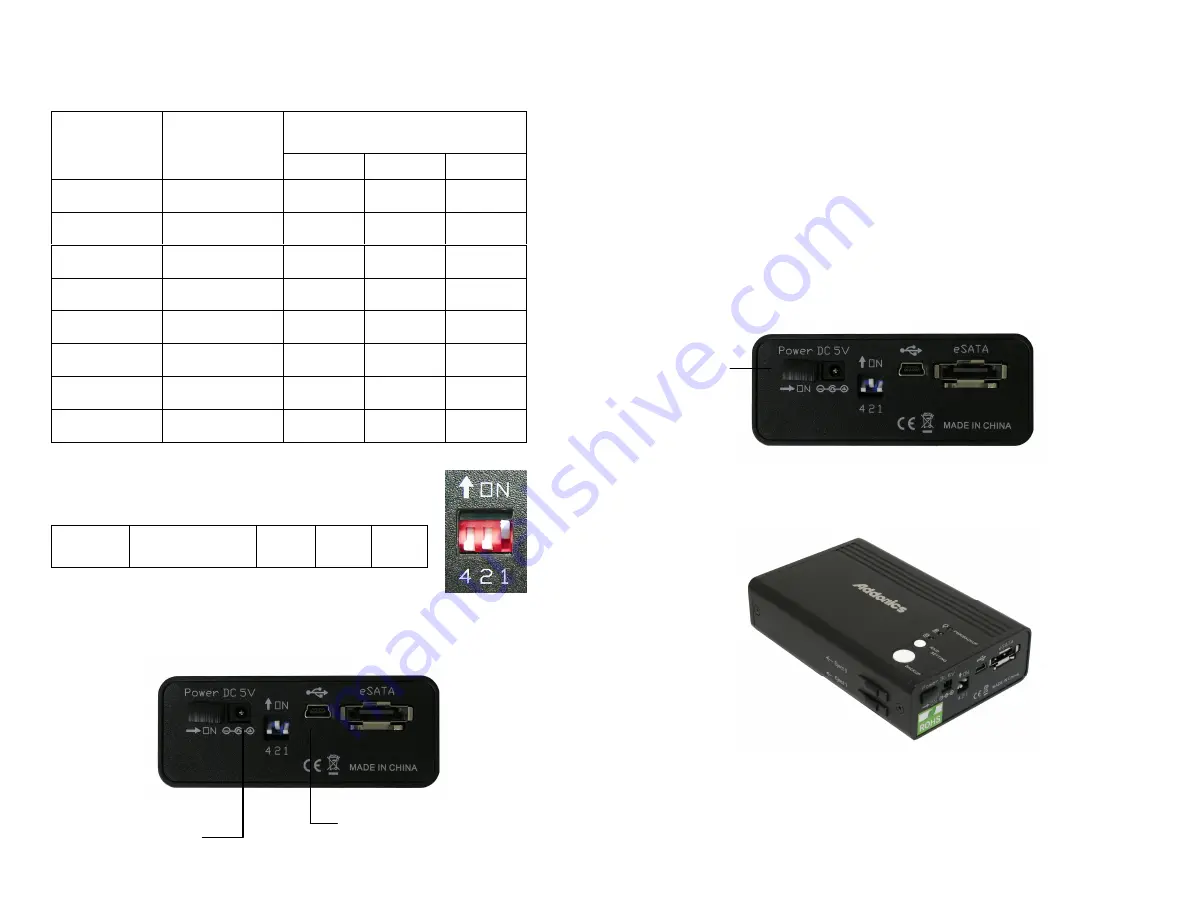
Raid Setting Table 


How to Build Raid JBOD


a. Setup Raid mode JBOD using RAID selection switch 


b. 

USB Connection


Plug in mini USB data cable & USB power cable as shown. 


c. Plug the other end of the mini USB data cable & USB power cable to USB ports 

on your system. 

Note:  

Due to the different layouts of Laptops, we suggest to plug the USB 
cables on opposite sides of the Laptops to avoid weak power from the 
same side USB ports. 
Avoid using the front USB ports of desktop because, sometimes, it is too 
weak to give enough power.  

 
eSATA Connection 

If you are connecting via eSATA, you will have to connect the USB power cable 
or the 110/220V AC/DC 5V power adapter. 
 

Note:  

To see 2 individual drives (JBOD single) using eSATA connection, the 
enclosure must be connected to a port multiplier compatible SATA host 
controller. 

 
d. Turn on the power switch. 


e. Press the “RAID Setting” button once. 
Note:  

Since the default Raid mode may be different from your new Raid mode 
setting, it is

 required

 to press the “RAID Setting” button once before 

using Portable Dual Drive RAID enclosure. 


f. Place the cursor on the My Computer icon on your desktop, do a right click and 

choose “Manage” by clicking mouse left button 

RAID Selection Switch  

Display 

RAID Status 

BIG (span) 

OFF 

OFF 

OFF 

JBOD (single) 

OFF 

OFF 

ON 

FAST (strip) 

OFF 

ON 

OFF 

SAFE (mirror) 

OFF 

ON 

ON 

SAFE33 

ON 

OFF 

OFF 

SAFE50 

ON 

OFF 

ON 

RESERVED 

ON 

ON 

OFF 

GUI ONLY 

ON 

ON 

ON 


JBOD (single) 


OFF 


OFF 


ON 

USB Data Cable


USB Power 
Cable


Power Switch


Summary of Contents for AE25RDESU

Page 1: ...f the equipment does cause harmful interference to radio or television reception which can be determined by turning the equipment on and off the user is encouraged to try and correct the interference...

Page 2: ...e 2 Detach the front door of the enclosure 3 Slide the 2 5 SATA hard disk into the drive bay 4 Make sure that the SATA drives are seated correctly on the SATA connectors of the enclosure 5 Screw back...

Page 3: ...0V AC DC 5V power adapter Note To see 2 individual drives JBOD single using eSATA connection the enclosure must be connected to a port multiplier compatible SATA host controller d Turn on the power sw...

Page 4: ...lect Disk Management h Disk Management shows the hard disks that are Unallocated i Place cursor on Disk 1 do a right click then select Initialize Disk j Press OK k Refer to steps i j to initialize Dis...

Page 5: ...Hard disks will become Online m Place cursor on Unallocated portion and select New Partition n Choose Next o Choose Next again p Set up partition size and click Next q Tick Quick format and click Nex...

Page 6: ...agement shows system is Formatting t When format is finish it shows the drive as Healthy u Format the other hard disk by referring to steps m r v When the drive has been formatted My Computer will sho...

Page 7: ...id SAFE50 Set the DIP switch as following and Refer to Step b v to build the Raid SAFE50 mode This time you can see 2 hard disks one is mirror hard disk and the other BIG See following two pictures To...

Page 8: ...to proceed the back up F LED PWR Back up does not light on F 1 It means the hard drive has problem under Safe Mirror Mode G When powering on you can hear the clicker sound G 1 That means you have not...

Reviews: