background image

AdderView MATRIX MP

Installation and Use

Page 68

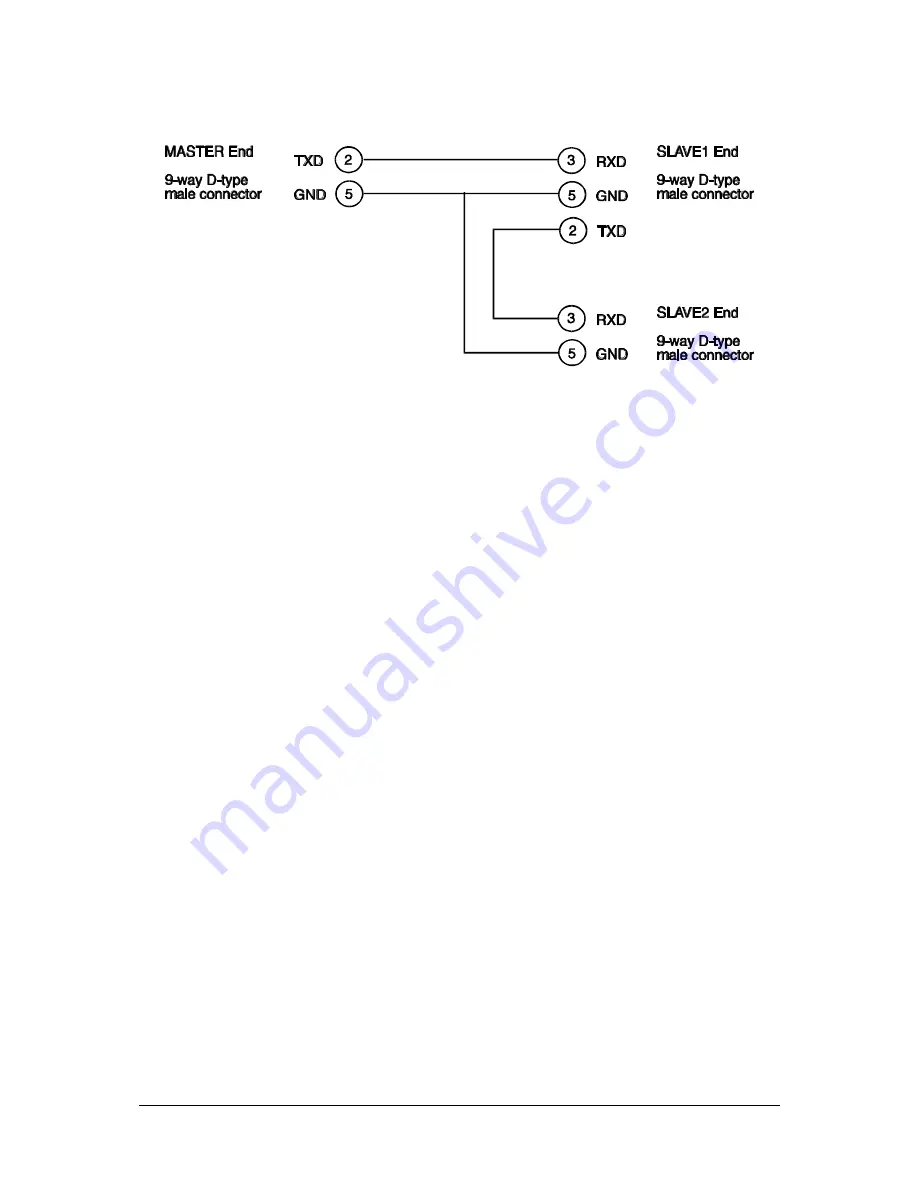
The pinout for a “daisy chain” RS232 cable for more than 2 units is shown below:

6.2 Logging access activity

By connecting the AdderView’s serial port to a computer, a time stamped log of the
AdderView’s activity can be generated. This is useful for applications where it is
necessary to keep track of which users have accessed which computers. A simple
data logging program may be downloaded from the Adder Technology website
(XPLOG.EXE). This enables the activity log to be saved to a file or printed to a
printer. This logging program uses the Excel-compatible file XPRODATA.CSV (that
may be downloaded from the AdderView – see section 4.2) to cross reference the
port and user information to computer and user names in order to generate an
informative activity log.

To make use of the activity logging features:

1.


Download the program XPLOG.EXE from the support section of the Adder
Technology website (www.adder.com).

2.


Follow the instructions in section 4.2 to create the Excel compatible file
XPRODATA.CSV that contains a list of user and computer names and port
numbers.

3.


Copy the XPRODATA.CSV file into the same directory as the XPLOG.EXE file.

4.


Run the XPLOG file using the following command format:

XPLOG  {activity_log_destination}  {com_port}

Summary of Contents for AdderView Matrix AVM208MP

Page 1: ...tion and Use Part Model AVM208MP AdderView Matrix 2 user ports and 8 computer ports AVM216MP AdderView Matrix 2 user ports and 16 computer ports Intelligent Server Management An electronic version of...

Page 2: ...live parts contained within power adapter No user serviceable parts within power adapter do not dismantle Plug the power adapter into a socket outlet close to the AdderView MATRIX MP Replace the power...

Page 3: ...orrect the interference with one or more of the following measures a Reorient or relocate the receiving antenna b Increase the separation between the equipment and the receiver c Connect the equipment...

Page 4: ...your devices 14 2 4 Configuring your PCs 16 2 5 Structuring your AdderView MATRIX MP installation 17 2 6 Maximising the video quality 21 2 7 Other useful installation information 22 2 8 Hot plugging...

Page 5: ...12 Setting the USER PREFERENCES 52 4 13 Using the FUNCTIONS menu 53 4 14 Querying the routing status 54 4 15 Cascading AdderViews 54 4 16 Resetting user port keyboards and mice 55 4 17 Using the Adde...

Page 6: ...le Sun computers USB style keyboards and mice are available for all the different styles of computer that may be controlled and so the AdderView MATRIX MP supports USB devices to enable you to use you...

Page 7: ...KVM console usually consists of a keyboard monitor and mouse although sometimes only a keyboard and monitor may be used Devices such as the AdderView MATRIX MP are generally known as KVM sharers or KV...

Page 8: ...bandwidth monitors at resolutions up to 1920 x 1440 Fully flash upgradeable via the serial port Supports a very wide range of software including Windows 3 X WFWG 95 98 2000 NT ME XP DOS Unix Linux Ne...

Page 9: ...an be cascaded to a depth of four levels to provide a video switching network Automatically restores keyboard and mouse states when channel changed Supports PC keyboard modes 1 2 and 3 and PC mouse pr...

Page 10: ...bber feet A CD ROM containing this manual in PDF format 1 3 AdderView MATRIX MP rackmount kit for model 208 part code RMK1 2 x mounting brackets for fixing the unit into a 19 inch rack 4 x screws for...

Page 11: ...AdderView MATRIX MP Installation and Use Page 10 1 5 Product information Fig 1 AdderView MATRIX MP 208 and 216 models viewed from the front...

Page 12: ...AdderView MATRIX MP Installation and Use Page 11 Fig 2 AdderView MATRIX MP 208 and 216 models viewed from the rear...

Page 13: ...keyboard and a wheel mouse on one user port and a smaller monitor with a basic mouse and keyboard on another The AdderView MATRIX MP intelligently handles these mixtures of devices 2 1 What you will n...

Page 14: ...rt code VSA1 If you have a PC with an older style RS232 mouse connection then you will need an adapter to convert this to the 6 pin mini DIN format There are several specifications of these adapters t...

Page 15: ...to fit the rack mounting brackets to the side of the AdderView 2 3 Connecting your devices Ensure that the power is disconnected from the AdderView and all devices which are to be attached Connect any...

Page 16: ...Cs with serial mouse connections and AT style keyboard connections use the PC cable together with the adapters specified in appendix A If you have an existing 6 pin mini DIN to 9 pin serial adapter th...

Page 17: ...en power on the monitor and each of the computers in turn Failure to switch the AdderView and computers on in the correct order can lead to the mouse and or keyboard not being recognised by the comput...

Page 18: ...s so that it is able to positively verify that all the cascaded AdderViews have correctly responded to a switching request from the user The AdderViews communicate with each other via the keyboard cab...

Page 19: ...Keep all cascade cables as short as possible The video quality is maximised by using the shortest possible total cable run from computer to KVM If you are making multiple cascade links then ensure tha...

Page 20: ...AdderView MATRIX MP Installation and Use Page 19 The following diagrams show some typical AdderView MATRIX MP installations Fig 4 A typical installation using a single AdderView MATRIX MP 208...

Page 21: ...AdderView MATRIX MP Installation and Use Page 20 Fig 5 A cascaded application using multiple AdderView MATRIX units...

Page 22: ...appalling with smudging ghosting and loss of focus Cables that are designed to carry video signals are constructed using three separate co axial cores to carry the red green and blue signals These co...

Page 23: ...t and you will have to re boot the PC to regain normal operation RS232 mice can usually be unplugged and plugged back in provided that a mouse was connected when the operating system initially booted...

Page 24: ...and the type of mouse that was connected when the driver was booted The following table may be used as a guide Note that the mouse reset functions predict the likely mouse resolution settings but may...

Page 25: ...ep 1 Decide if you are going to use password security The AdderView may be run with security enabled or disabled With security disabled all user ports have full access to all of the computers and full...

Page 26: ...ight digit port number depending on the number of cascade levels that have been connected see section 4 10 for details The AdderView supports up to 512 computer names although special versions are ava...

Page 27: ...esses the system via a special user named ADMIN This profile may not be altered or deleted from the system and has full access rights to all computers and system parameters Consequently it is advisabl...

Page 28: ...the menu bar to select the user that you want to edit Press ENTER or RETURN to edit the user s name password and access rights Press RETURN or ENTER if you want to keep the existing entries 3 5 Creat...

Page 29: ...The starred users will have access to this computer Don t worry if all the users have not yet been defined You can allocate computers to users when you add the users later Press RETURN or ENTER to cr...

Page 30: ...umber that the computer is attached to Port numbers for computers connected to cascaded AdderViews are constructed by defining the port routing that is required to get from the user s KVM to the compu...

Page 31: ...AdderView MATRIX MP Installation and Use Page 30 Fig 6 Creating menu entries for computers that are connected to cascaded AdderViews...

Page 32: ...er than to individual users These may only be setup or changed by the system administrator logged in using the ADMIN account From the main menu press F1 for MORE MENUS Use the cursor keys to position...

Page 33: ...oard is assumed to have a QWERTY format The new language settings are enabled when you quit from the SETUP OPTIONS menu The language option only affects the way that the AdderView interprets the keybo...

Page 34: ...iew detects an active user by looking for keyboard and mouse data A user becomes inactive if no keyboard or mouse data has been received by the AdderView for a specified timeout period Whilst one user...

Page 35: ...rom menu SETUP OPTIONS Settings AUTOMATIC MANUAL DISABLED Some computers query the keyboard to find out its country code and key layout These computers use this information to configure the way that t...

Page 36: ...st Adder Technology KVM switches the AdderView MATRIX MP s channel may be switched using a three button mouse or IntelliMouse see section 4 9 Pressing the central button or wheel button together with...

Page 37: ...ve computers avoids blank screens from being displayed and stops the monitor from going into a power down state on every scan cycle WARNING Many modern monitors are fitted with automatic power save re...

Page 38: ...RENCES Settings 1 2 3 5 10 SECONDS After a successful computer channel change the AdderView will display a confirmation message for a few seconds The length of time that this confirmation message dwel...

Page 39: ...sh than the others that send three byte mouse reports RS232 mice are almost always more sluggish than PS 2 types because the data rate is much slower 3 6 15 Mouse Type Accessed from menu GLOBAL PREFER...

Page 40: ...4 2 Power supply connections and indicators Plug the power adapter into the power inlet The power indicator on the front of the AdderView see figure 1 monitors the voltage that is being supplied to th...

Page 41: ...r port is defined by the way that the AdderView MATRIX MP is configured There are two special computer ports that may be selected using the COMPUTER key switch These are the on screen menu port o and...

Page 42: ...isplay shows the user port number that your keyboard and mouse are connected to Then press the COMPUTER key until the red COMPUTER display shows the computer that you wish to connect to Pressing the c...

Page 43: ...access to computer ports 1 3 and 7 Action of the COMPUTER key if the front panel controls have been disable 4 7 Logging on to the AdderView MATRIX MP If password security has been set on the system t...

Page 44: ...ease the hotkeys and the command key before a new hotkey command is accepted by the AdderView HOTKEYs TAB is an exception and this allows you to tab through the ports by holding down the hotkeys and r...

Page 45: ...lects the next available channel HOTKEYs and M displays the on screen menu for selecting computers by name this is the recommended way of selecting computers for systems with more than 4 computers HOT...

Page 46: ...aded AdderView and port 16 on the last AdderView Examples of common hotkey sequences assuming CTRL ALT hotkey option To select channel 2 press ba ba2 2 release 2 2ba ba To tab through channels press b...

Page 47: ...en the AdderView will select the next available channel otherwise it will select the next numerical channel Mouse switching may be enabled or disabled see section 3 6 8 When mouse switching is disable...

Page 48: ...default hotkeys CTRL ALT the key combination to launch the on screen menu would be press ba baM M release Mba Mba You may also use a 3 button mouse or wheel mouse to launch the on screen menu if you...

Page 49: ...a computer place the menu bar over the computer name using a combination of the up and down cursor keys and the page up page down keys You may also use the wheel on a wheel mouse to move the menu bar...

Page 50: ...j jf f When a computer is selected in EXCLUSIVE mode the computer s video picture will only be displayed on the KVM console that has exclusive access Other KVM consoles will not be able to access the...

Page 51: ...ether with the CTRL key on the keyboard If you have many connected computers then you can do an alphabetic search of the list of computer names by pressing F3 and then entering the name that you want...

Page 52: ...and so this banner serves as a useful reminder of which computer you are working on The colour and transparency of the banner can be selected to make it as discreet as possible It may also be moved ar...

Page 53: ...he option as required Press ESC to quit and save the changes 4 12 1 OSD COLOUR Accessed from menu USER PREFERENCES Settings DEFAULT SCHEME 1 SCHEME 2 As you toggle between these options you will see t...

Page 54: ...you select MOVING DOT then a moving dot will be displayed on a blank background The dot regularly changes colour and bounces off the sides of the screen in a zigzag pattern 4 13 Using the FUNCTIONS me...

Page 55: ...uter you may wish to know if another KVM console has exclusive use of this computer and consequently is preventing your access To query the routing status press F1 from the main on screen menu and the...

Page 56: ...the cabling is working as expected To do this you can use a hotkey sequence similar to the example shown below For example to connect to port 14 on a AdderView MATRIX MP that is cascaded off port 1 of...

Page 57: ...t and return the AdderView to its factory default state 1 Power on the AdderView normally 2 Whilst the AdderView is powered on move switch 2 on the rear panel of the AdderView labelled UPGRADE to the...

Page 58: ...ions given by the program 4 Make sure that you are logged onto the AdderView as the ADMIN user From the main selection screen press F1 for More Menus In the Configuration Menu select Functions In the...

Page 59: ...s connected to the AdderView s serial port 3 Run the program AVMWRITE EXE and follow the instructions given by the program 4 Make sure that you are logged onto the AdderView as the ADMIN user From the...

Page 60: ...xadecimal code 71 switches user port 1 to computer port 0 off Hexadecimal code 72 switches user port 2 to computer port 0 off The 9 pin female RS232 connector at the rear of the AdderView has the foll...

Page 61: ...yboard keyboard Left Ctrl Left Control Left Control Left Win Start Left Diamond Left Command Left Alt Left Alt Left Option alt Right Alt or Alt Graph Alt Graph Right Option alt Right Win Start Right D...

Page 62: ...on 4 10 and then press F1 The version number of the current firmware will then be displayed at the bottom of the Configuration Menu To perform a firmware upgrade on your AdderView MATRIX MP you will n...

Page 63: ...tical servers should be switched off or disconnected before performing an upgrade Step 2 Connect your computer to the AdderView MATRIX MP Connect your computer s serial port COM1 or COM2 to the AdderV...

Page 64: ...le from the Adder Technology website at www adder com The upgrade files will be supplied to you as a group and consist of several files as explained below These files should be downloaded to the same...

Page 65: ...ou want to upgrade to version 1 30 then the DAT file that you need would be named M216V130 DAT Also check that all the required files are loaded into the same directory on your computer From that dire...

Page 66: ...perate It is therefore good practice to ensure that the upgrade process is always fully completed A partial or failed upgrade may be rectified by performing another upgrade If the upgrade process is i...

Page 67: ...n RS232 command out on its serial interface The AdderView switches its channel if it receives the same command on its serial interface Consequently by linking the serial interfaces a master unit may b...

Page 68: ...AdderView MATRIX MP Installation and Use Page 67 Synchronised AdderViews used for a dual head video switching application The pinout of the RS232 synchronisation cable is as shown below...

Page 69: ...ted to a printer This logging program uses the Excel compatible file XPRODATA CSV that may be downloaded from the AdderView see section 4 2 to cross reference the port and user information to computer...

Page 70: ...ceived on COM1 to the file datalog txt XPLOG PRINT 2 would print activity information received on COM2 to the printer attached to the computer s LPT1 printer port These programs will run continuously...

Page 71: ...oard monitor and mouse to AdderView MATRIX MP All of the shared devices plug directly into the relevant ports at the rear of the AdderView MATRIX MP Cable specification Cables should be no longer than...

Page 72: ...metre VKVM 2M Cable for PC connection PS 2 style 2 metres VKVM 2M AT Cable for PC connection AT style 2 metres VKVM 5M Cable for PC connection PS 2 style 5 metres VKVM 5M AT Cable for PC connection AT...

Page 73: ...computers with 8 pin mini DIN keyboard mouse connectors may be up to 20 metres long If you use an extension cable then this should be added to the MATRIX MP end of the cable Part code Description Len...

Page 74: ...connectors may be up to 20 metres long If you use an extension cable then this should be added to the MATRIX MP end of the cable as the USB end can only be extended by up to 5 mertres Part code Descri...

Page 75: ...erial mouse connection Cables should be no longer than 30 metres NOTE There are several common wiring specifications for 6 pin mini DIN to 9 pin serial adapters If you have an adapter that has been su...

Page 76: ...a 5 pin DIN AT style keyboard connector you will need a PS 2 to AT keyboard adapter 6 pin mini DIN female to 5 pin DIN male VSA7 video adapter If your Sun computer has a 13W3 video connector then you...

Page 77: ...Appendix B Problem Solving Problem Poor video quality with smearing fuzziness or ripple Action Use screened coaxial video cables to connect your devices to the AdderView For more help with problems vi...

Page 78: ...AdderView MATRIX MP Installation and Use Page 77 Notes...

Page 79: ...AdderView MATRIX MP Installation and Use Page 78 Notes...

Page 80: ...www adder com www adder com AdderView AdderView MATRIX MP MATRIX MP Installation Use...

Reviews: