background image

April 2015

NOTE

 - If the blade transmission belt slips, the correct tension can be achieved (This can be seen 

when the rotation of the cutting blade can be stopped while cutting). Please see the following: 
1.  Approach the regulating components on the bottom.
2.  Loosen the bolt on the tension belt screws then turn the screws in a clockwise direction to 

achieve correct tension of the belt.

3.  Tighten the bolt on the screws.

BLADE SHARPENING


Note - The blade is highly resistant, normally needing to be sharpened about once a year when used 
regularly.  Should the blade become blunt or dull, please see the following:  
1.  Unplug the unit.
2.  Check that the gauge plate is closed (graduated knob in position “0”).
3.  Carefully clean the part of the blade sharpened.
4.  Reinsert the plug.
5.  Loosen the locking knob on the sharpener group.
6.  Raise the sharpener, turning it by 140 degrees so that both grinding wheels are in working      

position.

7.  Lower the sharpener group until it locks.  During this procedure, press button to bring the   

sharpening wheel into contact with the cutting edge of the blade.

8.  Secure the group by turning the locking knob.
9.  Set the gauge plate by turning the graduated knob to no. 2.
10. Switch on, letting the blade turn for 1-2 minutes.  When the blade is still, check to see if any burr 

has formed on the edge.

11. After having verified the presence of burr, switch on and gently press button for about 3 sec-

onds to remove the burr produced during sharpening in (in this last phase both grinding wheels 
should be working).

12. Turn the graduated knob back to position “0”.
13. After sharpening, move the sharpener back to its original position, clean the edge of the blade 

and the grinding wheels with alcohol.

14. After several sharpening operations, the grinding wheels should be cleaned with a brush to       

remove traces of alcohol.

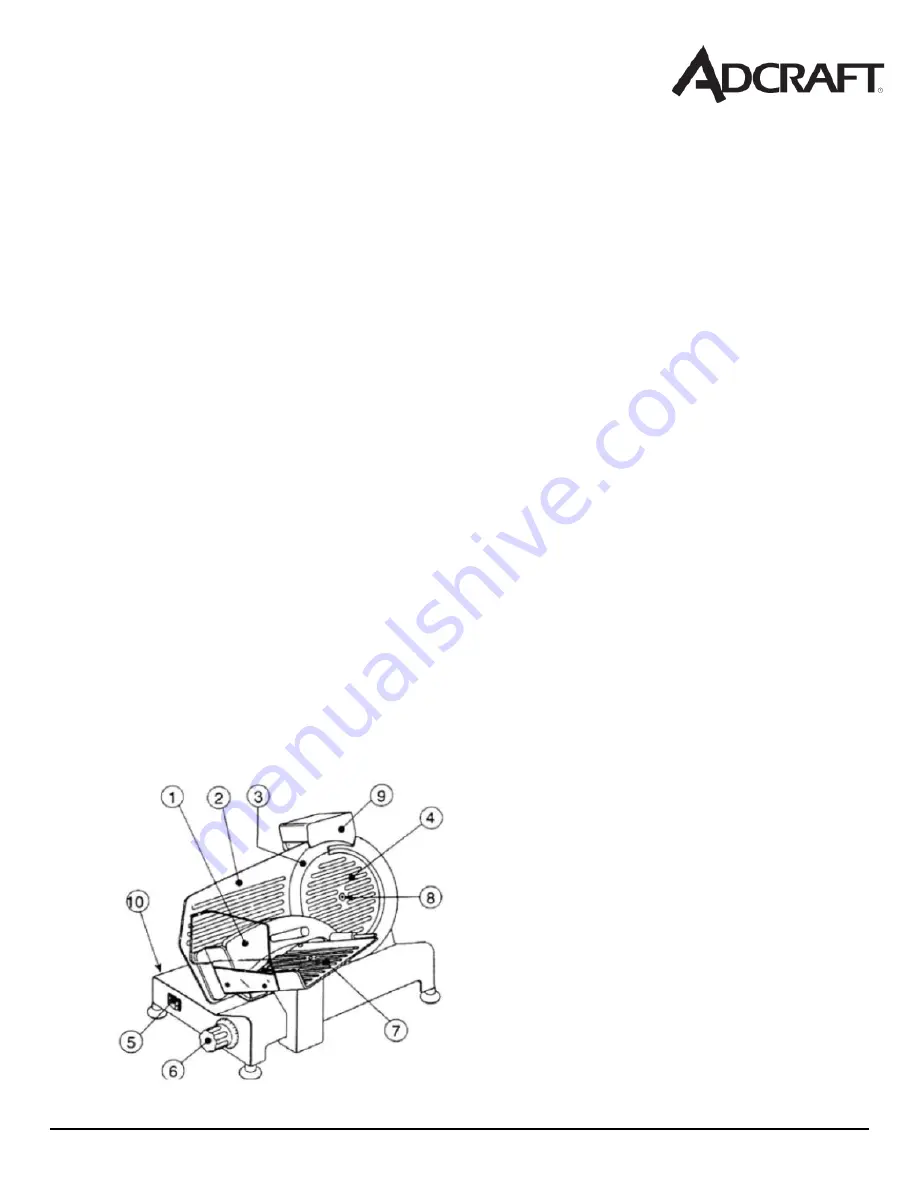
1. Food holder
2. Gauge Plate
3. Blade
4. Blade Guard
5. On/Off Switch
6. Graduated Knob
7. Carriage
8.  Blade Guard Bolt
9. Sharpener
10. Body

Summary of Contents for SL250ES-10

Page 1: ...r Adcraft unit Please read this manual thoroughly prior to equipment set up operation and maintenance Failure to comply with regular maintenance guidelines outlined in this manual may void the warranty INSTRUCTION MANUAL SL250ES 10 10 MEAT SLICER 1 4 HP 120V ...

Page 2: ...or stops automatically at this point the machine must be turned off Check that the warning light is turned off Give the motor time to cool down before using again TO USE 1 Unwrap and place machine with the On Off switch so that it is in front of the operator 2 Regulate the thickness of the slice desired by turning the graduated knob 3 Switch on to activate the blade 4 Place the food to be sliced o...

Page 3: ... grinding wheels are in working position 7 Lower the sharpener group until it locks During this procedure press button to bring the sharpening wheel into contact with the cutting edge of the blade 8 Secure the group by turning the locking knob 9 Set the gauge plate by turning the graduated knob to no 2 10 Switch on letting the blade turn for 1 2 minutes When the blade is still check to see if any ...

Page 4: ......

Page 5: ...April 2015 Parts Diagram and Replacement Parts for the Meat Slicer SL250ES 10 ...

Page 6: ... Diagram Description 41 Motherboard 42 Meat scraper 43 Sharpener Mulch 44 Sharpener Base of Subassembly 45 Sharpener Base of Assembled 46 Button of Sharpener 47 Fine Grinding Wheel 45 48 Crude Grinding Wheel 45 49 Pin of Rubbingstone 50 Spring 51 Pin of Sharpener Bracket 52 Sharpener Tighten Knob 53 Active Clapboard Mandril 54 Rubber Foot 55 Pin of Blade Guarding Ring 56 Tray Finger Plate Guard 57...

Page 7: ...rranty Equipment failure relating to improper installation improper utility connection or supply and problems due to improper ventilation Equipment that has not properly been maintained damage from improper cleaning and water damage to controls Equipment that has not been used in an appropriate manner or has been subject to misuse neglect abuse accident alteration negligence damage during transit ...

Reviews: