background image

150-712-200-02

Appendix A - Technical Reference

HRE-712 List 1 and List 2

July 26, 2000

 25

The stub pairs connect to the 12 shelf slots as shown in 

Table 2 on page 24

. The HRE-712 is wired in a typical 

mini-repeater fashion and follows Side 1 and Side 2 terminology. The terminology adheres to conventional T1 
terminology, which describes a unidirectional (simplex) service. HDSL is a bidirectional (duplex) service. The 
wiring from the cable stub entry to the card cage connectors and to the order wire connector is factory installed. 
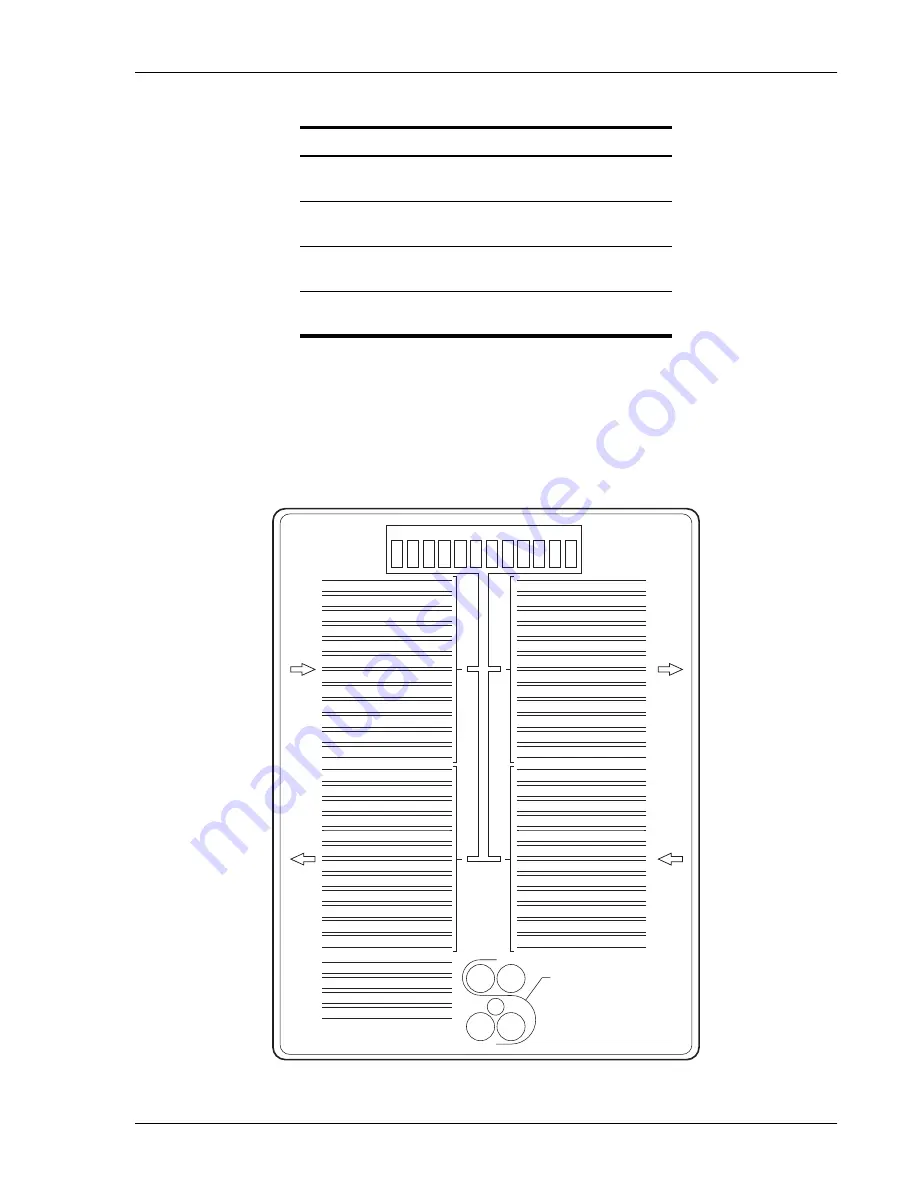
The HRE-712 can be used to house HiGain doublers, ISDN, DDS, or 239 repeaters. The wiring diagram described 
in 

Table 2 on page 24

 has been made into a gummed label, shown in 

Figure 9

, that is attached to the inside of the 

stainless steel dome for easy reference.

Figure 9.

Wiring Diagram Gummed Label

Table 3.

Inner Statial Pair Cable Stub Wire Assignment

Pair ID

Pair

Wire

Order Wire

BL-W

BL

W

Spare

O-W

O

W

Spare

G-W

G

W

Spare

BR-W

BR

W

1

2

3

4

5

HRE-712

6

7

8

9 10 11 12

CENTRAL OFFICE

SIDE 1

(IN)

SIDE 2

(OUT)

BLUE

GROUP

BLUE

GROUP

BROWN

GROUP

IS

GROUP

ORDER WIRE

BLUE/WHT

SPARE

ORANGE/WHT

SPARE

GREEN/WHT

SPARE

BROWN/WHT

BROWN

GROUP

FIELD

CABLE STUB

SIDE 1

(OUT)

SIDE 2

(IN)

ORANGE

GROUP

ORANGE

GROUP

IS

G

GREEN
GROUP

GREEN
GROUP

SCREEN

SLOT 1

SLOT 2

SLOT 3

SLOT 4

SLOT 5

SLOT 6

SLOT 7

SLOT 8

SLOT 9

SLOT 10

SLOT 11

SLOT 12

BLUE/WHITE

ORANGE/WHITE

GREEN/WHITE

BROWN/WHITE

SLATE/WHITE

BLUE/RED

ORANGE/RED

GREEN/RED

BROWN/RED

SLATE/RED

BLUE/BLACK

ORANGE/BLACK

SLOT 1

SLOT 2

SLOT 3

SLOT 4

SLOT 5

SLOT 6

SLOT 7

SLOT 8

SLOT 9

SLOT 10

SLOT 11

SLOT 12

BLUE/WHITE

ORANGE/WHITE

GREEN/WHITE

BROWN/WHITE

SLATE/WHITE

BLUE/RED

ORANGE/RED

GREEN/RED

BROWN/RED

SLATE/RED

BLUE/BLACK

ORANGE/BLACK

SLOT 1

SLOT 2

SLOT 3

SLOT 4

SLOT 5

SLOT 6

SLOT 7

SLOT 8

SLOT 9

SLOT 10

SLOT 11

SLOT 12

BLUE/WHITE

ORANGE/WHITE

GREEN/WHITE

BROWN/WHITE

SLATE/WHITE

BLUE/RED

ORANGE/RED

GREEN/RED

BROWN/RED

SLATE/RED

BLUE/BLACK

ORANGE/BLACK

SLOT 1

SLOT 2

SLOT 3

SLOT 4

SLOT 5

SLOT 6

SLOT 7

SLOT 8

SLOT 9

SLOT 10

SLOT 11

SLOT 12

BLUE/WHITE

ORANGE/WHITE

GREEN/WHITE

BROWN/WHITE

SLATE/WHITE

BLUE/RED

ORANGE/RED

GREEN/RED

BROWN/RED

SLATE/RED

BLUE/BLACK

ORANGE/BLACK

Summary of Contents for 150-2257-01

Page 1: ...HIGAIN REMOTE ENCLOSURES USER MANUAL HRE 712 List 1 Part Number 150 2257 01 CLEI Code T1M1XL0C HRE 712 List 2 Part Number 150 2257 02 CLEI Code T1M1YL0C HRE 712 List 1 HRE 712 List 2 ...

Page 2: ... only and may be trademarks or registered trademarks of their respective companies Information contained in this document is company private ADC DSL Systems Inc and shall not be modified used copied reproduced or disclosed in whole or in part without the written consent of ADC DSL Systems Inc Information furnished by ADC DSL Systems Inc is believed to be accurate and reliable However no responsibi...

Page 3: ...r and inspect the contents for signs of damage If the equipment has been damaged in transit immediately report the extent of damage to the transportation company and to ADC DSL Systems Inc Order replacement equipment if necessary Check the packing list to ensure complete and accurate shipment of each listed item If the shipment is short or irregular contact ADC DSL Systems Inc as described in Appe...

Page 4: ...Inspecting Shipment 150 712 200 02 iv July 26 2000 HRE 712 List 1 and List 2 ...

Page 5: ...ng the HRE 712 List 1 10 Mounting the HRE 712 List 2 11 Flat Surface Mounting the HRE 712 List 2 11 Rack Mounting the HRE 712 List 2 12 Grounding the HRE 712 List 1 and List 2 13 Installing Doubler and Repeater Units 15 Detaching the Enclosure from the Baseplate 15 Opening the Enclosure 16 Opening a Gel filled Enclosure 16 Opening an Air filled Enclosure 16 Closing the Enclosure 17 Pivoting the HR...

Page 6: ...6 Replacing the Air Stem Valve 36 Replacing the Pressure Cutoff Valve 37 Appendix B Specifications ____________________________________________________________ 38 Appendix C Product Support _________________________________________________________ 41 Appendix D Abbreviations ___________________________________________________________ 42 Certification and Warranty __________________________________...

Page 7: ...nting Bracket 7 5 Base Plate Mounting Bracket 12 6 Grounding the HRE 712 14 7 Front View of HRE 712 12 slot Card Cage 19 8 Lightning Protection Unit 20 9 Wiring Diagram Gummed Label 25 10 Cable Stub Construction 28 11 Dress Splice in Splice Case 30 12 Post Splicing Procedure 31 13 Screen Folding Diagram 32 14 HRE 712 List 1 Bar Code and P1 Label Locations 39 15 HRE 712 List 2 Bar Code and P1 Label...

Page 8: ... and List 2 LIST OF TABLES 1 Slot Pair Assignments 15 2 Binder Group Stub Cable Termination 24 3 Inner Statial Pair Cable Stub Wire Assignment 25 4 Deployment Rules for Doublers and Remote Units 26 5 Replacement Part Kits 34 6 Bar Code and P1 Label Information 40 ...

Page 9: ...ntegrity and provides efficient heat exchange to expel the heat generated within the HRE 712 HRE 712 List 2 has a stainless steel composite baseplate for the HRE 712 List 2 for easy replacement when used as a 4 slot HRE 454 APPLICATIONS The primary application of the HRE 712 is to house HiGain doubler units in an HDSL T1 transmission system It is designed to protect HiGain doubler units from poten...

Page 10: ...external pressure relief valve is included in the shipping kit for the HRE 712 List 1 Use the valve in place of the breather vent assembly when sealing the enclosure for underground applications or when locally pressurizing the HRE 712 List 1 The combined Schrader air stem and External Air Intake T valve shown in Figure 1 has both a Schrader air valve and an air intake port that accepts a tube for...

Page 11: ...ls and stresses expected in standard installations Figure 2 HRE 712 List 2 Remote Air Filled Enclosure The HRE 712 List 2 unit similar to the HRE 712 List 1 contains three metal valves internal air pressure cutoff valve Schrader air stem valve and pressure relief valve The air pressure cutoff valve is used to shut off the inlet air supply that is pumped from the main feeder cable through the 30 fo...

Page 12: ...alve and pin locations An optional breather vent assembly is enclosed in the HRE 712 List 2 shipping kit The kit is a small plastic bag that is attached to the spare pair brown white shrink tab This assembly is used to replace the pressure relief valve when the HRE 712 List 2 is not pressurized The assembly allows the enclosure to breathe and keeps the internal atmosphere free of harmful contamina...

Page 13: ... outlet Adapter Breather adapter Baseplate outer surface Baseplate outer surface Baseplate outer surface Baseplate outer surface Baseplate connection Cap Cap Air stem valve PRV A Pressure Relief Valve PRV B Breather Vent Valve BVV C Air Stem Valve ASV List 2 only D Pressure Cutoff Valve PCV E Air Stem Air Intake T valve List 1 only Air stem valve Valve cap Air intake Baseplate connection Cap F Air...

Page 14: ...rify that all equipment listed on the packing list is present 3 Inspect the enclosure card cage and O ring for shipping damage 4 On the rearbase of the card cage loosen the retaining screws 5 Tilt the card cage on its hinge Lower the card cage to its level position and tighten the screws to lock it in position Always keep the card cage in a level locked position In order to preserve the integrity ...

Page 15: ...o Pedestal or Small Pole Mounting the HRE 712 List 1 on page 8 Pole mounting with a diameter greater than 7 inches 17 78 cm refer to Large Pole Mounting the HRE 712 List 1 on page 9 Flat surface mounting refer to Flat Surface Mounting the HRE 712 List 1 on page 9 Rack mounting refer to Rack Mounting the HRE 712 List 1 on page 10 Figure 4 below shows the mounting brackets Figure 4 Pivot Mounting Br...

Page 16: ...cket must be positioned so the stub will be down Mark the location of the two center mounting holes Remove the mounting bracket 4 Drill two 1 4 inch 0 635 cm diameter holes at the locations marked in Step 3 Each hole should be drilled approximately 3 inches 7 62 cm into the pole 5 Start a lag bolt in the top center bottom mounting hole by tightening the lag bolt into the pole or pedestal approxima...

Page 17: ...o holes on the outside bottom of the mounting bracket Tighten the lag bolts 7 Secure the enclosure bracket to the pole by securely tightening all lag bolts 8 Reattach the enclosure base mounting brackets with the four side plate bolts and torque the mounting bracket bolts 30 to 40 inch pounds 3 4 to 4 5 Newton meters 9 If the cable stub connects to an underground cable dress the cable down the pol...

Page 18: ...t up the wall to the splice case Rack Mounting the HRE 712 List 1 This procedure describes how to mount the enclosure in a rack Have the following equipment ready before you begin this procedure Four 3 8 inch thru bolts for rack mounting Four 3 8 inch nonmetallic washers One wrench To rack mount the enclosure follow these steps 1 Select a location on the cable rack 2 Position the enclosure so that...

Page 19: ... the mounting bracket from the shipping carton 3 Position the mounting bracket against the wall and mark the locations of the four outside mounting holes Remove the mounting bracket 4 Drill four 1 2 inch 13 mm diameter by 21 2 inches 6 4 cm deep holes at the locations marked in Step 3 5 Attach and secure the baseplate to the mounting surface with the four anchor bolts 6 Attach the enclosure to the...

Page 20: ...e on the two mounting rails 2 Attach the baseplate to the mounting rails with the four 5 8 inch 1 6 cm mounting bolts 3 Slide the thru bolts with nonmetallic washers through the outside slots and holes of the mounting bracket shown in Figure 5 Begin tightening the bolts into the mounting holes 4 Dress out the stub and attach it to the main feeder cables as described in Splicing Procedure on page 2...

Page 21: ...main cable shield resistance to manhole ground The resistance must be 5 Ω or less 6 If the resistance requirement in Step 5 is not met ground the main cable shield every 2 000 feet 610m Grounding the stub shield reduces the possibility of EMI interference and stub shield corrosion Both units are shipped with their stub shield connected to the enclosure ground plane through the 8 mil aluminum brade...

Page 22: ...nd List 2 Figure 6 Grounding the HRE 712 No 6 gauge wire No 6 gauge wire Bullet bond Field side CO side Splice case Stub Or Stub Ground lug HRE 712 List 1 Stub 1 CO side of the cable stub Screen divider Aluminum shielded cable with screen divider HRE 712 List 2 ...

Page 23: ... is entirely within the card guide The unit should snap into place indicating that it is properly sealed Table 1 lists slot pair assignments for the doubler and repeater units supported by the HRE 712 DETACHING THE ENCLOSURE FROM THE BASEPLATE To detach either enclosure from the baseplate as shown in Figure 5 on page 12 1 Remove the six baseplate mounting bolts 2 Lift the enclosure Table 1 Slot Pa...

Page 24: ... 5 Close the pressure cutoff valve by rotating the valve clockwise one complete turn This blocks the pressure from the external source Unlock the enclosure Gently push the dome cover back and forth while loosening the cover clamp until the seal is broken and the pressure is released The seal should break well before the cover clamp is loosened enough to allow the cover to separate from the enclosu...

Page 25: ...n cable Verify that the air cutoff valve is off or turned fully clockwise Turn on the pressure from the external source 8 If you are pressurizing an HRE 712 List 2 from the main cable open the air inlet tube by turning the air valve one complete turn counterclockwise Allow the enclosure to pressurize from the main cable through the cutoff stub 9 If you are pressurizing an HRE 712 List 1 which has ...

Page 26: ...eadroom required in manhole installations from 10 inches to less than 3 inches and the amount of valuable air space required for such underground applications To pivot the enclosure from its vertical position 1 Loosen the four bolts that connect the pivot bracket to the enclosure base plate 2 Lift the housing up slightly and pull it out until the top bolts rest against the end of the two pivot bra...

Page 27: ... approximately 45 to allow easy access to the rear of the card cage in case LPU board service is needed Two knobbed retainer screws at the base of the card cage one on each side lock the card cage in its normal level position and prevent it from tilting during severe vibrations The cable stubs shield is grounded to the card cage base through a short braided wire This braided wire should be disconn...

Page 28: ...ds that provide protection from Tip and Ring to ground The ground pin is connected to pin 1 of each slot The gas tube parameters are equivalent to a TII 47 BT The DC breakdown ranges from 300 to 500 volts The tube can withstand at least 400 10 1000 500 amp discharges Although the individual gas tubes are field replaceable components ADC recommends replacing the entire LPU when any of its protector...

Page 29: ...onal information refer to HRE 712 List 2 Air Filled Stub on page 3 The pressure relief valve is not intended to control the pressure that is supplied to the enclosure The external network pressure control system usually located at the front end of the main feeder cable in the servicing CO performs this function The pressure relief valve should be used as a safety device to limit the maximum intern...

Page 30: ...ure conversions 4 Check the threaded hole for debris and clean it if necessary 5 Remove the pressure relief valve from the plastic bag Verify that an O ring is installed on the threaded end of the valve 6 Carefully place the threaded end of the air pressure cutoff valve into the threaded brass fitting from which the breather vent assembly was removed 7 Hold the valve straight and push it into the ...

Page 31: ...e folded back for easy access ORDER WIRE CONNECTIONS The access port for the external order wire pair in each enclosure is connected to its surge protector by the black and white jumper wire The black and white order wire pairs also terminate on this protector This permits access to the order wire without opening the enclosure Unscrew the order wire protective cap to expose the wire terminals as s...

Page 32: ...ORANGE Pair Wire Pin No in Housing Binder Group GREEN Pair Wire Pin No in Housing Binder Group BROWN Pair Wire Pin No in Housing 1 BL BL W BL 5 O BL W BL 3 G BL W BL 11 BR BL W BL 8 W 6 W 4 W 12 W 9 2 BL O W O 5 O O W O 3 G O W O 11 BR O W O 8 W 6 W 4 W 12 W 9 3 BL G W G 5 O G W G 3 G G W G 11 BR G W G 8 W 6 W 4 W 12 W 9 4 BL BR W BR 5 O BR W BR 3 G BR W BR 11 BR BR W BR 8 W 6 W 4 W 12 W 9 5 BL S ...

Page 33: ...E 712 6 7 8 9 10 11 12 CENTRAL OFFICE SIDE 1 IN SIDE 2 OUT BLUE GROUP BLUE GROUP BROWN GROUP IS GROUP ORDER WIRE BLUE WHT SPARE ORANGE WHT SPARE GREEN WHT SPARE BROWN WHT BROWN GROUP FIELD CABLE STUB SIDE 1 OUT SIDE 2 IN ORANGE GROUP ORANGE GROUP IS G GREEN GROUP GREEN GROUP SCREEN SLOT 1 SLOT 2 SLOT 3 SLOT 4 SLOT 5 SLOT 6 SLOT 7 SLOT 8 SLOT 9 SLOT 10 SLOT 11 SLOT 12 BLUE WHITE ORANGE WHITE GREEN ...

Page 34: ...ll solar load the number of full T1 HDU 439 or HDU 437 doublers must be limited to ten per enclosure without full solar load or eight with full solar load The fractional doublers HDU 219 and HDU 217 and the full T1 microdoublers HDU 409 and HDU 407 comply with the TA when all 12 slots are occupied with full solar load The thermal equivalence relationships are 1 HDU 437 439 1 5 HDU 217 219 407 409 ...

Page 35: ...is to make all the spans the same electrical length same 196 kHz loss This minimizes the maximum span loss and ensures the maximum operating margin resulting in optimum transmission performances Use Rule 3 if specific application constraints prevent using Rule 2 or if two different circuit layout choices have the same maximum span loss 3 The third rule minimizes the power consumption and dissipati...

Page 36: ...s into the main cable maintain cable pair integrity by following local practices as required Pre Splicing Procedure Perform the following steps to pre splice the enclosure cable stub 1 Strip a sufficient length of outer jacket aluminum shield and mylar sheath from the cable stub 2 Strip the main cable as required by the cable manufacturer 3 Install shield bonding connectors in accordance with stan...

Page 37: ...lve splicing the cables on the HRE 712 The following section describes splicing procedures and wire list information 1 Splice the cable stub to the main cable using the wire identification information in Table 2 on page 24 2 Visually inspect each splice for split pairs opens and shorts 3 Connect the CO side of the main cable to the CO side of the cable stub with a straight splice as shown in Figur...

Page 38: ...ith aluminum tape as shown in Figure 11 above or dress out the splice according to local procedures 7 Repair or correct defective or wandering pairs before closing the splice These corrections help maintain the validity of the color code sequence of the cable stub in relation to the pair count and main cable 8 Roll back and tape the screen divider from the cable stub 9 Perform any cable tests requ...

Page 39: ...tt shown in Figure 12 wrap the pairs on one side of the screen with 2 inch pressure sensitive aluminum tape Overlay the tape by one half its width and form the tape in place Aluminum tape provides electrical isolation from outside EMI sources For these applications dress out the splice per local practices Aluminum tape may present a potential shorting hazard when splicing paper insulated cables HR...

Page 40: ... Fold each corner at a 45 angle to the center of the screen as shown in Figure 13 Figure 13 Screen Folding Diagram 9 Fold the screen divider back on itself several times and tape it to prevent it from unfolding 10 Position the folded taped screen divider between the spliced and taped Group 1 and Group 2 pairs 11 Seal and close the splice case according to the splice case instructions The screen di...

Page 41: ...n the dome cover and clamp of dust and debris 2 Remove the clamp and dome cover 3 Remove the defective LPU board 4 Insert a new LPU board in the vacant position 5 Replace other defective LPU boards in the same manner 6 Replace O ring if damaged 7 Replace cover and clamp and repressurize housing if required per Detaching the Enclosure from the Baseplate on page 15 The cover clamp O ring and LPU sur...

Page 42: ...ccant 1 Single Slot 4 Port Protection LPU Board 2 Desiccant 2 unit bag 132 1014 01 Metal Locking Clamp O Ring Desiccant 1 Dome Cover O Ring 1 V Band Locking Clamp 2 Desiccant 2 unit bag 132 1038 01 Valve Kit 2 Pressure Relief Valves 2 Breather Vent Valves 2 Air Stem Valves 2 External Air Pressure Cutoff Valves 2 Air Intake T Valve Caps 2 Desiccant 2 unit bag 132 1016 01 Hardware Installation Kit 4...

Page 43: ...s adapter The adapter has two O rings that are required to create an airtight seal One is located on its outer threaded stem that connects to the brass fitting the other is located at the base of its inner well where it seals the PRV to the adapter To remove and replace the PRV proceed as follows 1 Grip the adapter nut with a 3 4 inch wrench and the PRV with a 1 2 inch wrench 2 While holding the a...

Page 44: ...he ASV pressurizes the enclosure from an external air supply or release the internal pressure The assembly consists of an adapter that screws into a brass fitting located at the bottom of the base The ASV itself which screws into this adapter and the cap connects to the top of the ASV The adapter has two O rings that are required to create an airtight seal One is located on its outer threaded stem...

Page 45: ...until completely disengaged Some resistance will occur as the stem s O rings rub against the walls of the body housing 4 Check that the O ring remains attached to the threaded tip of the body housing 5 The replacement PCV assembly comes as a unit which includes the limiting nut adjustment knob and all O rings Do not attempt to disassemble it Insert the valve stem into the body housing s threaded t...

Page 46: ...To 14 000 ft 4 300m Mounting Dual or Single 239 T1 or DDS ISDN Repeater Mechanics Dimensions Domed stainless steel enclosure with stainless steel composite baseplate Height 19 in 48 3 cm Diameter 12 4 in 31 5 cm Volume 1 55 ft3 042m3 Weight 41 lbs 18 6 kg boxed shipping weight 43 lbs 19 9 kg Baseplate Length 13 5 in 34 3 cm Baseplate Width 13 5 in 34 3 cm Stub Diameters Gel 1 in 25 4 mm maximum Ai...

Page 47: ...gure 15 on page 40 show the location of the CLEI code and P1 label on the HRE 712 List 1 and List 2 Table 6 on page 40 describes the label Figure 14 HRE 712 List 1 Bar Code and P1 Label Locations HRE 712 List 1 Identification label P1 label date code CLEI and ECI bar code label Manufacturer s serial number ...

Page 48: ...ECI bar code number P1 Label Date Code Contains the serial number date code and configuration code Date code consists of YY Last two digits of shipment year DDD Julian date Configuration code consists of Part number Xnn Configuration code Manufacturer s Identification Label Contains the identification number supplied by the customer Manufacturer s Identification Label Contains the part number and ...

Page 49: ...n Testing System Turn Up and Testing Network Monitoring upstream or downstream Power Monitoring and Remote Surveillance Service Maintenance Agreements Systems Operation Technical Assistance Center 800 366 3891 ext 73223 952 917 3223 Fax 952 917 3244 Email technical adc com Technical Information System Network Configuration Product Specification and Application Training product specific Installatio...

Page 50: ...Language Equipment Identifier CO Central Office D DDS Digital Data Service E ECI Equipment Catalog Item EMI Electromagnetic Interference H HDSL High bit rate Digital Subscriber Line HRE HiGain Remote Enclosures I ICEA Insulated Cable Engineers Association IS Inner Statial ISDN Integrated Services Digital Network L LPU Logical Processing Unit P PCV Pressure Cutoff Valve PRV Pressure Relief Valve R ...

Page 51: ...C will replace defective media at no charge if it is returned to ADC during the 30 day warranty period along with proof of the date of shipment The transportation charges for shipment of returned products to ADC will be prepaid by the Buyer ADC will pay transportation charges for shipment of replacement products to Buyer unless no trouble is found NTF in which case the Buyer will pay transportatio...

Page 52: ...RED FIRM ISO 9001 TL 9000 ADC DSL Systems Inc 14402 Franklin Avenue Tustin CA 92780 7013 Tel 714 832 9922 Fax 714 832 9924 Technical Assistance Tel 800 638 0031 Tel 714 730 3222 Fax 714 730 2400 DOCUMENT 150 712 200 02 JP 6 1242486 ...

Reviews: