background image

Troubleshooting 

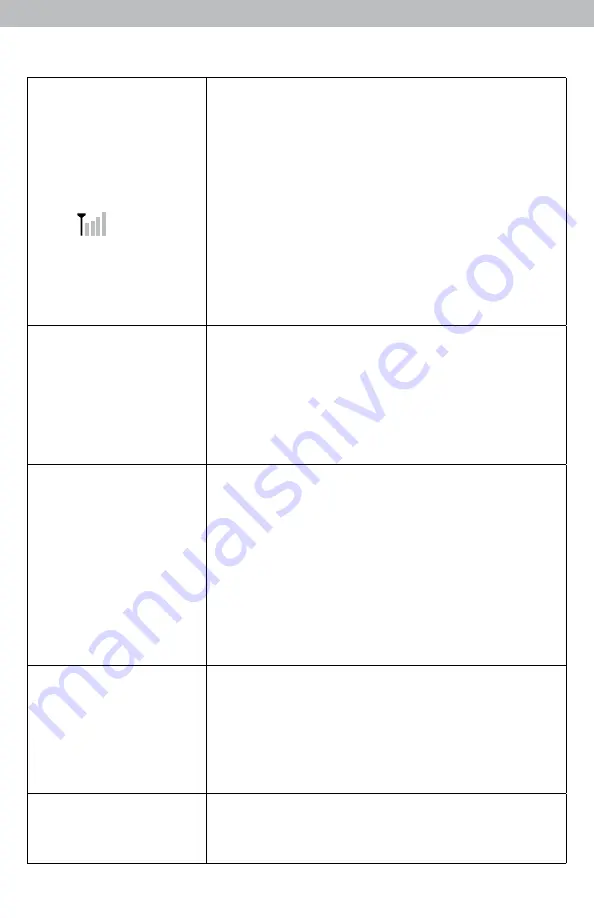
No outdoor sensor 

reception 

no bars


If the wireless signal indicator shows no bars:


• Relocate the display unit and/or the outdoor sensor. 

The units must be within 330 ft (100 m) of each other.


• Make sure both units are placed at least 3 feet (.9


m) 

away from electronics that may interfere with the 

wireless communication (such as TVs, microwaves, 

computers, etc).  

• Use standard alkaline batteries (or lithium batteries in 

sensor when temperature is below -4ºF/-20ºC). Do not 

use heavy duty or rechargeable batteries. NOTE: It 

may take up to 20 minutes for display unit and sensor 

to synchronize after batteries are replaced. 

Display screen 

not working 

• Check that the batteries are installed correctly. 

Batteries may need to be replaced.


• Reset display by pressing the RESET button, located in 

the battery compartment on the display unit. Time and 

date will need to be entered after a reset.


• Forecast will be blank for first 4 hours after battery 

    installation.


Outdoor 

temperature 

is flashing or


showing dashes 

Flashing of the outdoor temperature is generally an 

indication of wireless interference. 

1. Bring both the sensor and display unit indoors and
    remove batteries/power adapter from both.


2. Make sure the A-B-C switch on both units match.


3. Reinstall batteries in the outdoor sensor.


4. Re-connect AC adapter and/or reinstall batteries in 
    the display unit.


5. Let the units sit within a couple feet of each other
    for about 20 minutes to gain a strong connection. 

Inaccurate 

temperature  

or humidity 

• Make sure both the display unit and sensor are 

placed out of direct sunlight and away from any heat 

sources or vents (see page 10). 

• Make sure both units are positioned away from any 

    sources of moisture. 

Inaccurate barometric 

pressure 

It may take up to 14 days for the pressure to calibrate to 

your location.


12 

Summary of Contents for 02007

Page 1: ...up 6 Display Setup 7 Setup Preferences 8 Intelli Time Clock 8 Backlight Settings 9 Placement Guidelines 10 Using the Weather Station 11 Troubleshooting 12 Care Maintenance 13 Replace Intelli Time Batt...

Page 2: ...Contents 1 Display unit 2 Outdoor sensor 3 Power adapter 4 Instruction Manual IMPORTANT PRODUCT MUST BE REGISTERED TO RECEIVE WARRANTY SERVICE PRODUCT REGISTRATION Register online to receive 1 year wa...

Page 3: ...ounting 10 GEO Button Set geographic region preference 11 ZONE Button Set time zone preference 12 Plug in for Power Adapter 13 Battery Compartment Cover not shown 14 15 FRONT OF DISPLAY UNIT 14 HISTOR...

Page 4: ...OoF 95 o 90 u 80 n 70 T TEMPERATURE 111IH T TEMPERATURE I I 38 19 CV C I RH T HUMIDITY T HUMIDITY I t I OUTDOOR I inHg 29 76 INDOOR LOW PRESSURE 4 8 HR a 12 HR cC 1 1 1 1 1 1 I SOOXR GION Features Ben...

Page 5: ...mode 14 Geographic Region Selection for setup preferences 15 4 to 8 Hour Weather Forecast 16 8 to 12 Hour Weather Forecast 17 Barometric Pressure Arrow icon indicates direction pressure is trending 18...

Page 6: ...uct performance Heavy duty or rechargeable batteries are not recommended The sensor requires lithium 2 Install Batteries 2 AA batteries batteries in low temperature conditions Cold temperatures can ca...

Page 7: ...to preserve records in the event of a power outage Power adapter recommended as the primary power source to enjoy the full functionality of the product PLEASE DISPOSE OF OLD OR DEFECTIVE BATTERIES IN...

Page 8: ...l you need to do is select your time zone using the ZONE button Setup Time Date Units Language Press the button located on the front of the display unit to enter SET MODE Once in set mode the preferen...

Page 9: ...lay is powered with the power adapter backlight remains on at 100 brightness Press BACKLIGHT button once to dim to 60 brightness press again to dim to 30 press a 3rd time to enter AUTO DIM mode AUTO D...

Page 10: ...d to hang it from a suitable location like a well covered tree branch The best location is 4 to 8 feet above the ground with permanent shade and plenty of fresh air to circulate around the sensor Impo...

Page 11: ...otation Barometric Pressure Subtle variations in barometric pressure greatly impact the weather This weather center displays the current pressure with an arrow icon to indicate the direction the press...

Page 12: ...ery compartment on the display unit Time and date will need to be entered after a reset Forecast will be blank for first 4 hours after battery installation Outdoor temperature is flashing or showing d...

Page 13: ...he RESET button inside battery compartment time and date will need to be entered after a reset Next press GEO button to toggle through each of the regions A B C D E F G and back to your correct region...

Page 14: ...ew in the battery cover Calibration Calibrate Weather Forecast The forecast can be calibrated on the display unit to improve accuracy when sensor placement or environmental factors impact your data ac...

Page 15: ...tial installation This equip ment generates uses and can radiate radio frequency energy and if not installed and used in accordance with the instructions may cause harmful interference to radio commun...

Page 16: ...by Chaney Transportation costs and charges for returned goods shall be paid for by the purchaser Chaney hereby disclaims all responsibility for such transportation costs and charges This warranty wil...

Page 17: ...17...

Page 18: ......

Page 19: ......

Page 20: ...ovide you with information you can depend on to Plan your day with confidence www AcuRite com Chaney Instrument Co All rights reserved AcuRite is a registered trademark of the Chaney Instrument Co Lak...

Reviews: