background image

5


4

7

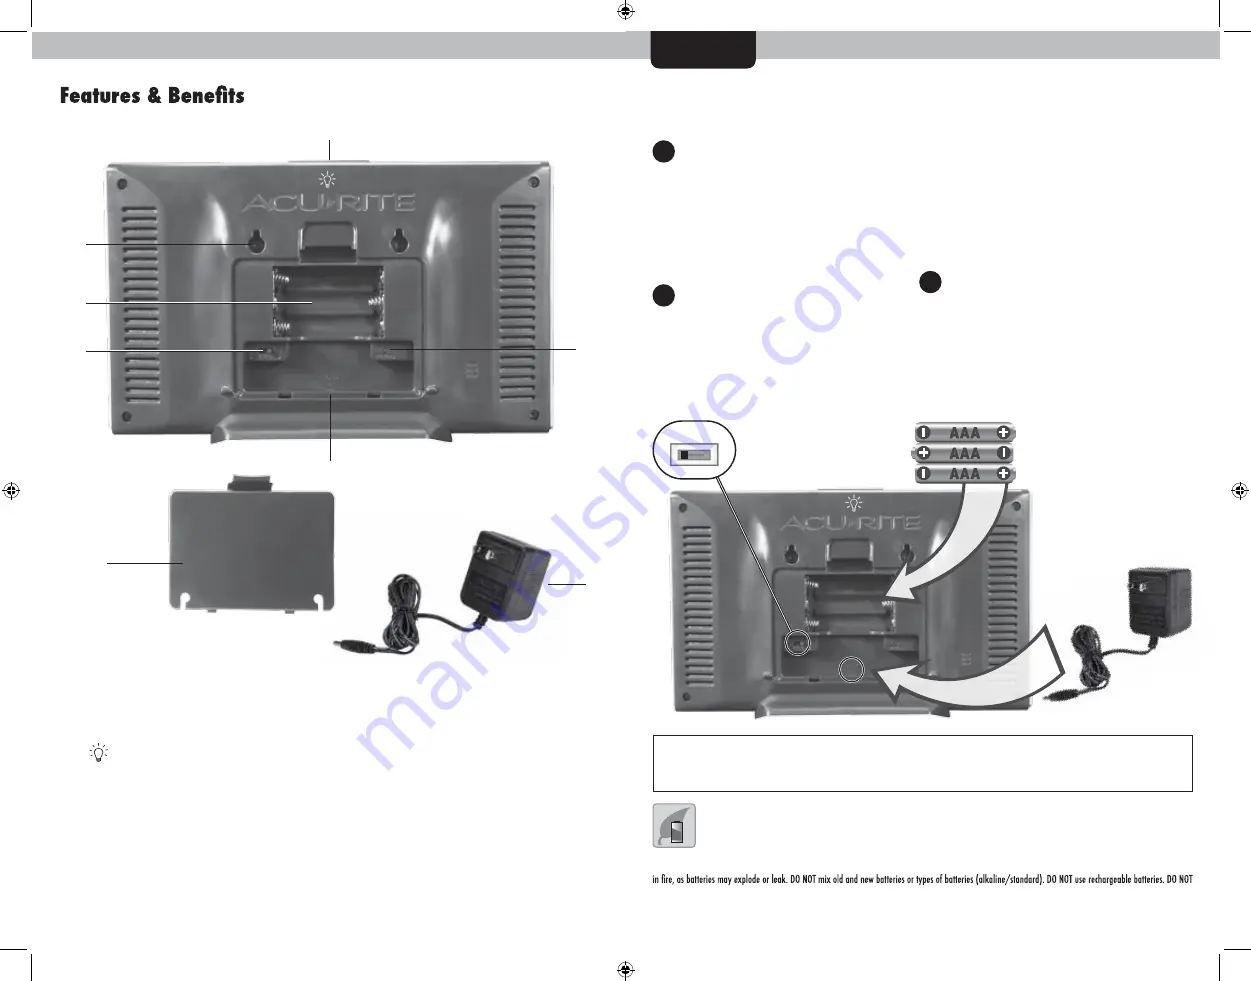
DISPLAY BACK

1. 

Backlight Button


For momentary backlight and dimmer 

settings.

2.  Integrated Hang Holes


For easy wall mounting.

3.  Backup Battery Compartment
4.  A-B-C Switch 


ID code that must match sensor’s A-B-C 

switch to ensure units synchronize.

5.  Plug-in for Power Adapter
6.  Battery Compartment Cover 

7.  Power Adapter

8.  RESET Button 

Press and release to clear historical record. 

Press and hold for 10 seconds for full reset 

to factory defaults.

4

3

2

5

1

6

8

PLEASE DISPOSE OF OLD OR DEFECTIVE BATTERIES IN AN ENVIRONMENTALLY SAFE 

WAY AND IN ACCORDANCE WITH YOUR LOCAL LAWS AND REGULATIONS.

BATTERY SAFETY: Clean the battery contacts and also those of the device prior to battery installation. Remove batteries from equipment which is not to 

be used for an extended period of time. Follow the polarity (+/-) diagram in the battery compartment. Promptly remove dead batteries from the device. Dispose of 

used batteries properly. Only batteries of the same or equivalent type as recommended are to be used. DO NOT incinerate used batteries. DO NOT dispose of batteries 

recharge non-rechargeable batteries. DO NOT short-circuit the supply terminals.

SETUP

Display Setup

Install Backup 

Batteries 

3 AAA Batteries 

(optional)

Plug in  

Power Adapter

A B C

A-B-C Switch 

Set to match sensor's  

ABC switch

IMPORTANT: Batteries are a backup power source to preserve records in the event of a 

power outage. 

Power adapter is required as the primary power source to enjoy the full 

functionality of this product.

Set the A-B-C Switch

Locate the A-B-C switch inside the 

battery compartment. Set the A-B-C 

switch to A, B or C. You must select 

the same letter choices for both the 

sensor and the display in order for 

the units to synchronize. 

Install or Replace Backup 

Batteries 

(optional)

1. Remove the battery    


  compartment cover. 

2. Insert 3 x AAA batteries into the 

  battery compartment, as  

  shown. Follow the polarity  

  (+/-) diagram in the battery  

  compartment.
3. Replace the battery cover.

Plug in Power Adapter

For the best performance, plug 

in the power adapter as the main 

power source for this product.

2

3

1

Display Setup

Summary of Contents for 06095

Page 1: ...ter 3 Instruction Manual PRODUCT REGISTRATION Register online to receive 1 year warranty protection www AcuRite com IMPORTANT PRODUCT MUST BE REGISTERED TO RECEIVE WARRANTY SERVICE This product requires an AcuRite 5 in 1 Weather Sensor sold separately to be operational Questions Contact Customer Support at www AcuRite com support or email support chaney inst com ...

Page 2: ...age 6 20 Clock 21 Current Indoor Humidity Arrow icon indicates direction humidity is trending 22 Display Low Battery Indicator 23 Current Indoor Temperature Arrow icon indicates direction temperature is trending 24 Peak Wind Speed Highest speed from past 60 minutes 25 Current Wind Speed 26 Current Wind Direction 27 Previous 2 Wind Directions 28 Average Wind Speed Average of all speeds over the pas...

Page 3: ...f the same or equivalent type as recommended are to be used DO NOT incinerate used batteries DO NOT dispose of batteries recharge non rechargeable batteries DO NOT short circuit the supply terminals SETUP Display Setup Install Backup Batteries 3 AAA Batteries optional Plug in Power Adapter A B C A B C Switch Set to match sensor s ABC switch IMPORTANT Batteries are a backup power source to preserve...

Page 4: ...E CALENDAR MONTH CALENDAR DATE CALENDAR YEAR TEMPERATURE UNITS ºF or ºC WIND SPEED UNITS mph km h knots RAINFALL UNITS inches or mm PRESSURE UNITS inHg or hPa You will automatically exit SET MODE if no buttons are pressed for 20 seconds Enter SET MODE at any time by pressing and holding the button If you live in an area that observes Daylight Saving Time DST should be set to ON even if it is not c...

Page 5: ...tteries or lithium batteries in sensor when temperature is below 4ºF 20ºC Do not use heavy duty or rechargeable batteries NOTE It may take a few minutes for display and sensor to synchronize after batteries are replaced Synchronize the units 1 Bring both the sensor and display indoors and remove power adapter batteries from each 2 Reinstall batteries in outdoor sensor 3 Reinstall power adapter bat...

Page 6: ...oubleshooting If your AcuRite product does not operate properly after trying the troubleshooting steps visit www AcuRite com or email support chaney inst com for assistance 11 Care Maintenance Display Care Clean with a soft damp cloth Do not use caustic cleaners or abrasives Keep away from dust dirt and moisture Clean ventilation ports regularly with a gentle puff of air Calibration The indoor out...

Page 7: ...termine that repair or replacement is not feasible we may at our option refund the amount of the original purchase price We expressly disclaim all liability for special consequential or incidental damages whether arising in tort or by contract from any breach of this warranty Some states do not allow the exclusion or limitation of incidental or consequential damages so the above limitation or excl...

Page 8: ...owners AcuRite uses patented technology Visit www AcuRite com patents for details Printed in China 06095M INST 062519 It s More than Accurate it s AcuRite offers an extensive assortment of precision instruments designed to provide you with information you can depend on to Plan your day with www AcuRite com Weather Stations Temperature Humidity Weather Alert Radio Kitchen Thermometers Timers Clocks...

Reviews: