background image

Set the Time & Date 

The clock and calendar are utilized to time stamp history records and other 

data, so it is important to set the time and date soon after you power on the 

display. 

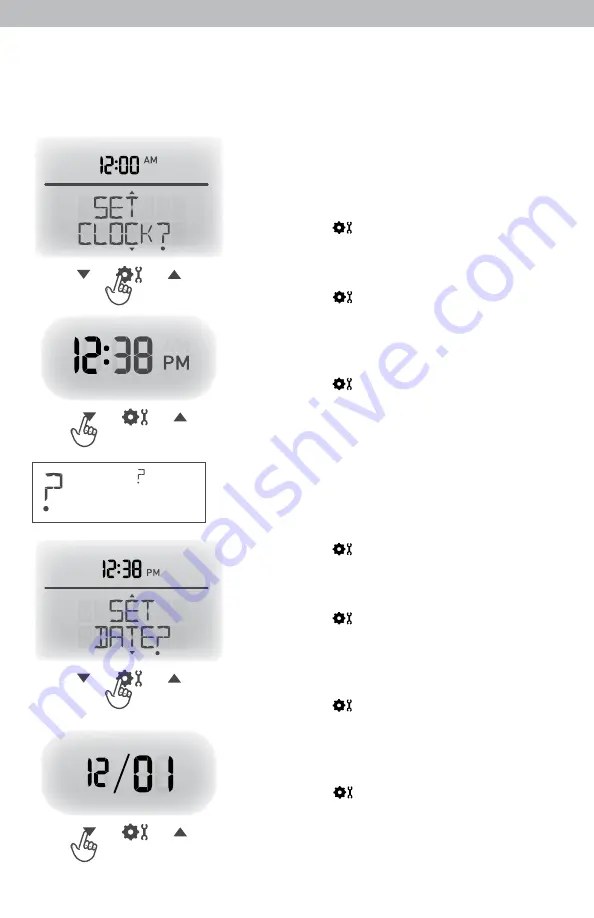
Set the Time 

1. Press the “

“ or “

“ buttons until  

“SET CLOCK?” is displayed on the 

Selectable Category part of the display. 

2. Press the “   ” button to set the clock. 
3. Press the “

“ or “

“ buttons to adjust the 

hour. Note the “AM” and “PM” indicators. 

4.


Press


the


button


to


confirm


hour


selection. 

5. Press the “

“ or “

“ buttons to adjust 

minutes. 

6.


Press


the


button


to


confirm


minute


selection. 

The clock is now set. 

Set the Date 

Note: The “  ” stays in 
Selectable Categories, 

1. Press the “

“ or “

“ buttons until  

even after setup. 

“SET DATE?” is displayed on the Selectable 

Category part of the display. 

2. Press the “   ” button to set the date. 
3. Press the “

“ or “

“ buttons to adjust the 

month. 

4.


Press


the


button


to


confirm


month


selection. 

5. Press the “

“ or “

“ buttons to adjust the 

day. 

6.


Press


the


button


to


confirm


day


selection. 

7. Press the “

“ or “

“ buttons to adjust the 

year. 

8.


Press


the


button


to


confirm


year


selection. 

The date is now set. 

Summary of Contents for 06006RM

Page 1: ...anual This product requires an AcuRite 5 in 1 Weather Sensor sold separately to be operational IMPORTANT PRODUCT MUST BE REGISTERED TO RECEIVE WARRANTY SERVICE PRODUCT REGISTRATION Register online to receive 1 year warranty protection www AcuRite com Register a Product Questions Contact Customer Support at 844 228 5465 or visit www AcuRite com SAVE THIS MANUAL FOR FUTURE REFERENCE ...

Page 2: ...2 Features Benefits Display 2 1 3 4 4 41 40 39 35 37 38 36 32 33 28 29 34 5 7 6 8 10 9 12 11 13 14 18 20 19 15 17 16 26 27 26 23 25 24 23 22 21 30 31 ...

Page 3: ...nd date recorded 22 Button Activates current Weather Ticker message during ticker customization mode 23 to Select Category 17 Adjust Settings 24 Button Press to manually advance through Weather Ticker messages 25 Button For setup preferences 26 Button Activate alarm press and hold to adjust alarm values 27 Button Deactivates current Weather Ticker message during ticker customization mode 28 Indica...

Page 4: ...online connectivity functions 5 Backup Battery Compartment 6 A B C Switch ID code that must match 5 in 1 sensor s A B C switch to ensure units synchronize 7 Clear Today Clears data recorded since 12 00am 8 Clear All Clears all recorded data without having to reset time and date 9 Reset Full reset to factory defaults 10 Power Adapter 11 USB Cable for PC Connection 12 Battery Compartment Cover not s...

Page 5: ... of a power outage Power adapter is the recommended primary power source to enjoy the full functionality of this product PLEASE DISPOSE OF OLD OR DEFECTIVE BATTERIES IN AN ENVIRONMENTALLY SAFE WAY AND IN ACCORDANCE WITH YOUR LOCAL LAWS AND REGULATIONS BATTERY SAFETY Clean the battery contacts and also those of the device prior to battery installation Remove batteries from equipment which is not to...

Page 6: ...the hour Note the AM and PM indicators 4 Press the button to confirm hour selection 5 Press the or buttons to adjust minutes 6 Press the button to confirm minute selection The clock is now set Set the Date Note The stays in Selectable Categories 1 Press the or buttons until even after setup SET DATE is displayed on the Selectable Category part of the display 2 Press the button to set the date 3 Pr...

Page 7: ...s the or buttons to select the desired language 4 Press the button to confirm your selection Language is now set Note Display reverts to English language when display runs out of power or is reset Placement for Maximum Accuracy AcuRite sensors are sensitive to surrounding environmental conditions Proper placement of both the display and the sensor are critical to the accuracy and performance of th...

Page 8: ... used for the AcuRite Connect software 1 Press the or buttons until SET USB MODE is displayed on the Selectable Category part of the display 2 Press the button to set the mode preference 3 Press the or buttons to select USB mode 3 4 Press the button to confirm your selection AcuRite Connect USB Mode is now set Download the Software The AcuRite Connect software is available online as a free downloa...

Page 9: ...earning Mode Self Calibrating Forecasting use a unique algorithm to analyze changes in pressure over a time period called Learning Mode to determine your altitude After 14 days the Learning Mode icon disappears from the display screen At this point the self calibrated pressure is tuned in to your location and the unit is ready for superior weather prediction Weather Forecast AcuRite s patented Sel...

Page 10: ...ction the pressure is trending FALLING STEADY or RISING Weather Ticker The Weather Ticker automatically streams your real time weather information and alerts as scrolling text in the lower part of the display screen You can manually cycle through all the available messages by pressing Default WEATHER TICKER messages are pre loaded as follows FORECAST 12 to 24 hour future weather forecast MOON PHAS...

Page 11: ...ther Ticker Messages Customize which messages you want to scroll across the WEATHER TICKER 1 Press the button to manually cycle through each message available 2 During the MANUAL REVIEW PRESS the button to activate the current scrolling message The corresponding appears on screen to the left of the message to indicate the message is now active in the ticker cycle PRESS the button to deactivate the...

Page 12: ...ecorded Similarly the storm alarm sounds when a large atmospheric pressure drop occurs which usually indicates an oncoming storm Note The storm alarm is NOT intended to be a safety device or warning system Set a Weather Alarm 1 Choose the weather category for which you wish to set an alarm by pressing the or buttons until the category is displayed on the Selectable Category part of the display 2 T...

Page 13: ...then sounds every few minutes afterwards until one of the following happens Alarm On Alarm Off Adjust Mode Low Value High Value BUTTON FUNCTIONS Press to activate or deactivate an alarm Press and hold to set or adjust an alarm value 1 SNOOZE Press any button Alarm silences but sounds again if the alarm condition reoccurs 2 Turn alarm OFF Deactivates alarm ...

Page 14: ... Let the units sit within a couple feet of each other for about 20 minutes to gain a strong connection Outdoor temperature is flashing or showing dashes Flashing of the outdoor temperature may be an indication of wireless interference Make sure the A B C switch in the battery compartments of both the display and sensor are switched to the same letter You may choose A B or C but both units must mat...

Page 15: ...to compare data using a sensor positioned at the same mounting height Check location of the sensor Ensure it s mounted a minimum of 5 ft in the air with no obstructions around it within several feet Ensure wind cups are spinning freely If they hesitate or stop try lubricating with graphite powder or spray lubricant USB connectivity not working Verify display is in USB mode 3 see page 8 Unplug USB ...

Page 16: ... powered ON Verify the PC that the display is connected to is always connected to the internet Verify that the display s MAC ADDRESS is entered correctly in the AcuRite Connect software on your PC Verify that Streaming is enabled in the AcuRite Connect software on your PC Verify that the display s MAC ADDRESS is correct in your www acu link com and or AcuRite mobile app account Follow on screen tr...

Page 17: ...ental factors impact your data accuracy 1 Choose the weather category you wish to calibrate by pressing the or buttons until the category is displayed on the Selectable Category part of the display 2 Press AND HOLD the and buttons all at the same time for 10 15 seconds The display beeps and all display data is hidden except for the value being calibrated calibrate and arrows appear next to the val...

Page 18: ... digital device pursuant to Part 15 of the FCC rules These limits are designed to provide reasonable protection against harmful interference in a residential installation This equipment generates uses and can radiate radio frequency energy and if not installed and used in accordance with the instructions may cause harmful interference to radio communications However there is no guarantee that inte...

Page 19: ...placed by Chaney Transportation costs and charges for returned goods shall be paid for by the purchaser Chaney hereby disclaims all responsibility for such transportation costs and charges This warranty will not be breached and Chaney will give no credit for products it manufactures which have received normal wear and tear been damaged including by acts of nature tampered abused improperly install...

Page 20: ...to provide you with information you can depend on to Plan your day with confidence www AcuRite com Chaney Instrument Co All rights reserved AcuRite is a registered trademark of the Chaney Instrument Co Lake Geneva WI 53147 All other trademarks and copy Printed in China rights are the property of their respective owners AcuRite uses patented technology 06006DI INST 090315 Visit www AcuRite com pate...

Reviews: