background image

13

Using the CameraConnect Pro

Front Panel Functions

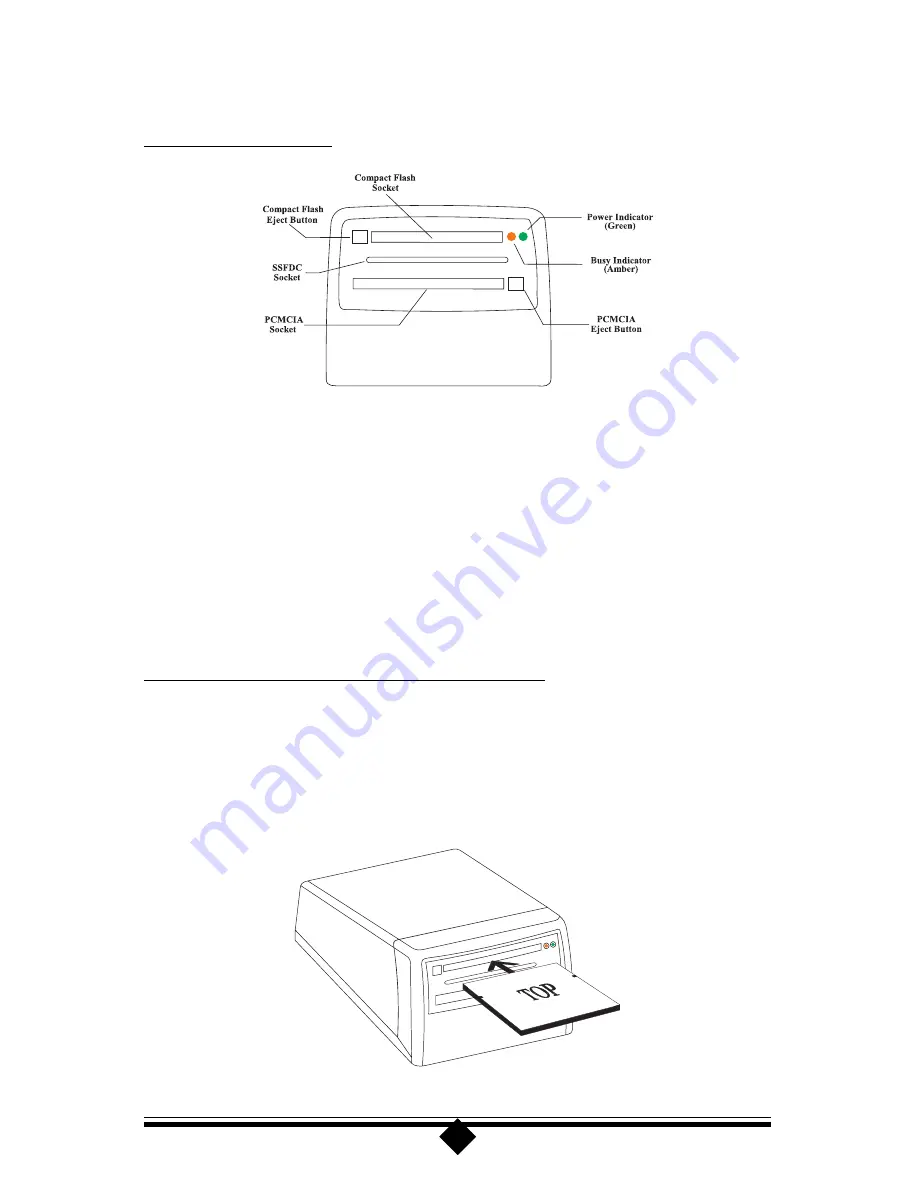
Figure 4:  Front Panel Arrangement

Figure 4 shows the front panel layout of the CameraConnect Pro. There are two
indicator LEDs, three slots, and two eject buttons.

The indicator lights display the power-on and device-busy states of the reader. The
green LED indicates that the unit has power and is ready to function. The amber
LED shows that data is being read from or written to the device. If the unit is prop-
erly connected, the green light should always be on. The busy or amber LED light is
on only when the device is accessing a card placed in the CameraConnect Pro.

Inserting Devices into the CameraConnect Pro

The upper slot is designed to accept CompactFlash Association-compliant flash cards.
These storage devices are primarily used in digital cameras and Personal Digital As-
sistants  (PDAs).  Figure 5 illustrates the proper method of inserting these devices
into the upper slot. Remember to push the card completely into the slot so that the
CameraConnect Pro’s ejector button comes out.

Figure 5: Inserting a Compact Flash Card

Summary of Contents for CameraConnect Pro

Page 1: ...Parallel Port Flash Card Reader User s Manual ...

Page 2: ... special or incidental li ability Note PC AT and PS 2 are trademarks of IBM Corporation Windows 95 Windows 98 and Win dows NT are trademarks of Microsoft Inc SmartMedia is a trademark of Toshiba Corporation Cam eraConnect and CameraConnect Pro are trademarks of Actiontec Electronics Inc Proprietary Notice and Disclaimer 2 Introduction 3 Contacting Actiontec Customer Support 3 Features 4 Getting St...

Page 3: ... you should need assistance the Actiontec Technical Support Depart ment is available from 7 00 AM to 7 00 PM Pacific Coast Time Monday through Friday to provide professional support Actiontec Electronics Inc Technical Support 760 N Mary Avenue Sunnyvale CA 94086 Phone 408 752 7714 choose option 7 Fax 408 732 0097 BBS 408 732 0112 Email techsupp actiontec com New drivers are released as need arises...

Page 4: ...ftware based Smart Media SSFDC management supports up to 64MB devices for easy future updates Does not require additional IRQ or DMA settings Leaves valuable system resources available for other hardware to use Provides faster digital camera image transfers to your computer so that there is no need to hook up a serial cable to your camera and wait for images to transfer Includes a printer pass thr...

Page 5: ...onnecting the CameraConnect Pro Hardware Turn off the power and unplug the power cord Although you will not be opening your computer s cover this step is necessary to prevent damage to your computer system s motherboard from insertion or removal of connectors with the power on Step 1 If your computer is on shut it down turn off the power and unplug the power cord Step 2 Find the keyboard adapter i...

Page 6: ... keyboard connection scenarios For an AT keyboard the adapter plugs into the computer For a PS 2 keyboard the adapter plugs into the keyboard cable Step 4 After you have completed the installation of the CameraConnect Pro check your work again to verify that all the connections are correct and that each connector is firmly inserted and secure ...

Page 7: ...roper connectors on your computer If you do not see a green light on the front of the CameraConnect Pro turn off the power and check the method you used to connect your keyboard and the keyboard adapter Installing the Driver and Utility Software Windows 95 or 98 Step 1 Close any applications you may have running Insert the installation disk into your computer s floppy disk drive On the Windows tas...

Page 8: ...se agreement You must click Yes to continue Step 4 The Choose Destination Location dialog box will appear next suggesting a folder where the drivers will be installed Click Next to install in the location displayed or click Browse to pick a different location ...

Page 9: ...lation program will ask you to confirm the destination folder Click Next to continue Step 6 When the file has been copied to the location you specified earlier click Finish to restart your computer and enable the software ...

Page 10: ... 4 0 Step 1 On the Windows taskbar click Start On the Start menu click Settings then click Control Panel Double click on SCSI Adapters Step 2 Click the Drivers tab to bring it to the front then click the Add button ...

Page 11: ... Step 3 Next insert the CameraConnect Pro s installation disk into the A drive and click Have Disk Step 4 In the next dialog box be sure that A appears under Copy manufacturer s files from Click Continue ...

Page 12: ...and install the CameraConnect Pro driver Step 7 Allow Windows NT to restart the system and enable the CameraConnect Pro If you had difficulty with the procedure above place the installation disk in the A drive On the Start menu click Run then type a setup exe and click OK Follow the on screen instructions ...

Page 13: ... If the unit is prop erly connected the green light should always be on The busy or amber LED light is on only when the device is accessing a card placed in the CameraConnect Pro Inserting Devices into the CameraConnect Pro The upper slot is designed to accept CompactFlash Association compliant flash cards These storage devices are primarily used in digital cameras and Personal Digital As sistants...

Page 14: ... error message will be displayed With certain types of PCMCIA cards the system will cease responding altogether ATA type Flash Cards will not be recognized until you read or write to the device When you select the CameraConnect Pro in My Computer your computer system will sound a beep if the card is recognized Figure 6 illustrates the proper insertion of these devices in the lower slot Figure 6 In...

Page 15: ...st be formatted before you can store information on it This section outlines the procedure for formatting a device using your operating system and the CameraConnect Pro Note If you are using Windows NT format cards using the Windows NT FAT option Otherwise the card may be unreadable by a computer running a non Windows NT operating system Step 1 To format a device using the CameraConnect Pro first ...

Page 16: ...he Windows desktop as shown below Step 3 The CameraConnect Pro will be identified as a Removable Drive and a drive letter will be assigned to it in My Computer Click on its Removable Drive icon to select it as shown below Do not double click the icon ...

Page 17: ...e Format dialog box for Windows 98 Windows 95 displays a slightly different dialog box but the options offered will be the same Click the Start button in this dialog box to begin formatting Note Do not use the format function on a computer running Windows NT 4 0 Computers running other operating systems may not be able to read cards formatted under Windows NT 4 0 ...

Page 18: ... to coexist with other peripherals on the parallel port See Using the CameraConnect Pro with Other Parallel Port Devices for help Using The CameraConnect Pro With Other Parallel Port Devices The CameraConnect Pro s driver and utility program allow it to share the system printer port with other devices However this does not mean that the other devices can or will share the printer port Granted the ...

Page 19: ... icon There will be an option to close or exit on the menu that appears Click once on either of these listings and the program should close If you want to use the advanced features of your printer after you have copied the files from your Flash Card you can reactivate the printer s resident program through the Start Programs menu It will be listed in your printer s program folder Other External De...

Page 20: ...t Pro Utility can be started from Programs menu On the Start menu click Programs click CameraConnect Pro then click CameraConnect Utility The utility will display the dialog box shown below Figure 9 The CameraConnect Utility Screen Three sections of information are provided in the utility s dialog box The first block gives PC Parallel Port detection information The port address indicates which LPT...

Page 21: ...inter port mode can be configured through your system BIOS setup utility See your computer system user s manual for information on setting your printer port mode through the system BIOS setup Note Setting your printer port to EPP or ECC EPP mode will also facilitate the best transfer speeds in most cases The Card Information block will show the type of card inserted SmartMedia or ATA Flash CF its ...

Page 22: ... to a separate printer port Some Common Error Messages The above error message is likely to be issued when the card placed in the Camera Connect Pro is not recognized This message can also be seen when there is no card in the CameraConnect Pro Likely causes are The card is not formatted has no CIS Card Information Structure or the card is not an ATA Flash Card the Camera Connect Pro will only oper...

Page 23: ...e error See Inserting Devices into the CameraConnect Pro for the correct way to insert an SSFDC device When I copy files from the CameraConnect Pro my printer pauses printing for a few seconds When you access the CameraConnect Pro be sure no other device is using the printer port See Using The CameraConnect Pro With Other Parallel Port Devices for help When I try to use a card formatted by a compu...

Page 24: ...ere will be an option selection box for Reserved drive letters Click once on the Start drive letter box as shown in the picture The start drive letter must be greater than the total number of disk drives and CD ROM drives in your system After you have set the start drive letter set the End drive letter to Z Restart your system and check My Computer Your CameraConnect Pro should be listed as a Remo...

Page 25: ... the computer system s power light and the green light on the CameraConnect Pro are off you should turn off the power and disconnect the CameraConnect Pro If your system is functioning normally not be allowing power sharing from the key board connector Contact your computer s manufacturer for assistance ...

Page 26: ...s then click Control Panel In Control Panel double click Add Remove Programs Step 2 Click CameraConnect Pro Reader to select it Then click Add Remove Step 3 A warning message will ask you to confirm the removal of the CameraCon nect Pro Reader from the system Click the Yes button Step 4 After the files have been removed click OK ...

Page 27: ...on SCSI Adapters Step 2 Click on the Drivers tab In the list click to select CameraConnect Pro Reader Then click Remove Step 3 A warning message will ask you to confirm the removal of the CameraCon nect Pro Reader from the system Click the Yes button Step 4 The driver will be removed from your system Click Cancel ...

Page 28: ...28 Appendix B Technical Reference External Port Connectors Figure 10 Printer LPT Port Connector Front View Figure 11 AT Keyboard Connector Front View Figure 12 PS 2 Keyboard Connector Front View ...

Page 29: ...ay cause harmful inter ference to radio communications However there is no guarantee that interference will not occur in a particular installation If this equipment does cause harmful interference to radio and television reception the user is encouraged to try to correct the interference by one or more of the following measures Reorient the receiving antenna Increase the separation between the equ...

Page 30: ...30 ...

Page 31: ...31 ...

Page 32: ...32 ...

Page 33: ...33 ...

Reviews: