background image

www.acti.com

XNR-4200 User’s Manual 1.00.15   


38 

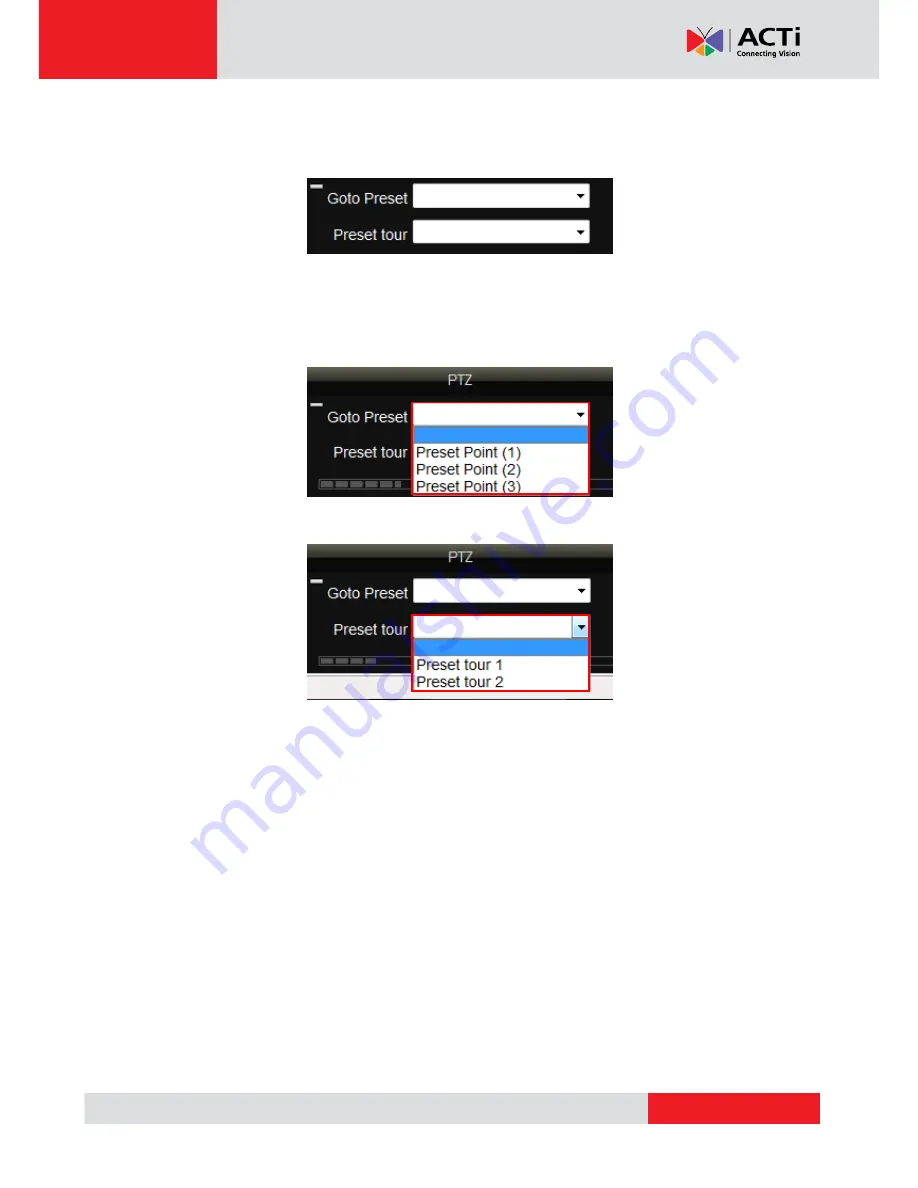
Preset Point Panel 


PTZ Preset points allow you to easily move the camera to pre-defined points of view. 

This is enabled only for cameras with PTZ function support. 


Fig. 33


Preset Point Panel 

You need to setup these points in Setup 

  Device 

  Preset Point. Be sure to save your 

settings before you leave the setup section to commit the changes. 

Once you have defined these points you will find the preset points in the drop down list. 


Fig. 34


Selecting Preset Point 


Fig. 35


Selecting Preset Tour 

After you have more than one preset points defined, you may configure the Preset Tour in the 

Setup 

  Device section. 


Summary of Contents for XNR-4200

Page 1: ...XNR 4200 Standalone NVR User s Manual Version 1 00 15 2011 5 27...

Page 2: ...2 Installation 17 Connecting to Network 17 Accessing XNR 4200 by IE 17 Accessing XNR 4200 by UPnP 18 Login 19 Setup Wizard 22 Licensing 23 How does Activation Work 23 Online Activation 24 Offline Acti...

Page 3: ...46 Layout Bar 47 Select Device for Playback 47 Bookmarks 48 Scrolling and Playing Video 49 Video Search 50 Video Search Result 51 Export Video 52 Snapshot 55 Print Image 55 5 Setup 58 System 59 Infor...

Page 4: ...p 77 Event Handling Options List of options of event handler 77 Added Event Handling List List for added event handlers 77 Event Trigger Type Icon 78 Event Response Options 78 Popup 79 Goto Preset 81...

Page 5: ...reen in Setup Wizard 23 Fig 17 Entering License Key via Online registration 24 Fig 18 Selecting License File to Load 25 Fig 19 Date and Time setting during Setup Wizard 26 Fig 20 User setting during S...

Page 6: ...a single Bookmark to a device 48 Fig 53 Add Bookmarks to all displayed devices 48 Fig 54 Playback Scrolling and Playing Video 49 Fig 55 Fast Play Backward 49 Fig 56 Extreme Play Backward 49 Fig 57 Fas...

Page 7: ...etup Event Responses 77 Fig 90 Setup Device Event Handling Trigger selection 78 Fig 91 Setup Device Event Popup 79 Fig 92 Setup Device Instant Playback 80 Fig 93 Setup Device Goto Preset 81 Fig 94 Set...

Page 8: ...rror Notice 93 Fig 115 Setup Delete User Notice 94 Fig 116 Setup User Permission with Admin account 94 Fig 117 Setup User Permission list 95 Fig 118 Setup User Permission Live 96 Fig 119 Setup User Pe...

Page 9: ...your device to power supply 3 Removable Hard Disk Bay x 6 stored inside XNR 4200 4 Installation Accessories 5 Machine Info Card 6 Warranty Card Introduction XNR 4200 Standalone NVR is a Linux based N...

Page 10: ...shot from playback for export Digital Zoom Zoom in out digitally by mouse scroll wheel or by zoom control buttons Video Cropping Crop a short video clip from long recording file and save it as an inde...

Page 11: ...rol room and mounted on server racks The device is attached to standard rack via the Rack Mount Ears 3 LED Indicators The LED indicators show the current device status The Red light to the left indica...

Page 12: ...flash drive and restore to default settings and original firmware If you just want to shutdown and re open XNR please press Power Switch instead 3 USB Port The two USB ports allow external DVD ROMs to...

Page 13: ...out by itself Pull the tab to 90 degrees from the front panel to disengage the internal connection Pull out the tray to insert or remove Hard Disk To insert HDD tray slide the tray until it is stopped...

Page 14: ...www acti com XNR 4200 User s Manual 1 00 15 14 Fig 6 Inserting HDD Tray...

Page 15: ...Any other hard disk that is not bigger than 2TB will theoretically also work however in such cases ACTi does not guarantee the performance of those uncertified hard drives Note Hard disks with capacit...

Page 16: ...o and access settings PC Specifications Minimum CPU Intel Core 2 Duo 2 4 GHz Memory 2GB Network Gigabit Ethernet Graphics Card memory 256 MB or more Hard Drive Space Only needed when exporting video f...

Page 17: ...68 0 10 while Ethernet Port 2 will use IP address 192 168 1 10 Accessing XNR 4200 by IE If you know the IP address and port number of the standalone NVR you may also type in the IP address and port nu...

Page 18: ...ext to the XNR 4200 title the MAC address to this Standalone NVR is shown here You will need to provide this MAC address to your sales representative if you are registering offline If you have interne...

Page 19: ...gin to skip the Login page and go directly to the main page every time you login from this PC in the future If your PC may be accessed by someone without proper authority please do NOT use either reme...

Page 20: ...acti com XNR 4200 User s Manual 1 00 15 20 When your browser s pop up blocker prompts ask if you would like to install ACTi Corporation s control or not please accept it Fig 13 Ative X Installed by Po...

Page 21: ...u may also click the Download ActiveX installation package link at the lower left of login screen This will download and install file that gives you the required components to access Standalone NVR Fi...

Page 22: ...p wizard will also show up if you delete all devices from device list in the future You may click Previous or Next button located to the lower right at any time This will skip the current step so that...

Page 23: ...Setup Wizard Standalone NVR licensed per number of channels managed Each additional channel requires one license License codes are purchased through our sales representatives Contact your distributor...

Page 24: ...ly into system You need to have an account on ACTi com for authentication If you do not have an account yet please click the blue link below and register your account once you click OK XNR 4200 will c...

Page 25: ...nse Offline Registration click Open File and select the license file Click OK to activate this license An email with activation code file lic will be sent to your registered email Transfer this licens...

Page 26: ...tup it manually The methods are as follows Setup by using NTP server STEP 1 Fill in the NTP server IP or domain name STEP 2 Press the NTP Sync button to synchronize your time setting with NTP server S...

Page 27: ...indow you can setup the name password and the group of a new user Please notice that you cannot add new group in the installation wizard you can only add a new group in the setup menu inside the stand...

Page 28: ...en click Format to change RAID configuration Reformatting the hard drives will take some time Before reformatting is complete you may perform other setups but cannot record video Here s a table of ava...

Page 29: ...n menu on the top of the page Fig 22 Adding Device during Setup Wizard You can choose your searching target then press search button and the system will search all related device for you STEP 2 Choose...

Page 30: ...nformation panels Including Device Event PTZ and Preset Point 3 Tool Bar This bar provides access to functions including Application Help About and Date Time 4 Module Tab Switch between 3 main modules...

Page 31: ...full screen mode allows you to escape from full screen mode Right Click Context Menu Right Clicking in Live View Live playing camera brings out an options list which contains the following choices Fig...

Page 32: ...ut Enable and diable your audio output Note All functions from the Right Click Context Menu work only on the single channel you have chosen Side Panel The Side Panel is divided into four panels as sho...

Page 33: ...need to have more than one group of camera to switch views to If not this function will only repeat displaying the same cameras in the same group 9 Sort You may sort the display of cameras according t...

Page 34: ...p Fig 28 Side Panel Event List 1 Minimize Minimizes the event list panel 2 Event information This shows the type of event by an icon camera ID IP address and time of event You can also double click on...

Page 35: ...d from 1 to 5 higher the number faster the speed Caution Speed varies from protocol to protocol 4 Zoom Out Zoom out 5 Focus In Focus near 6 Zoom In Zoom in 7 Focus Out Focus far 8 Digital PTZ Mode Dig...

Page 36: ...e the PTZ mode is Optical PTZ If not change via right click context menu There will be a red crosshair right in the middle of screen Clicking anywhere on the screen will allow the camera to move in th...

Page 37: ...ndow In this mode a picture in picture view will show in the lower right of live view window A red rectangle will mark the currently enlarged view area within the full size video Just click and drag t...

Page 38: ...t Point Panel You need to setup these points in Setup Device Preset Point Be sure to save your settings before you leave the setup section to commit the changes Once you have defined these points you...

Page 39: ...stretch image 3 Disconnect All Channels Disconnect all channels 4 Decode I Frame Change all channels to 1 FPS This saves CPU on the remote client PC 5 Logout Logout of the Stand Alone NVR but stay in...

Page 40: ...e info and image Channels currently in view will show a orange border to the left The currently selected channel will be highlighted Fig 39 Card Style Device Panel List Change the Device Panel display...

Page 41: ...but the info listed now extends to the right and include device IP and camera model Fig 41 Detail Style Device Panel Hide Toolbar You may choose to hide the toolbar with this button Press the Esc key...

Page 42: ...More Layouts Some layouts are not shown in the default Layout Bar Click this to show more layouts Fig 44 More Layouts 4 Sequence Patrol Patrol your cameras in the Side Tool List starting from the top...

Page 43: ...the date time in the center of device playback control to jump to target day time 5 Click the play reverse pause buttons below the playback control to play 6 Click and drag the black circle left or r...

Page 44: ...On Playback Module the Side Panel contains Device Tab and Search Tab On Device Tab you may group all the added devices by ID by Group by Model by Name and by IP Address On Search Tab you may click on...

Page 45: ...e shifted to the beginning of the video Then you may proceed to play the archive video 5 Page Index Number You may click on the page index number to go to the next page or to the previous page 6 Page...

Page 46: ...tly viewed Click here to go jump directly to target time date 3 Displayed Time Bar Marks time of video currently viewed 4 Return to Present Instantly moves Displayed time to now 5 Search Click this bu...

Page 47: ...Network Loss and Bookmark Previous Next Record is very useful when navigating long stretches of video Layout Bar Fig 51 Playback Layout Bar 1 Hide Side Tool List Click to hide or unhide the side tool...

Page 48: ...ed for future security analysis You may also do search query by Bookmark Fig 52 Add a single Bookmark to a device Here are the steps to insert a single Bookmark on the Playback Window 1 Browse to a sp...

Page 49: ...ick and drag the pause button to the left or right limit Fig 55 Fast Play Backward Fig 56 Extreme Play Backward 2 Play Backward Click this button to play backward 3 Pause Click this button to pause pl...

Page 50: ...type the searched date time range You may also click on the down arrow to select date time range from the calendar as shown below 2 Device Select the devices to include in search You may toggle the se...

Page 51: ...close button 2 Page Up Down Arrows You may click on the page index arrow to go to the next page or to the previous page 3 Page Index Number You may click on the page index number to go to the next pa...

Page 52: ...xport Video There are two ways to export Videos 1 From Device Playback Control You may mark start and end point on the time bar and then export the video Fig 61 Playback Mark Export Start Fig 62 Playb...

Page 53: ...Fig 64 Playback Playback Windows Once you clicked Export Video you may reschedule the time duration include or exclude devices add overlay and export the videos to desktop or to a specific path or st...

Page 54: ...ath You may export the videos to your desktop or to a specific path or even store them on a DVD media through a burner 5 Cancel Button Click to return to main page 6 Burn Button Click to export select...

Page 55: ...click Snapshot a message of Saving Of snapshot to clipboard is completed will display as below You may then paste the image into software using Ctrl V Print Image There are two ways to export Videos...

Page 56: ...clicked Print Image from the Playback Windows you may print the selected channel If you click the Print Image from Device Playback Control you will be able to print back one channel or all added chann...

Page 57: ...www acti com XNR 4200 User s Manual 1 00 15 57 Fig 70 Playback Print Multiple Image...

Page 58: ...r s Manual 1 00 15 58 Setup In the Setup Home there is the shortcut of all the setting items with short explanations of them You can go to that page by clicking the corresponding button or on the tabs...

Page 59: ...ou can enter any name for it as he wants 2 Firmware It shows the firmware version of the device 3 Mac Address 1 It shows the Mac address 1 of the device 4 Mac Address 2 It shows the Mac Address 2 of t...

Page 60: ...will be automatically adjusted When the daylight saving time has finished uncheck the box to return to original setting 4 NTP Server Please enter a NTP server address if you wish to synchronize time...

Page 61: ...4200 User s Manual 1 00 15 61 8 Time Button If you don t have any NTP server and want to manually modify the time please click this button Then a clock as below will pop up You have to select the time...

Page 62: ...74 Setup System Network DHCP If you would like to use DHCP to assign IP please click the check box to enable DHCP Static IP If you wish to assign one specific IP please fill up all the fields 1 Fixed...

Page 63: ...dress list After setting up please click Save button on the bottom right side to save the settings Fig 75 Setup System Block List Block a IP address When you wish to block any IP please enter IP addre...

Page 64: ...utton to remove it from IP address list Unblock all the IP address in the list When you wish to unblock all the IP please click Remove All button to remove all of them from the list RAIDStorage Fig 76...

Page 65: ...hard drives Your operation will not be affected during the rebuild Here s a list of available configurations for each number of disks RAID 0 RAID 1 RAID 5 RAID 10 No of Disks 1 Y 2 Y Y 3 Y Y 4 Y Y Y 5...

Page 66: ...ed to upgrade the firmware please come to this page to upgrade Please click Select button to browse and find your img file then click Update button to upload the file You can check the current firmwar...

Page 67: ...At that time please come to this page and setup Fig 79 Setup System Setting Backup Restore 1 Backup Button If you need to backup please click this button A window will popup to ask you to select a fo...

Page 68: ...the setting after you finish configuration This section works in two modes You can add and remove devices in the Al Device View Just double click on the All Devices row in the Devices tree to go to A...

Page 69: ...r devices located in the same LAN and you should only manually add device when they are located over the internet Search Devices Selecting Search Devices will bring you to the page where you decide wh...

Page 70: ...ill go to the basic page of a new camera as below Please fill up the fields such as Manufacture Model and IP Address System will automatically assign a default value for other fields If there is any f...

Page 71: ...will be highlighted in yellow Click Delete to assign them for deletion Note Changes will only be committed after you clicked save in All devices View Confirming Changes Click the Save button after you...

Page 72: ...the All Devices View in Setup Device Double click on the device to view 2 From the Device list in Setup Device Group Fig 83 Setup Device Device settings The following images are the configuration pag...

Page 73: ...f the device is camera its channel ID would be 1 Streaming Port Please enter the port number that is set to stream video from device The default value is 6002 HTTP Port Please enter the port number th...

Page 74: ...e either full time or event only Event responsive schedule also need to be scheduled separately There are some event responses that do not involve recording like access control to email You may 1 Edit...

Page 75: ...ys or the same time over the same week this way 4 Pre event and Post event buffers determine how long will Standalone NVR record video when an event triggers recording 5 Copy schedule from one camera...

Page 76: ...s There are 5 event types which are Motion 3 or 4 regions DI Digital Input DO Digital Output Network Loss Recovery Video Loss Recovery and Record Fail Recovery Event Edit Button Click to setup and cle...

Page 77: ...editable Following paragraphs will introduce features in Event Handling Fig 89 Setup Event Responses Event Type Icon Indicate the event type Device Name Shows the device you are currently setting up E...

Page 78: ...There are 2 DI available number shows in the icon indicate its input 1 or 2 Digital Input Off There are 2 DI available number shows in the icon indicate its input 1 or 2 Network Loss Network Recovery...

Page 79: ...popup display click the arrow for the dropdown menu of camera list Previous Button Return to Event Handling page Fig 68 Add Button Click to add the selected camera into list Ok Button Click to confirm...

Page 80: ...e white pointer indicate the current playback time Cursor position will display as a white arrow with timestamp Playback Controls Allow users to play back fast forward pause rewinds and fast rewind Fi...

Page 81: ...ints configured will be available Goto Preset Select a preset point 1 32 from the dropdown menu Beep Fig 94 Setup Device Beep Option Setup Duration Duration in second s for alert beeping Times Number...

Page 82: ...mail Setup To Receiver s email address Subject Subject of the email Body Content of the email Attach Snapshot Attached snapshot from a selected camera in the email Slots with invalid input will point...

Page 83: ...ord of the account Port Port number of the FTP server Remote Folder Folder path at the FTP server Attach Snapshot Attached snapshot from a selected camera in the email File Name Denote file name for u...

Page 84: ...Handling Options will list in the Event Handling List Double click event in Event Handling List will bring up option setup for event editing Delete Button Deletion of the event Notification messages...

Page 85: ...e setup panel to add a new group You will see the new group you created in the device tree You also can enter the name in the field Group Name that you wish to set to change it Delete Group Please dou...

Page 86: ...Layout tab Device List Under this page you can see the devices within this group You can change the group name from the edit box on top Fig 103 Setup Device Group Device List View 1 Add Devices to Gro...

Page 87: ...st will be shown Please select the device s that you wish to remove from the group by clicking them Then click Delete button to delete them from the group There will be a popup window as below to make...

Page 88: ...connect to After configuring please click Save to save setting the device Please take below sample as a reference Fig 105 Setup Settings Email FTP Please fill up the information about the FTP server...

Page 89: ...ess of FTP server 2 Folder Please enter the upload path of the file 3 Port Please enter the FTP port number 4 Account Please enter the user name of the account 5 Password Please enter the password of...

Page 90: ...list once successfully added Fig 108 Setup Add New Group Existing Groups List of existing groups Groups other then Administrator are deletable and editable on both Name and Descrption slots Administra...

Page 91: ...15 91 Fig 109 Edit Group Notification message will popup for Group Delete confirmation Fig 110 Setup Delete Security Confirmation Screen Note You must click Save button to commit changes otherwise ed...

Page 92: ...be available in the dropdown menu at the bottom of popup window newly created user can then assigned to a group Fig 112 Setup Add New User Existing User List of existing users For all fields users ot...

Page 93: ...process of creating or editing users system will continuously validate the input information and notify you for invalid inputs Slots with invalid inputs will point out with red dotted lines Fig 114 Se...

Page 94: ...in sub options for detail setups on each individual group or simply enable disable the categories by check uncheck the checkbox Following paragraphs will explain in detail on each individual category...

Page 95: ...acti com XNR 4200 User s Manual 1 00 15 95 Fig 117 Setup User Permission list Save Button Click to save the settings Select all Devices List of device Checkbox for category Live Playback Setup Permiss...

Page 96: ...Fig 118 Setup User Permission Live Playback Click the Playback section to configure playback permissions A list of device shows up with checkbox for each Check uncheck to select the device In additio...

Page 97: ...www acti com XNR 4200 User s Manual 1 00 15 97 Setup Click to select Setup where a list of setup option will display You may check uncheck to select the option Fig 120 Setup User Permission Setup...

Page 98: ...er Logitech and IP Desktop There are 12 buttons available on each controller and its function can be assign modified with the drop down list as shown Note Every time you change the settings on this pa...

Page 99: ...www acti com XNR 4200 User s Manual 1 00 15 99 Fig 122 Setup Controller Button Function List...

Reviews: