background image

www.acti.com


TCD-2100 Hardware Manual 


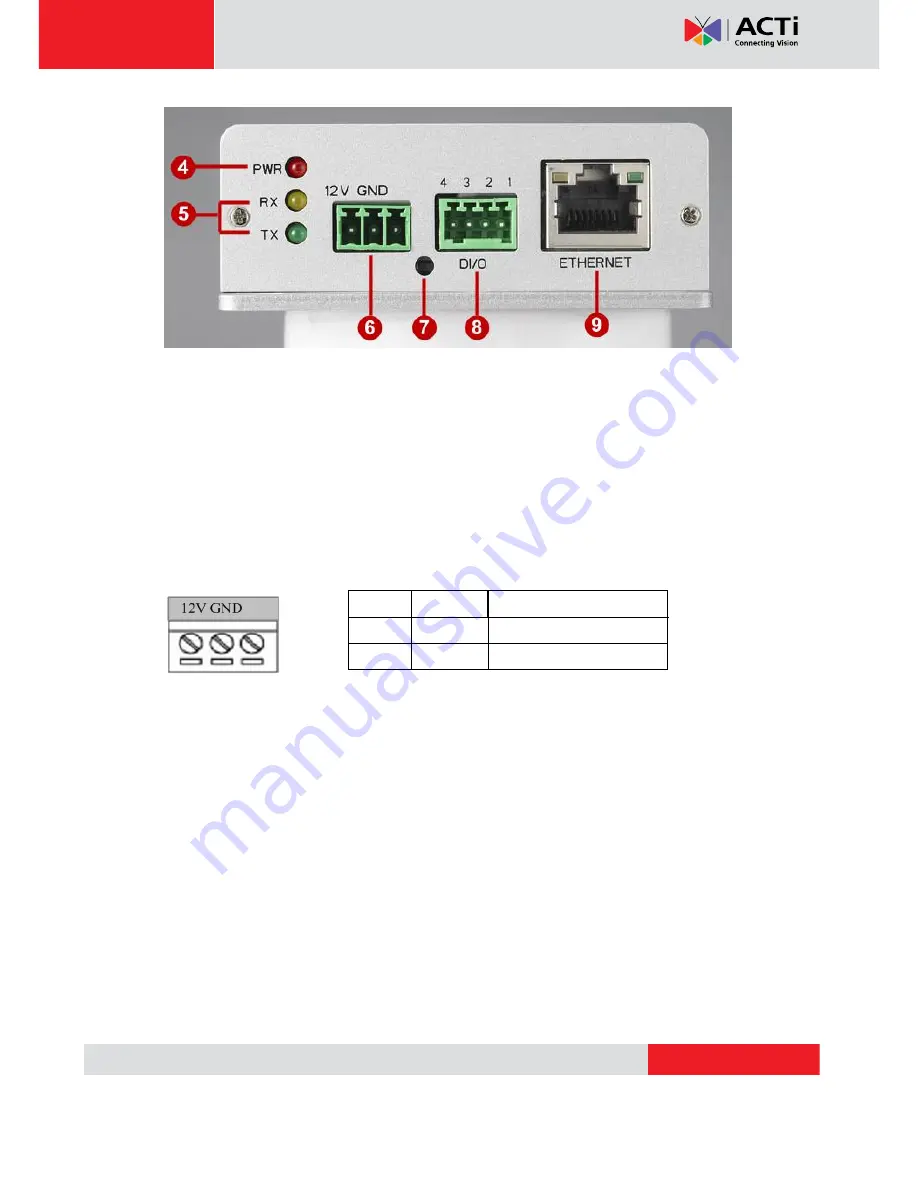
4)


Power LED 

The LED will light up after device has successfully completed the boot process 


5)


Serial Port LED 

LED will light up when serial port is active 


6)


Power Input 

Connect the power adaptor here if your power input is DC12V. 


7)


Reset Button 

Step 1: 

Switch off IP device by disconnecting the power cable 


Step 2: 

Press and continue to hold the Reset Button (with a sharp tipped object, like a pen.)   


Step 3: 

Reconnect the power cable while continuing to hold the reset button.

 The red 

Power LED light will flash on for 3 second first, turn off for about 15 seconds, flash on for 

another second and turn off again. By this time the reset to default operation is already 

completed. 

This will take around 20 seconds from power up. 

You may then release the 

reset button. This length of time fluctuates slightly with the environment. The Power LED light 

will come back on and stay on after a few more seconds. The unit will start up with factory 

default settings automatically. 

PIN 

NAME 

DESCRIPTION 

12V 

DC Power Input 

GND 

Ground Pin 

Summary of Contents for TCD-2100

Page 1: ...TCD 2100 1 channel H 264 Video Encoder Hardware Manual DC 12V Ver 2013 07 02...

Page 2: ...al 2 Table of Contents Precautions 3 Safety Instructions 4 Introduction 6 Package Contents 6 Physical Description 7 Basic Connections 10 Serial Port Connection 11 Accessing the Device 13 Configure the...

Page 3: ...he writing of this manual Please inform your local office if you find any inaccuracies or omissions We cannot be held responsible for any typographical or technical errors and reserve the right to mak...

Page 4: ...ter for example near a bathtub washbowl kitchen sink or laundry tub in a wet basement or near a swimming pool and the like Don t use accessories not recommended by the manufacturer Only install this d...

Page 5: ...nstruction manual as an improper adjustment of other controls may result in damage and will often require extensive work by a qualified technician to restore the video product to its normal operation...

Page 6: ...www acti com TCD 2100 Hardware Manual 6 Introduction Package Contents TCD 2100 Power Adaptor Optional Mounting Screws Terminal Blocks Power Serial DI O Warranty Card...

Page 7: ...Terminal Block Connect a serial port device to the supplied terminal block See Serial Port Connection on page 11 for connection details 3 DIP Switch for Serial Port Configuration The same terminal co...

Page 8: ...a pen Step 3 Reconnect the power cable while continuing to hold the reset button The red Power LED light will flash on for 3 second first turn off for about 15 seconds flash on for another second and...

Page 9: ...P device connects to the Ethernet via a standard RJ45 connector Supporting NWAY this IP device can auto detect the speed of local network segment 10Base T 100Base TX Ethernet PIN NAME 1 GND 2 DC 12V 3...

Page 10: ...nect the IP device to the respective apparatuses 1 Connect an analog camera to the IP device video in BNC connector 2 Connect the power adaptor to the IP device 3 Connect IP device Ethernet port to th...

Page 11: ...t it to the IP device following the procedures below 1 Set the DIP switch to select the communication protocol to use RS 485 RS 422 Default RS 232 2 Map the wires from the analog camera to the IP devi...

Page 12: ...s purchased For example some devices may have TX pin labeled as A or 485 etc Refer to the camera documentation or contact the manufacturer to verify the corresponding pin labels and ensure proper wiri...

Page 13: ...s a DHCP server running then you do not need to configure the IP addresses at all both the device and the PC would request a unique IP address from the DHCP server automatically In such case the devic...

Page 14: ...l that can not only discover the devices but also list lots of valuable information such as IP and MAC addresses serial numbers firmware versions etc and allows quick configuration of multiple devices...

Page 15: ...into the network and it does not detect any DHCP services it will automatically assign itself a default IP 192 168 0 100 Whereas the default port number would be 80 In order to access that device the...

Page 16: ...ing IP Utility With the procedure shown above all the devices will have unique IP addresses starting from 192 168 0 101 In case there are 20 devices selected the last one of the devices would have the...

Page 17: ...lities Functionality Internet Explorer Live Video Yes Live Video Area Resizable Yes Capture the snapshot Yes Video overlay based configuration Motion Detection regions Privacy Mask regions Yes All the...

Page 18: ...login page The HTTP port number was not added behind the IP address since the default HTTP port of the device is 80 which can be omitted from the address for convenience Before logging in you need to...

Reviews: