background image

www.acti.com

U

SER’S MANUAL 

12 


Installation 

Installation Environment 


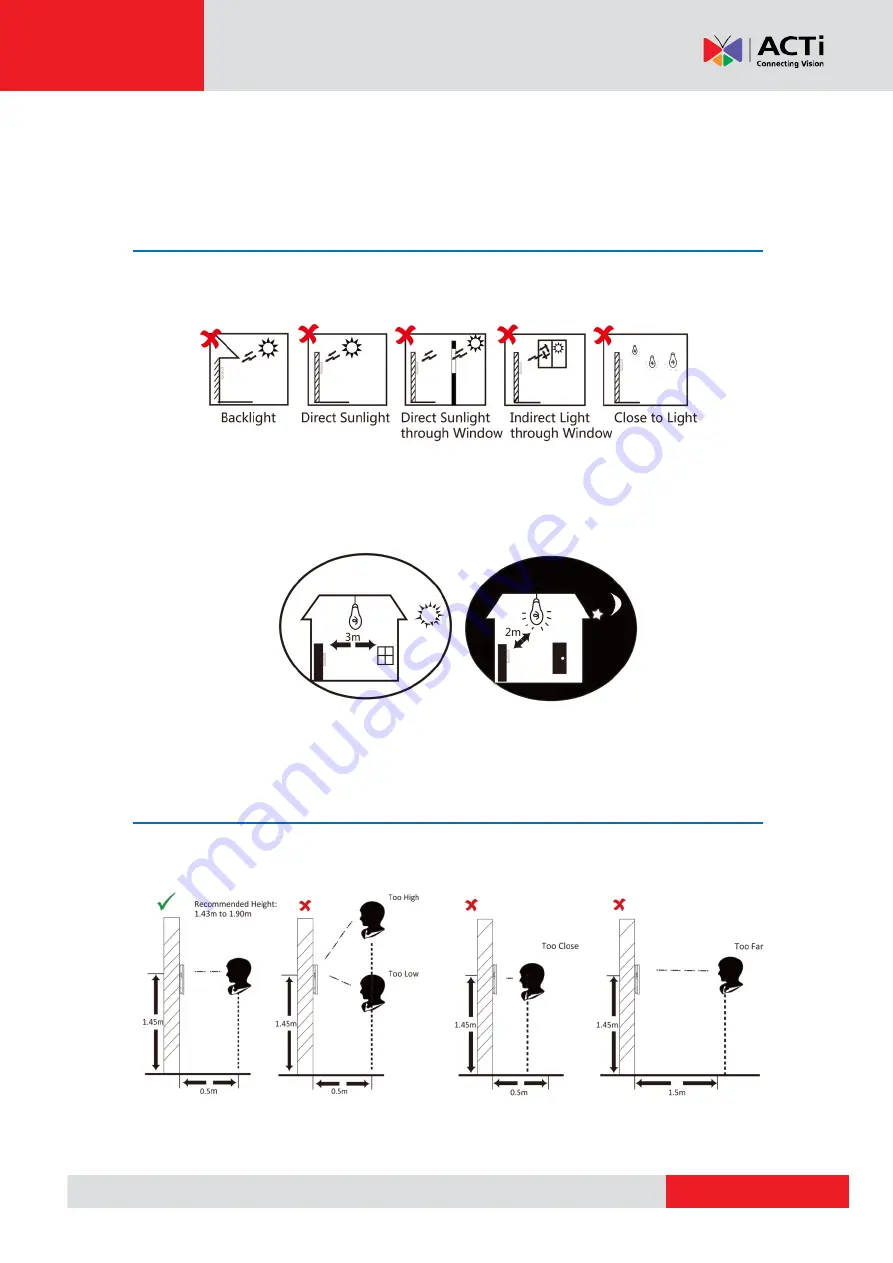
Indoor installation 


Avoid backlight, direct and indirect sunlight. 


Avoid direct or indirect sunlight through window. 


The device should be installed at least 2 meters away from light, and 3 meters away from 

the window or door.


Make sure the wall can bear three (3) times the weight of the device. 

Installation Height 

Recommended installation height of device = 1.43 m to 1.9 m 


Summary of Contents for R72FT-31

Page 1: ...Face Recognition Reader Controller User s Manual R72FT 31 2021 04 09...

Page 2: ...to radio or television reception which can be determined by turning the equipment off and on the user is encouraged to try to correct the interference by one or more of the following measures Reorien...

Page 3: ...See the product documentation for specific battery information The battery is marked with this symbol which may include lettering to indicate cadmium Cd lead Pb or mercury Hg For proper recycling retu...

Page 4: ...the product is installed on wall or ceiling the device shall be firmly fixed If smoke odors or noise rise from the device turn off the power at once and unplug the power cable and then please contact...

Page 5: ...over because the acidic sweat of the fingers may erode the surface coating of the device cover Please use a soft and dry cloth when clean inside and outside surfaces of the device cover do not use alk...

Page 6: ...erminal Diagram 9 Terminal Description 9 Wiring Common Devices 11 Wiring Secure Door Control Unit 11 Installation 12 Installation Environment 12 Installation Height 12 Wall Mounting 13 Initial Setting...

Page 7: ...i com USER S MANUAL 7 Introduction Package Content Face Recognition and Temperature Reader Controller Mounting plate Wrench Lock screws for mounting plate x2 Screw pack Cable Quick start guide Drill t...

Page 8: ...m 1 Thermographic Module 9 Card Slot reserved 2 White Light 10 USB Port 3 IR LED 11 Thermographic Module Connector 4 Cameras 12 Power Cable Connector 5 Touch Screen 13 Terminal Cable Connector 6 Card...

Page 9: ...up No Function Color Name Description Group A A1 Power Input Red 12 V 12 VDC Power Supply A2 Black GND Ground Group B B1 Alarm Input Yellow Blue IN1 Alarm Input 1 B2 Yellow Black GND Ground B3 Yellow...

Page 10: ...d Green W0 Wiegand Wiring 0 C5 White W1 Wiegand Wiring 1 C6 Brown WG_OK Wiegand Authenticated C7 Orange WG_ERR Wiegand Authentication Failed C8 Purple BUZZER Buzzer Wiring C9 Gray TAMPER Tampering Ala...

Page 11: ...t authentication information to the access controller The recommended power supply is 12 VDC 2 A The recommended power supply for door lock is 12 V 1 A The recommended power supply for Wiegand card re...

Page 12: ...direct sunlight Avoid direct or indirect sunlight through window The device should be installed at least 2 meters away from light and 3 meters away from the window or door Make sure the wall can bear...

Page 13: ...e holes on the wall or other surface where the device will be installed according to the bundled Drill Template 3 Insert the screw sockets into the drilled holes 4 Align the holes to the mounting plat...

Page 14: ...he device with the mounting plate and hang the device on the mounting plate 7 Use the two 2 supplied lock screws to secure the device and the mounting plate NOTE When the screw head is beneath the dev...

Page 15: ...he network settings must be configured first Step 1 Login 1 Long tap the screen for 3 seconds to enter the Login page 2 Enter the Activation Password provided by your ACTi sales agent 3 Type the activ...

Page 16: ...Settings 2 Select Network 3 Set the IP address Subnet Mask and Gateway Enable DHCP the system will assign IP address subnet mask and gateway automatically Disable DHCP you will need to manually set t...

Page 17: ...ain Screen The Main Screen shows the date and time and status icons on the upper part of the screen On the bottom part are shortcut key icons These functions need integration and are not readily avail...

Page 18: ...Home Menu Except for Communication Network settings almost all configurations can be done through the Access Control Server thus the Home Menu is rarely used NOTE This photo is for reference only ico...

Page 19: ...ral device settings Data The Data Management menu allows you to delete user data and restore default factory settings NOTE It is not recommended to restore to default factory settings Instead contact...

Page 20: ...ensure recognition accuracy Registering a face can be done through the Access Control Server see Access Control Server manual for more details Expression Keep expression natural Do not wear hat sungl...

Page 21: ...Copyright 2021 ACTi Corporation All Rights Reserved 7F No 1 Alley 20 Lane 407 Sec 2 Ti Ding Blvd Neihu District Taipei Taiwan 114 R O C TEL 886 2 2656 2588 FAX 886 2 2656 2599 Email sales acti com...

Reviews: